If you’re a hiker or spend any time in the backcountry, you should be familiar with the Ten Essentials and carry them with you on all of your trips.
The first time I heard of the Ten Essentials was during a Mountaineers course. Up until taking my first course with The Mountaineers, a Seattle-based non-profit organization for climbers and outdoor adventurers, I’d never given much thought as to what to carry in my pack on a day hike other than water, lunch to eat at the top, my phone to take pictures with and a pair of sunglasses. The Ten Essentials are survival items recommended by The Mountaineers for safe travel while traveling in the backcountry. If you take any course through The Mountaineers, you will be reminded on what the Ten Essentials are in every course. The Ten Essentials are that important.
After having a couple thousand hiking miles logged into my boots and trail runners AND taking quite a few more classes with The Mountaineers over the last couple of years, I can’t imagine going on a hike without my Ten Essentials. With my newfound knowledge and recent hiking and backpacking experience, I’ve realized that it’s too much of a risk to get out on the trail without the Ten Essentials. Mother Nature is beautiful, but if you’re not prepared, she can turn on you in an instant making your adventure a miserable or even deadly experience.
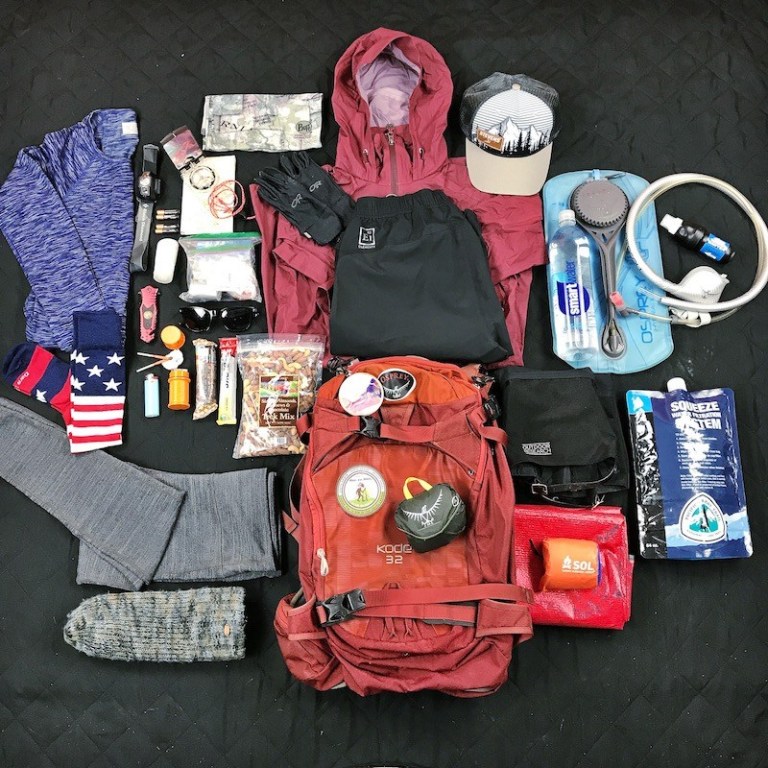
The Ten Essentials were developed by The Mountaineers, who started teaching this concept in their climbing courses back in the 1930s. Instead of thinking of the Ten Essentials as being extra weight in your pack, think about how they can help save your life or even help you save someone else’s life while out on the trail. The Ten Essentials are designed to help you to do two important things when you’re in the backcountry: First, give you the tools to respond positively to an accident or emergency. Second, enable you to safely spend the night (or multiple nights) outside if needed. The Ten Essentials concept has morphed over the years from being a list of individual items into a list of functional systems. Originally, the Ten Essentials list included:
1. Map
2. Compass
3. Sunglasses and sunscreen
4. Extra clothing
5. Headlamp/flashlight
6. First-aid supplies
7. Firestarter
8. Matches
9. Knife
10. Extra food
Now, most people (myself included) think of the Ten Essentials as a list of systems instead of individual items, which include:
1. Navigation (map and compass)
2. Sun Protection (sunglasses, hat and sunscreen)
3. Insulation (extra clothing)
4. Illumination (headlamp/flashlight and extra batteries)
5. First-Aid Kit
6. Fire (waterproof/storm matches or lighter)
7. Repair Kit and Tools
8. Nutrition (extra food)
9. Hydration (extra water)
10. Emergency Shelter (tent/space blanket/tarp)
Below is a brief description of each of the Ten Essentials systems and why they’re important to bring with you anytime you venture outside, whether it be for a day hike or an overnight/weekend backpacking trip.
1. Navigation
A Navigation System should include a detailed topographic map of the area you’re travelling in and a compass. Protect the map from wet weather with a plastic, waterproof lanyard or Ziploc bag. If your compass has a sighting mirror, it can also be used to flash sunlight to a helicopter or rescuer during an emergency. You can carry some sort of global positioning system (GPS) receiver, but this shouldn’t replace a map and compass. Why? A map and compass will never rely on a satellite signal or batteries in order to operate.
It’s not enough to carry these items in your pack, you’ll need to know how to use them. Otherwise these items are just deadweight in your pack when you’re lost in the woods. The Mountaineers offers a number of different affordable night, weekend and now online navigational courses throughout the year that will teach you how to read a map and use a compass. Even REI offers navigational classes all year long at their various stores throughout the country.
2. Sun Protection
A Sun Protection System should include sunglasses, sunscreen for the skin and lips and clothing like a wide-brimmed hat or a Buff to protect your face. With sunscreen, use a broad-spectrum sunscreen with at least an SPF 30 protection. This will protect the skin from both UVA and UVB damaging rays for up to two hours at a time. Reapply sunscreen to the skin (think any skin exposed to the sun like the face, neck, ears, arms, hands and legs) every two hours and even more so if you’re sweating or swimming. Sun exposure can be more intense at higher elevations and in the snow, which makes sun protection even more important in these environments. Don’t forget about the lips! Use a lip balm or chapstick that has at least an SPF 15 and reapply it often.
3. Insulation (Extra Clothing)
Weather can turn instantly when you’re in the backcountry. This is why it’s always a good idea to carry an additional layer of clothing. “Extra clothing” should include a base layer top and bottom, an insulating hat, an extra pair of socks and a synthetic jacket or vest. Depending on the season and weather, it might be worthwhile to add in rain gear like a waterproof jacket, pants and a pair of gaiters. The extra clothing you bring on a trip should be selected according to the season. When packing, think about what you would need to survive any long, inactive hours of an unplanned emergency out in the backcountry.
When it comes to hiking clothes, remember that cotton is rotten. Cotton can cause hypothermia because it doesn’t insulate or dry easily. Always opt for synthetic or wool layers made of sweat-wicking material that can pull moisture away from the body, dries quickly and insulates.
For my own Insulation System, I always carry an extra pair of socks, base layer top and bottoms and a wool beanie. Depending on the season, I’ll add raingear to my pack including a waterproof jacket, pants and gaiters. During all seasons, I always carry a pair a glove liners to wear on my hands for early morning starts because my fingers are usually colder than the rest of my body, both on the way up and down.
4. Illumination
No one usually anticipates hiking after dark when going out for a day hike, but things can happen. Getting a late start for a day hike, being caught up in summit/lake fever and thinking a hike is much shorter than it really is have all caused me to finish some of the hikes I’ve done in complete darkness. These are all reasons why I never hike without a headlamp in my pack.
Headlamps are a more convenient option than flashlights because they allow for hands-free operation, are lightweight and have a long battery life. Most headlamps will also offer a strobe feature that can be useful during an emergency situation. Batteries don’t last forever so be sure to carry an extra set. Also, know how to change the batteries in your headlamp or flashlight before getting out on the trail. Don’t wait until you’re stuck in the dark during an emergency to learn how.
5. First-Aid Supplies
At the very least, a First-Aid Kit System should include treatment for blisters, adhesive bandages of various sizes, several gauze pads, adhesive tape (or duct tape), disinfecting ointment, over-the-counter medication, pen, paper and a pair of latex gloves .A first-aid kit doesn’t have to be large or heavy in order to be effective either.
I used to carry a pre-assembled medical kit that I bought from REI on all my day hikes. It could accommodate a group size of 1-6 people for up to 7 days. I hiked with this kit in my bag for two years and never had to use anything out of it except for ibuprofen and a safety pin to pop a blister. The kit I carried was hefty and not very practical. I’m a day hiker, not Search and Rescue.
This summer, I stopped carrying the bulky pre-assembled first-aid kit and made my own. I keep my homemade first-aid kit in a storage quart-sized Ziploc bag with the following items: over-the-counter pain reliever and Benadryl, Bodyglide, a bandana, various sizes of pre-cut moleskin, a small, compact roll of duct tape, various sized bandages, gauze pads, small packets of ointment, insect bite relief and antiseptic wipes, a mini bottle of hand sanitizer and a pair of latex gloves. My first-aid kit is now a fraction of the size and weight it used to be AND I know how to use everything in it.
6. Fire
Always carry the means to start and sustain fire should an emergency occur. A Fire System can include a butane lighter, matches or storm matches kept in a waterproof container and some sort of firestarter. Firestarter is used to help jump-start a fire and can include items such as dry tinder kept in a Ziploc bag, candles, priming paste, heat “nuggets” or even lint trappings from a household clothes dryer. If you’re travelling to a high-altitude snow or glacier environment, consider carrying a small stove as an additional emergency heat and water source.
7. Repair Kit and Tools
Having a repair kit and some sort of multi-tool can be super helpful if you ever find yourself in a pinch out in the backcountry. You never know what might happen out on the trail. A Repair Kit System can include a knife, pliers, screwdriver and scissors, which can easily all be part of a pocket multi-tool. Other additional, useful items for a Repair Kit System include shoelaces, safety pins, needle and thread, wire, duct tape, zip ties, parachute chord and any extra parts that might be needed for equipment you’re carrying like a tent, stove, snowshoes and/or skis.
8. Nutrition (Extra Food)
Even if you’re just going on a day hike, get in the habit of carrying at least an extra day’s worth of food. You never know when bad weather, getting lost or an injury can delay your planned return. The extra food you bring shouldn’t require any cooking, be easily digestible and store well for long periods of time. Standard hiking snacks like jerky, nuts, trail mix, energy bars, candy, granola and dried fruit are great options for a Nutrition System.
9. Hydration (Extra Water)
Whether you’re going on a day hike or going out in the backcountry for a few days, always carry extra water and have the means to filter additional water when needed. At the very least, carry two liters of water if you’re going on a day hike. On average, plan to drink 2-3 liters of water over a span of hiking 6-8 hours.
Whenever I go on a day hike, I always carry a 3-liter water reservoir in my pack, in addition to one or two 1-liter SmartWater bottles. I tend to drink my way through my water reservoir on warm and sunny 12+ mile day hikes. Once I go through my water reservoir, I know I always have an extra liter or two of water to drink in my pack and can filter water using the water filtration system I carry with me.
If you’re traveling in high altitudes, a hot and dry environment or over a long distance, two liters of water might not be enough. Always plan for enough water to accommodate any condition you might be traveling in including heat, cold, altitude, exertion and/or an emergency.
When traveling in a cold environment (think snowshoeing in the snow) and using a water reservoir as your main storage for water, know that your water could freeze, making it inaccessible to drink. To keep your water from freezing, invest $20-$30 into an insulated drinking tube that connects to your water reservoir. I have the Osprey Hydraulics Reservoir System and the Insulated Delivery Tube and love them both!
10. Emergency Shelter
Even though my tent weighs only two pounds, I never carry it with me on a day hike. Instead, I carry an emergency space blanket and a lightweight, reflective tarp that can be used as an emergency shelter if I ever needed one. These both can also be used in administering first aid to an injured or hypothermic person.
Another piece of gear I always have as part of my Emergency Shelter System is an ultralight rain cover designed specifically for the size of my pack. It’s waterproof, lightweight and covers my entire pack from the rain and snow, keeping all of the items in my pack dry at all times.
Safe hiking and happy trails everyone!
DISCLAIMER: This post and video contain affiliate links, which means that if you click on one of the product links, I’ll receive a small commission at no extra cost to you. This helps support my blog, The Hungry Hiker and allows me to continue to create content for you free of charge. Thank you for your support!