It’s been ten days since I’ve been back home from thru-hiking the PCT. For me, it wasn’t reaching the Northern Terminus monument or walking into Manning Park that symbolized the official end of my 2018 PCT thru-hike. It was the act of putting my gear away. For almost two weeks, I purposely left all of my gear out in the corner of my room and continued to sleep in my sleeping bag because I wasn’t ready to admit that my hike was over. This morning, ten days after being home, I finally packed up all my gear in my pack and put it away, for now.
Before I left to hike the PCT back in April, I wrote a blog post going over the gear I’d be bringing with me. After I finished my hike, a lot of you wanted to know what gear made it with me to Canada and what gear I either got rid of or sent home. I’m sad about having to put my gear away, but writing a blog post about the gear I used gave me an excuse to keep my gear unpacked a little bit longer. I was able to relive some of the memories from my PCT thru-hike just by looking at my gear pile. I figured writing a follow up to the original gear post would be a great way to share my PCT experience along with potentially helping future thru-hikers decide what they want to bring for their own hike.
Originally when I started putting together a list of what I wanted to bring with me on trail, I set up a profile on lighterpack.com. On my profile, I was able to add every single piece of gear I planned on bringing with me in addition to noting the weight in either pounds or ounces for each thing listed. The website would then give me the base weight of my pack based on this list, minus food and water.
I have to admit, I was a bit obsessive about trying to get the right number for my base weight before leaving to hike the PCT. I spent hours looking at my gear, taking stuff away and putting stuff back in, trying to justify why I had each piece of gear in my pack. While I understand the concept of knowing the base weight of your pack, I’m here to tell you, it doesn’t matter. Let me repeat, the base weight of your pack doesn’t matter. When you’re hiking 15-20 miles a day for five months straight and having to carry all of your worldly possessions on your back, the size and weight of your pack should be somewhat of a concern, but it isn’t worth obsessing over. The less you have to carry, the easier your hike will be.
In my experience, figuring out the right number for my base weight was impossible to do before starting my PCT hike. In hindsight, it didn’t really matter anyways. All of those hours I spent staring at my gear, weighing each piece and debating with myself on why or why I shouldn’t bring it with me on my hike was time wasted. Once I started hiking the PCT, I realized this would be something I’d figure out as I went and fine tune along the way. By the time I was 500 miles away from the Canadian border, I had a system for me that worked, but I still overpacked food and water – the two things I was always worried about running out of.
Food and water aside, I did get my gear figured out pretty early on in my hike. For each section of the PCT, whether it was the desert, the Sierra, Northern California, Oregon or Washington, I had to adjust my gear ever so slightly in order to adapt to the new section.
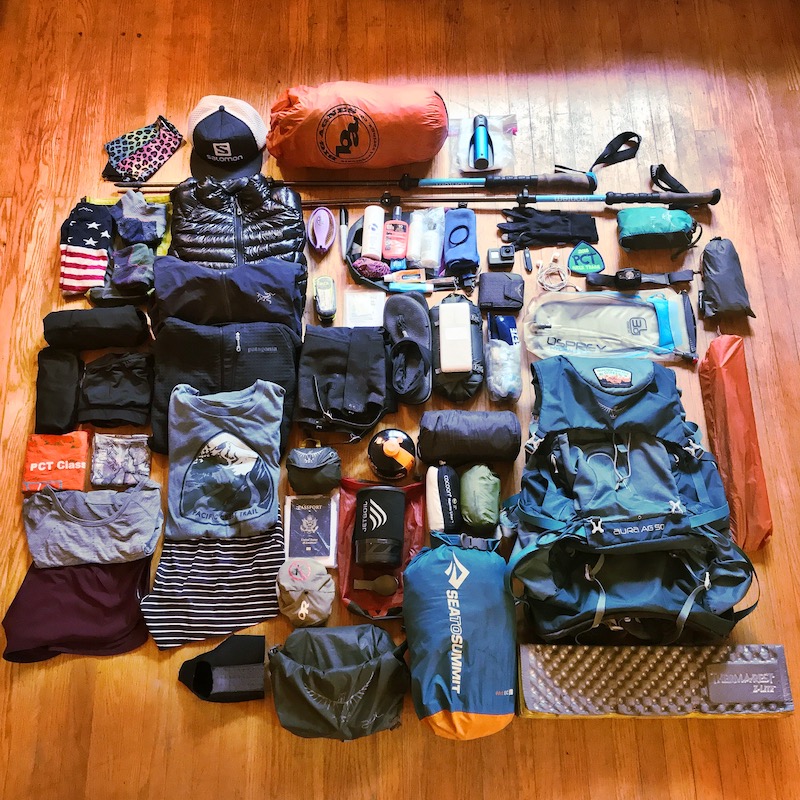
Here’s my official gear list I ended my PCT thru-hike with:
Pack
Osprey Aura 50 AG + large pack cover
*I sent home the pack brain (the top of the pack) at Kennedy Meadows North
I can’t believe I was worried about this pack weighing four pounds. I carried this pack on my back loaded with all of my gear for five months and never had any back problems. I had a minor shoulder injury before getting on trail. Never once on trail did I ever have a problem with my shoulder. I loved the fit of this pack. It felt absolutely comfortable wearing it on my body for 8+ hours a day. At Sierra City in Northern California, I had to adjust my hip belt on the fly because I had lost some weight in my hip area. The pack was super easy to adjust. I’m so glad I went with a pack with hip pockets because I used them every single day to store my snacks, phone, GoPro, wallet, swiss army knife and chapstick.
Shelter System
Big Agnes Copper Spur HV UL 2 + matching footprint
Other hikers thought having a two-person tent was a bit overkill. I was super happy to have the extra space. I had plenty of room to spread out and store all of my things inside my tent, including my pack and shoes. I never felt claustrophobic because there was plenty of headroom inside. I kept my trekking poles outside, right in front of my door, underneath the fly (or the porch as I liked to call it.) When I was feeling brave and the weather was just right, I slept with the fly off of the tent and gazed at the massive amounts of stars in the sky at night without getting swarmed by bugs and bees. Having the extra room was worth the few extra ounces.
Sleeping System
Sierra Designs Zissou 12 sleeping bag + dry sack for storage (to keep my sleeping bag dry)
Cocoon Mummy Silk Liner
Cocoon Camp Inflatable Pillow
Therm-a-Rest NeoAir XLite Inflatable Sleeping Pad
Therm-a-Rest Z Lite Sol Sleeping Pad
For the most part, my sleeping bag was warm enough for those few cold nights in the desert and slightly chilly evenings in the Sierra. Most of the time in the desert and Northern California, it was hot at night, I’d have to sleep with my sleeping bag slightly unzipped and my leg hanging out of it. Nights on trail really didn’t start getting cold until our third night in Washington. Luckily with my Cocoon Mummy Silk Liner and having extra clothes to layer into, I was plenty warm during those cold nights. There was only one really cold night, three days before the Canadian border when I questioned if my sleeping bag was warm enough. To be fair, we had camped at 6,000+ feet, at an exposed tentsite. Even hikers with zero degree sleeping bags were cold that night.
I love my Cocoon Mummy Silk Liner. I used my liner every single night, both on hot and cold nights. My liner did an amazing job keeping my sleeping bag clean when my body was covered in dirt and dust from hiking in the desert. During the few cold nights on trail, the liner seemed to add a few more degrees to my sleeping bag, making it nice and toasty. After using my liner every single night on trail for 100+ nights, it finally gave out on me on my way into Snoqualmie Pass. After 1,000+ miles, my liner got a hole in it and was no longer able to keep my feet warm. I happily purchased a new liner before leaving Snoqualmie Pass, especially because I knew from this point on, the nights would only be getting colder.
I love my Cocoon Camp Inflatable Pillow. This pillow was even more comfortable than most hotel and hostel pillows. Anytime we stayed in a hotel or hostel, I’d throw whatever pillow they had aside and use my inflatable pillow. This says a lot, especially coming from someone who has a $200 memory foam pillow at home and is prone to getting headaches when the pillow isn’t just right. The Cocoon Camp Inflatable Pillow gets two thumbs up from me.
I had a few problems with my Therm-a-Rest NeoAir XLite inflatable sleeping pad. Just outside of Wrightwood, my first pad had developed a slow leak. I’d have to wake up 2-3 times a night to blow up the pad so I wouldn’t end up sleeping on the ground.
From Hiker Heaven in Aqua Dulce, we took an Uber to the nearest REI so I could exchange my deflating pad for a new one. Two nights later, the new pad started to deflate in the middle of the night. I had to wait until I had service at Hiker Town, outside Lancaster before I was able to call REI and have them ship me a new one to Kennedy Meadows South.
The third pad worked great up until Northern California. At this point, Grit and I had got off trail at Mount Shasta, took a bus up to Medford, Oregon and rented a car. While in Oregon, I was able to exchange the pad for a new one at the Medford REI. They even refunded me the sales tax!
Sadly though, halfway through Washington, my inflatable pad started deflating itself in the middle of the night again. I considered it a win only having to re-inflate the pad twice during the night instead of three or four times like I had to with the previous pads. Now that I’m back home in Seattle, I’ll be bringing my pad back into REI in hopes of exchanging it for a new one. I really want to stick with the Therm-a-Rest NeoAir XLite because it’s incredibly light and easy to inflate. I’m just not quite sure why they haven’t been working for me. It’s not like I was cowboy camping out on rocks and needles every night.
My Therm-a-Rest Z Lite Sol Sleeping Pad got lots of good use on the trail. During the day, I’d sit or lay on it during my breaks. At night, I’d lay it down in my tent, underneath my inflatable sleeping pad. I used the sleeping pad so much, it got incredibly flat by the time I got to Canada. It took a beating and yet kept doing exactly what it was supposed to do.
Sleeping Clothes
1 pair of knee-high Darn Tough socks
1 quick drying tank top
One thing I overpacked on my PCT thru-hike was clothes. Originally, I brought a full change of sleeping clothes to wear each night – a base layer top and bottom, sports bra, socks and a pair of underwear. By the time I reached Warner Springs, the first 100 miles on trail, I realized having a sleeping clothing system was overkill. I sent everything home except for the sports bra and socks. For the rest of my hike, I used two sports bra – one to hike in and one to wear in town. I always had a pair of knee-high socks to sleep in at night. In the desert when it was warm out, I’d switch from my short-sleeved hiking shirt to a tank top to sleep in. I liked the idea of letting my hiking shirt “air out” overnight. I’d always sleep in the same shorts I hiked in. Once it got colder at night in Washington, I’d sleep in all of my hiking clothes along with my fleece and puffy jacket, depending on how cold it was.
Hiking Clothes
2 pairs of Athleta running shorts (1 pair to use for town days)
Athleta Speedlight top/Athleta Foothill tee
1 sports bra
1 pair of underwear
Buff (Used to cover my face in the desert and as a headband in the Sierra and Northern California)
Salomon Odyssey Pro trail runners
2 – 3 pairs of ankle-high Darn Tough socks
1 pair of Dirty Girl gaiters
Liner gloves/Outdoor Research Full Sun Gloves
Baseball cap
Oakley Holbrook Sunglasses (I made it all the way to Canada with one pair!)
Trekking poles
The clothes I wore on trail pretty much stayed the same all the way to Canada. I loved hiking in my Athleta gear – running shorts and Speedlight Top and/or Foothill Tee. I went through three pairs of shorts on trail. The first pair was a size medium that ended up being too big for me by the time I reached Northern California. The only way I could keep them from falling down was by using the waist band on my pack as a belt. I finished the trail in a size small shorts and even those were starting to be too big on me.
I fell in love with the lightweight Athleta Speedlight top on trail. It was perfect in the desert – lightweight so it never felt heavy on me and the long sleeves protected my arms from the harsh sun. I found though that I preferred hiking in a short sleeve shirt because I was sweating so much. A few hundred miles into the trail, I cut the sleeves off of my shirt so my arms could breathe. My arms got a lot more sun exposure, but I wasn’t getting as overheated as I was before with sleeves. The Speedlight top did a great job keeping the stinkiness at bay up to a point. Eventually, the stink would stop washing out in town stops. I had to switch out my top on trail in Wrightwood.
In Mount Shasta, the ladies at Athleta sent me a Foothill tee and I loved it. I rocked that bad boy all the way up to Canada. It didn’t matter what kind of top I wore out there though. Anything I’d wear out on trail would eventually stink because I was working so hard and sweating so much, all day long, every single day for five months. My Athleta tops just happened to stink less than anything else I’d ever hiked in.
I did bring two quick drying tanks tops with me at the beginning of my hike. At first, I’d wear a tank top underneath my hiking shirt. Then I turned one of the tank tops into my sleeping shirt and/or town shirt. I ended up sending one of the tank tops home and kept the other as a backup for sleeping in and wearing on town days.
For undergarments, I kept two sports bras – one to hike in and one to wear in town when I was doing my laundry. I also brought only one pair of underwear. Since my running shorts had liners in them, I could get away without having to wear underwear every single day. I could also turn the pair of underwear and sports bra into a swim suit if I ever needed one. If I go on another thru-hike again, I’d probably splurge and bring two pairs of underwear. Let’s just say I threw out the one pair of underwear shortly after I finished my hike.
I loved my Salomon Odyssey Pro trail runners and stuffed them with Superfeet insoles for extra comfort. With the 1,873 miles I walked on the PCT, I went through three pairs of shoes. I started off from Campo, California with a brand new pair of shoes. In Tehachapi, a little more than 550 miles into the trail. I got a second pair of shoes. Then at Burney Mountain Guest Ranch, around Mile 1409, I got my third pair of shoes and wore them all the way to Canada. By the time I was done with each pair of shoes, I had holes in both big toes from catching my feet on rocks and tree roots. The PCT can be really hard on shoes. Make sure you get shoes at least a size bigger than what you’d normally wear. Your feet will swell and grow on trail.
Having the right socks on trail made the hiking experience much more enjoyable. It wasn’t enough to have the right socks either. I had to have the right amount with me at all times for each section. I started off hiking the PCT in my knee-high Darn Toughs – one sock was the American flag and the other one was the Canadian flag. As a day hiker, I’d always wore knee-high Darn Tough socks. They were comfortable, I never got blisters in them and they helped keep my feet and legs clean. But the desert was so incredibly hot. Everyone else was wearing ankle socks except me.
It wasn’t until we left Big Bear when I realized I had made a terrible mistake. In the process of putting together my resupply boxes for the Sierra and sending them off, I had sent every pair of socks I had to the Sierra. The only pair of socks I had from Big Bear to Wrightwood (about a 100 mile section) were the socks I was wearing on my feet. Normally, I’d like to have at least two pairs of socks with me – one pair to wear and an extra pair to alternate whenever the first pair got dirty. I had no choice but to wear the same pair of socks for five days straight and hike 100 miles in them. I couldn’t rinse off the dirt that was building up on the bottom of the socks each day because I didn’t have any other socks to change into. I also didn’t want to hike without wearing a pair of socks. For five days, I suffered as my one pair of socks slowly started to disintegrate underneath my feet.
The first thing I did once we got to Wrightwood was I buy three pairs of ankle length Darn Tough socks and threw the old socks out. I know Darn Tough has a lifetime warranty on their socks. I could’ve sent them in to be replaced, but I didn’t want to carry the old socks any longer and I didn’t want to spend the time or energy to send them back. I was over having knee-high socks anyways and was ready to try a shorter pair of socks that would allow my legs to breathe. These new socks ended up being one of my best purchases made on trail. I won’t hike in anything other than my Darn Tough socks and wont head for the trail unless I have at least three pairs in my pack.
As for gloves, I sent the sun gloves home after the desert. I kept the liner gloves and used them on the really cold mornings and nights along the trail. I was really happy to have a pair of lightweight gloves to keep my fingers warm in Washington. I not only hiked with them on, but slept with them on too.
I started off my hike with a pair of Black Diamond Carbon trekking poles. I had them up until Reds Meadow. If I were to go back and change any piece of gear, it would’ve been my trekking poles. Up until hiking the PCT, I’d never hiked with trekking poles. I thought trekking poles were for old people or people with bad knees. The only reason why I brought trekking poles was because a fellow PCT thru-hiker whom I had been following online strongly recommended I bring them. I went to REI and got the lightest pair of trekking pole I could find, which happened to be the Black Diamond Carbons. They were so incredibly expensive. I used the poles all the way up until the night I got to VVR. Coming into VVR, I fell while hiking in the dark on the Bear Ridge Trail by myself. Instead of my face slamming into a tree, one of my poles took the beating and snapped when it hit the tree. When I reached Reds Meadow, Punchline gifted me his trekking poles since he was leaving to go back to Australia. I used his trekking poles all the way to Canada and Grit took my old poles after doctoring them up with a little bit a duct tape. I will never buy lightweight, ultralight trekking poles again. With all the river and creek crossings, snow fields and just general travel through the Sierra, I’d much rather have a study trekking pole that will hold my weight and save my ass from falling instead of lightweight poles that snap in half after one fall.
Town Clothes
Sanuk Yoga Sling sandals to wear at camp/in town
The Landmark Project Pacific Crest Trail cotton t-shirt
PCT Class of 2018 bandana (Not only a sentimental and fashionable item, but would also use this to hitch into and out of town with too)
Originally, I started off with way too many town clothes. I sent back almost everything I’d brought to wear into town and kept my town shoes, the Sanuk sandals. On town days when I did laundry, I’d wear a tank top, the spare sports bra I was carrying and the other pair of shorts I hadn’t hiked in. This way, I always had clean clothes to wear in town and could put all my dirty, hiking clothes in the wash.
I picked up the PCT cotton t-shirt in Cascade Locks at town days. I loved this t-shirt so much, I immediately turned it into my town t-shirt. I never wore this shirt while hiking on trail. Only on town days when I wasn’t hiking.
The one thing I’d change about my clothing would be my camp/town shoes. In off-trail life, the Sanuk sandals are super comfortable and lightweight. On trail, they’re not very versatile. For a few more ounces, I’d bring my sturdy Teva sandals. Not only do they give my feet a whole lot more support than the Sanuks, I could also use my Tevas for river and creek crossings without having to take my trail runners off or get my shoes and socks wet.
You’ll get your PCT Class of bandana at Casa de Luna’s from Terri, but only if you dance for it!
Warm Clothing Layers
Mountain Hardwear Ghost Whisper Puffy
Patagonia R1 Fleece Hoodie
Arc’teryx Norvan Jacket Women’s – ultralight raincoat
Yoga leggings
Outdoor Research Cascadia Gore-Tex gaiters (Used in Washington Only)
My Mountain Hardwear puffy stayed at the bottom of my pack for the first 1,000 miles of the trail. At times, I debated sending it back home because I had yet to use it. Since it was light and compact, I decided to keep it with me, just incase. In Washington, my puffy came in handy. There were nights I’d even sleep in it because I was so cold.
The one piece of gear I never thought I’d use as much as I did on trail was my Patagonia R1 fleece hoodie. I LOVE this thing. Not only does it breathe well, allowing me to wear it while hiking without sweating to death, but it also does a nice job keeping me warm at camp or in town. I wore my fleece all the time, especially on town days. The hood provides extra warmth on really cold nights. The chest zipper pocket is just the right size to fit a wallet, chapstick and GoPro inside. Not to mention, it’s quite stylish. I’ve worn my fleece as many times on trail as I have off-trail. It was kind of pricey, but worth every penny. I’d never do a hike without this fleece either on my body or in my pack, seriously.
The Arc’teryx Norvan ultralight raincoat was a last-minute purchase before getting on trail. I had a hard time deciding on which raincoat to bring with me on the PCT. I wanted something light, but that would also keep me fairly dry and warm in a rainstorm. This coat was a relatively new release from Arc’teryx right before I got on trail and was recommended to me by a fellow hiking friend. I hate to admit how much I paid for this coat because it was ridiculously expensive, but it was super lightweight. I could stuff it in the bottom of my pack without worrying about it taking up too much space or adding too much extra weight to my pack.
When I needed this jacket to perform the most, it didn’t let me down. During the constant rain downpour and even the few snow flurries in Washington, this little, crazy expensive jacket kept me dry and warm. I could layer my fleece underneath and stay warm and dry. I could wear this coat all on its own and stay dry without sweating to death. As much as it pained me to spend so much money on a jacket that sat in my pack unused for four months, I was really happy that I was able to wear this every single day for the last month on trail without any problems or complaints. Arc-teryx also has a lifetime warranty so if anything ever happens to it, I can send it back for either repair or a replacement.
I kept it simple with the hiking leggings. I picked my thickest pair of black yoga leggings and added them to my pack. The leggings came in handy when it was too cold to hike in shorts and on those cold nights when I had to layer up in all of my clothes in order to stay warm. I don’t believe in rain pants because I hate feeling like I’m stuffed inside a garbage bag, sweating to death. Instead, I’d wear my leggings with my heavy-duty Outdoor Research knee-high, Gore-Tex gaiters to keep my legs warm, dry and free from mud splatters.
Navigation System
Guthooks app (on my iPhone)
I hate to admit it, but I sent home my compass from Kennedy Meadows North. I never used it once on trail. Even though I had maps for each section printed out, I ended up throwing them all away on trail because I never used them either. The Guthooks app ended up being my saving grace on trail each and every day. God bless Guthooks. As long as my phone was charged, I could use the app in airplane mode on my phone. I always knew where I was, where I was going, how far away the next water source was, could get detailed information about upcoming towns, could pull up the elevation profile for any given section and could get a good feel for what was coming up next on the trail based on the comments left on waypoints written by previous hikers. If it weren’t for the comments, I would’ve missed unexpected water sources along the way, a few, cool alternative side trips, important information on upcoming fire detours and Packer Lake Lodge. Thanks to my RavPower Battery Pack Charger and being able to use the app with my phone in airplane mode, my phone never died while being on trail. I always had access to Guthooks. The only time my GPS acted funny on trail was within the last 50 miles before the Canadian border. The GPS would eventually start working again, but it was much slower to work than it was anywhere else on trail.
Misc
Homemade first aid kit (The only thing I used out of here was the Aleve and ended up giving the ankle brace to another hiker who needed it in Idyllwild)
Sea to Summit Pocket Trowel
Toiletries bag
Small Swiss Army Knife
Emergency Beacon (registered)
Outdoor Research Bug Bucket (Kept my face from getting eaten alive by bugs and prevented me from swallowing a lot of bugs while hiking, especially on the uphill climbs)
Ziploc bag with: Passport, PCT thru-hiking permit, Bleeder’s PCT hiking permit once he got off trail, California fire permit and Application to Enter Canada form
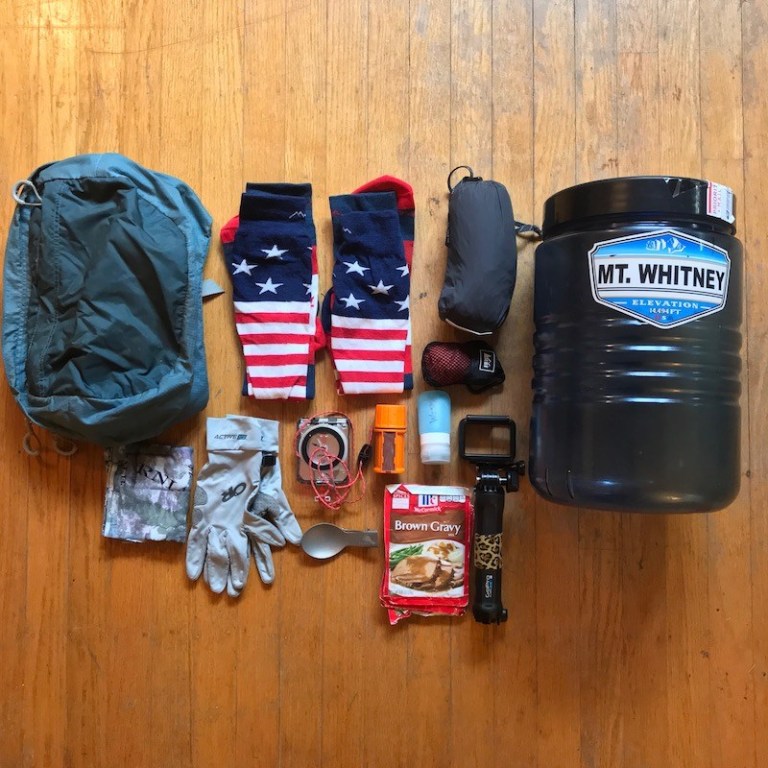
Bear Vault BV500 Food Container (Picked mine up at Triple Outfitter (Yogi) in Kennedy Meadows South and sent it home at Kennedy Meadows North. I HATED having to carry this thing, but it’s required and illegal to camp in the High Sierra without one)
If I had to do the PCT over again, I’d lighten my toiletries bag. At first, I had way too many things in here I never used like wilderness soap. I didn’t need to carry as many toiletries as I thought I’d need to carry. Every town stop had travel-sized soap and shampoo available to buy. Body lotion and conditioner were surprisingly hard to come by in the smaller towns. A lot of times, I’d have to do without lotion. I considered body lotion a luxury. Since my hair is on the longer side, I did pack out conditioner because I didn’t want to risk not having access to it in town for a shower. Disposable razors were surprisingly readily available at most town stops. Hiker Heaven in Aqua Dulce actually provided shampoo, conditioner, body soap, lotion and disposable razors in the outdoor shower for hikers to use.
The items I did carry in my toiletries bag included a travel hair brush (for my long hair), 100% Deet spray because bugs ate me alive out there, fancy moisturizing sunscreen sent to me by a friend, a travel size toothbrush, toothpaste and floss, a nail clipper, a medium-sized microfiber, quick drying towel, hair ties, a Sharpie, conditioner and a Diva cup. Ladies, dealing with my moon cycle on trail was super easy with the Diva cup. No need to pack in or out any other feminine products, except baby wipes, which I kept for washing my feet, legs and face off with every night before going to bed.
Cooking System
Jetboil Cooking System
Stove fuel
Titanium Folding Spoon (Just one lasted me all the way to Canada)
20L Osprey Ultralight Dry Sack used to store my food
I had no interest in cold soaking my food and knew I could never survive on just bars alone. I had to have a warm meal at least once a day while on trail. I was super happy with my Jetboil stove. It boiled water in about two minutes, saving me lots of time and a lot of fuel. I never got sick of the Knorr rice and/or noodle sides because I couldn’t cook them in my Jetboil. They always seemed to burn the bottom of my stove. Making ramen and boiling water for dehydrated meals was a breeze though. I originally had waterproof matches, but sent those home at Kennedy Meadows North. I never needed them the entire time I was on trail.
Electronics
Anker Quick Charge charging adapter
GoPro Hero 5
iPhone 7
Black Diamond headlamp
RavPower Battery Pack Charger
Misc cords for electronics
iPhone ear buds/headphones
I was really happy with the electronics I brought with me and the system I had in place to keep everything charged while on trail. The Anker Quick Charge charging adapter was a godsend in town. I could charge all of my electronics at once, using one outlet, in a timely fashion.
I used my GoPro and iPhone every single day. Both of them took amazing pictures and video. I did send home the GoPro selfie stick because it was a tad bit heavy and bulky. The GoPro worked just fine either handheld or when I set my pack up as a tripod.
My RavPower Battery Pack Charger was probably the best $40 purchase I made out of all my gear. This battery pack could charge up to three of my electronics at once – my GoPro, phone and FitBit. It would last for up to five or six days on trail with multiple charges each night. I never ran out of battery juice or the ability to charge my electronics while on trail. Since I was blogging and Instagramming the entire time along my trip, having a solid electronics system on trail was crucial for me being able to capture the footage I needed to document my adventures all the way to Canada.
Water System
Sawyer Squeeze Filter + 64 oz bag and 32 oz bag
Osprey 3 Liter Hydraulics Reservoir
Bleeder’s homemade scoop
The Sawyer Squeeze was lightweight and easy to use. I wouldn’t recommend the Sawyer Mini though. The Squeeze had a much faster, solid flow each time I used it. Good flow! The Sawyer system comes with a syringe you can use to backwash/clean the filter whenever you’re in town. I sent the syringe home. I never used it and there were plenty of syringes in the hiker boxes if I ever needed one. I think I might have backwashed my filter once on trail in the five months I was hiking. I never had a problem with my filter while I was out there. I did have a problem with the bags though. I started off with a 64-ounce Sawyer bag. It worked fine up until my second night in the High Sierra when it started leaking. I was able to fix it with a little duct tape until I was able to replace the bag in South Lake Tahoe.
A word of advice when using the Sawyer water filter – if you’re using bags as opposed to Smart Water bottles, only use the Sawyer bags. The outfitter in Tahoe was out of Sawyer bags so they sold me a Platypus bag. It ended up not fitting the filter properly and leaked every time I tried to use it. Luckily Grit had an extra Sawyer bag he gave me to use, but that eventually started leaking too. In Sierra City, I found three, brand new 32-ounce Sawyer bags in the hiker box at the general store. I took one, which lasted me all the way to Canada. I would suggest carrying an extra Sawyer bag, just in case the bag you’re using starts to leak. The bags aren’t that heavy or cumbersome. Also, Smart Water bottles are a perfect fit for both the Sawyer Mini and Sawyer Squeeze filters. A lot of hikers would just use Smart Water bottles to filter and store their water. Trust me, you want to make sure your water filtration system always works. I saw plenty of people who didn’t take water filtering seriously and got very sick on trail. Save yourself the pain and discomfort and filter your water the right way, with the right gear, each and every time.
In the desert, I hiked with two 1.5 Liter Smart Water bottles, in addition to my Osprey 3 Liter Hydraulics Reservoir. Having the capacity to carry at least 6 liters of water at a time came in handy for the long, waterless carries in the desert. When I reached the Sierra, I ditched the Smart Water bottles because there was plenty of water everywhere. I no longer had to camel my way through the trail.
Here’s a list of gear that didn’t make it to Canada and got sent home:
The pack brain (the top of my pack)
Two pairs of knee-high Darn Tough socks because I switched to ankle-high socks instead
Montbell Breeze Dry-Tech UL Bivy (sleeping bag cover)
An extra Buff
Waterproof matches
GoPro selfie stick
Compass
Wilderness wash/soap
An extra microfiber, quick drying towel
An extra spoon
Bear canister – Sent home from Kennedy Meadows North
Leftover gravy packets – Bleeder ran to a store in Mojave, in 96 degree weather just to buy gravy packets for me so I’d have enough in the Sierra. I got sick of eating mashed potatoes and gravy, but didn’t want to get rid of the packets for sentimental reasons so I sent them home.
*Not Shown – Extra town clothes I had originally packed with me from Campo
Now that I’ve thru-hiked the PCT, I have a much better understanding of what I need out there in order to survive and make the most of my time out on trail, without suffering too much. This is a system that has worked for me. It may or may not work for you. Only you can figure out what will work for you once you get out on trail.
I’m in no way an ultralight hiker, nor do I claim to be one or ever want to consider myself to be one. I’m willing to carry extra weight for things like an extensive sleeping system if it means having a better night’s sleep on trail. I’m also willing to carry extra weight by carrying more food and water than I need because I never want to be without. Also, I tend to run cold in the early mornings and once the sun goes down so I’m willing to carry the extra weight in clothing to stay warm (and dry) at all times.
My biggest piece of advice when it comes to gear is invest in quality gear the first time around. Don’t buy something because it’s cheap or on sale. Do your research, Ask what other thru-hikers think about it. Try gear out before taking it on your thru-hike. If it doesn’t work for you or if you can’t figure out how to use it, return it for something that will work for you.
Finding cheap gear is great, but if you don’t use it or send it home, throw it away or put it in a hiker box, you end up spending more money in the long run. Also, be mindful of where you’re purchasing your gear from. Retailers like REI have an amazing one year warranty on any purchases you make either in-store or online. You can return or exchange gear you’ve purchased from REI up to a year after the original purchase date, no questions asked. Also, brands like Darn Tough and Arc’teryx offer a lifetime warranty on all of their products. Speaking from personal experience, businesses like Darn Tough and REI have a special place in my heart because they went above and beyond to take care of me when I needed them while thru-hiking the PCT this year. This is one of the reasons why I continue to shop with companies like these.
You can plan as much or as little as you want, but know even with all the planning in the world, there’s still a lot of stuff you won’t be able to figure out or you’ll end up changing completely once you get on trail. Do your research, ask questions, test gear out and be flexible when your gear needs change.
If you have questions about the gear I used or didn’t use, please leave me a comment below. I’m more than happy to help you plan your next thru-hike!
*Some of the links provided in this post are Amazon Affiliate links. Shopping through my Amazon Affiliate links is an easy way to help support my blog. To shop through any of my Amazon Affiliate links, click on any of the links within this post. When you place an order through Amazon for any of the products linked within this post, a small portion from your order will go towards my blog. It’s simple and there’s no extra cost to you.
Hi Kathleen!
Love your video’s and blogs, espec. your ‘own’ way of telling the stories 🙂
Question about NOT wearing rain pants: what is your xperience during an all-day downpour? Won’t your legs get cold? And do your tights have time to dry out?
I like the idea of not bringnig rain pants, not a fan either, but am a little worried I might miss them still.
Keep up the good work!
Cheers,
Geert
Nope! I usually don’t get cold in my leggings because I keep moving and they dry pretty fast. I hate wearing rain pants because it feels like I’m in a garbage bag.