

Looking to plan a backpacking trip to Enchanted Valley in Olympic National Park in Washington State and have no idea where to start?
This year, I’ve gone on quite a few group overnight backpacking trips with students from my online backpacking program for women, The Confident Solo Female Backpacker System.
Even though this program is designed to help women go from feeling scared and intimidated about backpacking to feeling comfortable planning their trips so they feel confident getting out on trail by themselves, the group trips are a way for students to practice everything they’ve learned in the program, out on trail in the field, in a safe, group setting so that they can build up their confidence to plan and go on their own solo backpacking trips.
Recently I took a group of students from The Confident Solo Female Backpacker System on a 3 day/2 night overnight backpacking trip to Enchanted Valley in Olympic National Park. I’ll not only share with you how I planned this trip, but I’ll also share with you all of the backpacking gear and food I packed.
Why Enchanted Valley?
Enchanted Valley in Olympic National Park is one of Washington State’s iconic backpacking trip destinations. This weekend’s trip would be a relaxed, but long-distance backpacking trip that would give my students the opportunity to try out their gear and apply the skills they’ve learned in The Confident Solo Female Backpacker System while being able to enjoy all of the beautiful scenery around them and possibly meet some of the local wildlife residents.
For me, Enchanted Valley checked all of the boxes. This is a beautiful, low-risk destination suitable for beginner backpackers. For as remote as the area is, the trail itself is pretty well-traveled. Since this would be my third time hiking to Enchanted Valley, this trail was very familiar to me, helping to boost my confidence with leading a group of beginner backpackers here for the weekend.
So here’s how I planned this overnight backpacking trip.
Our Trip Itinerary
Our Trip Itinerary for the weekend would be:
Day 1: Start from the Graves Creek Trailhead and hike to Enchanted Valley, with plenty of breaks and water stops along the way. This means we’d hike 12.2 miles with 2,057 feet of elevation gain on our first day.
Day 2: On Day 2, we’d sleep in and have a lazy morning in camp. Then from the valley, go on a short day hike up to see the Western Hemlock Tree, have lunch by the river and then head back into camp. This means we’d hike a total of 3.6 miles with 397 feet of elevation gain on Day 2.
Day 3: For Day 3, we would get up early, pack up camp and head back to the cars at Graves Creek Trailhead, with plenty of breaks and water stops along the way. This means we’d hike 12.2 miles with 631 feet of elevation gain since the walk back to the trail was mostly downhill.
The total trip mileage for our trip would be 28 miles over three days and 2 nights with a total elevation gain of 3,085 feet.
Trail Conditions
Along our hike, we’d see a couple bears, navigate over a few blowdowns and cross over a couple water crossings. There was plenty of water available to filter along our hike. Since the trail runs parallel to the Quinault River for most of the way, there were no big water carries and none of us went thirsty.
The weather was perfect while we were out there. Clear, blue, sunny skies and warm enough weather to be able to hike in shorts. We did our trip in early June, which is still considered early season for this area, but the entire trail was dry and there wasn’t any snow along the trail up through Enchanted Valley.
Rules and Regulations For The Enchanted Valley Area
Since we were traveling inside Olympic National Park, there were a few rules and regulations we had to abide by.
First, in order to overnight camp anywhere in the park, an Olympic National Park Wilderness Permit is required so I made sure to get one of these for our group.
Hard-sided bear canisters are required in the Enchanted Valley area. Soft-sided Ursacks are not allowed in this area of Olympic National Park. This means all of our food, garbage and scented items needed to be stored in a hard-sided bear canister while camping in the Enchanted Valley area.
Pets are prohibited on trails in the park so we didn’t see a single doggo on this trip, but we did see a couple resident bears while we were out there.
Camping is only permitted in the camp area designated on the permit itinerary. Since I had indicated on our permit that we would be staying in Enchanted Valley for both nights during our trip, this meant we didn’t have the option to camp at any of the other campsites along the way including Pony Bridge, O’Neil Creek or Pyrites Creek.
The maximum group size permitted for this area is 6-12, depending on the camp area indicated on the permit. This weekend, we were a party of 6, which was well within the maximum group size permitted for the area. The area in Enchanted Valley is huge and there were plenty of places where our group could set up camp near each other.
Permits
A Olympic National Park Wilderness Permit is required year-round in order to overnight camp anywhere in the backcountry in the park. Getting a permit for Olympic National Park is actually a lot easier than other popular national parks here in Washington State.
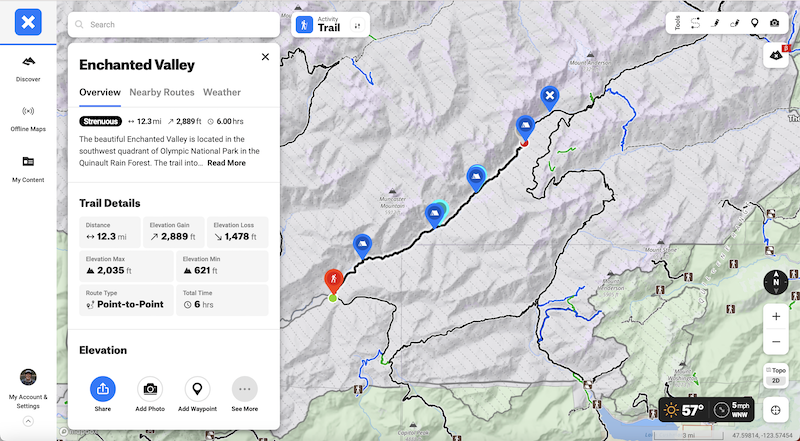
To get information on how to get a permit for the area, you can start by using a navigation app like onX Backcountry.
Inside OnX Backcountry, pull up the trail on the map and zoom in to click on any of the campsite icons along the trail. Scroll down to the Reserve/More Info section of the campsite overview and click on the link to get details on how to get a permit and make a reservation for the campsite.
CLICK HERE to get 20% off your purchase of onX Backcountry OR start a free 14 day trial of onX Backcountry Elite by using promo code “HungryHiker”
Since this area is in Olympic National Park, you can also go directly to the Olympic National Park’s website, click on the Wilderness Reservations page and click on Recreation.gov, which will take you to the Olympic National Park Wilderness Permit page. From here, you can check campsite availability based on date, group size and starting area.
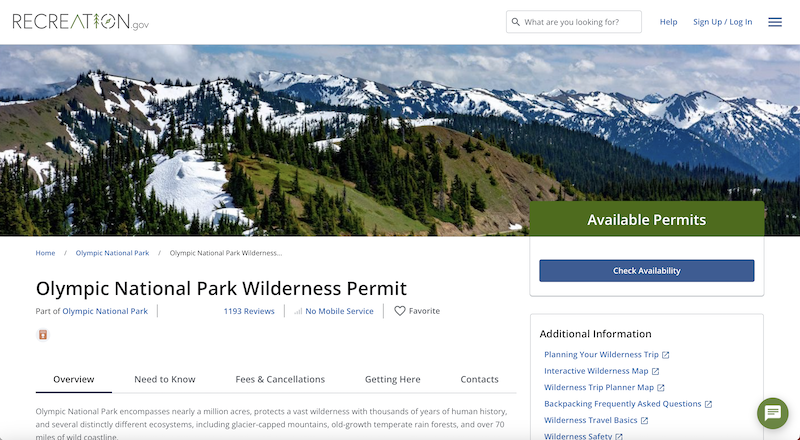
Once you’ve booked your permit and paid your permit fees, a week before your trip, you’ll be able to print out your Olympic Wilderness Permit. Once on trail, the group leader will need to keep the printed permit with them, including attaching the permit to their tent when at camp. Each permit is $8/night per person along with a $6 Olympic Reservation Fee. For our group of 6, the total cost for the Olympic Wilderness Permit for our trip was $102.
Backpacking Gear I Packed
For this trip, I created a backpacking gear packing list on LighterPack.com with all of the gear I packed and brought with me. My Backpacking Gear list included:
- My Pack System
- Shelter System
- Sleep System
- Cooking System
- Water Filtration System
- Repair/Tool/Toiletry Kit
- First Aid Kit
- Poop Kit
- Misc Gear
- Electronics
- Packed Clothes
- And the Clothes I wore on trail
Pack System
Starting with my Pack System, I brought with me my Gossamer Gear Mariposa 60 and the Gossamer Gear Air Flow SitLight Camp Seat that works as both padding on the back of my pack and as a butt pad whenever I stop for breaks out on trail.
On my pack shoulder strap, I attached a Chicken Tramper Ultralight Gear Shoulder Strap Sleeve for my CNOC collapsible water bottle for easy drinking water access when out on trail.
Shelter System
For my Shelter System, I brought my Big Agnes Copper Spur Ultralight 1-person tent along with the matching footprint.
Inside my tent, I hung up my Big Agnes mtnGLO LED tent lights in red, just for fun and to have a little extra ambiance while in camp.
Sleep System
For my Sleep System, I packed my Enlightened Equipment Enigma Custom Quilt in purple, a ThermaRest NeoAir Xtherm inflatable sleeping pad, a Cocoon Mummy Silk Liner and a Cocoon inflatable camp pillow and stored my entire Sleep System in a 13-liter Sea to Summit eVAC dry sack.
Cooking System
For my Cooking System, I brought my JetBoil Stash Stove, which includes the stove and cooking pot and boils water in less than two minutes, even in the windiest of conditions.
I also brought my Sea to Summit Long Spoon, a small REI multi-towel, a collapsible cup, a small fuel canister, a lighter and my DIY Backcountry Food Cozy.
And since it was required in this area, a hard-sided bear canister, which was the BV450 bear canister and was perfect for storing 3 days and 2 nights worth of food and snacks.
Water Filtration System
For my Water Filtration System, I brought my Sawyer Squeeze water filter and a CNOC 2 liter Vecto bag to collect dirty water in. I used a CNOC collapsible bottle to keep filtered drinking water in while I was out on trail and had Aquatab Water Purification Tablets in my First Aid Kit as an emergency backup in case my water filter failed.
I also brought with me a small Gatorade bottle to mix any of my electrolytes and Kencko smoothies out on trail in.
Get $20 off your Kencko Smoothies subscription by clicking here.
Repair/Tool/Toiletry Kit
In my Repair/Tool/Toiletry Kit, I keep things to repair my gear with like paracord, a pad patch kit, zip ties, tenacious tape and mini Krazy glue. I also keep toiletries I need for my trip like a travel toothbrush and toothpaste, a travel hairbrush, sunscreen and Body Glide. I also keep in here a headlamp and a travel cork massage ball to roll out my sore feet while at camp and store everything in a 3-liter Osprey lightweight stuff sack.
First Aid Kit
My First Aid Kit for every backpacking trip I go on in the backcountry usually stays the same. If you want to see how I created my backcountry First Aid Kit and everything I bring with me, check out the Backcountry First Aid Kit video I created, which I’ll include here:
Poop Kit
Normally I pack in baby wipes in my Poop Kit, but I decided to try something different. Instead, I brought Portawipes, which are lightweight compressed tissues that can be used for a bunch of different things in the backcountry including trail hygiene. Just like toilet paper, uncompressed Portawipes do need to be packed out with your trash after using them. These were significantly lighter than the premoistened baby wipes I’ve been lugging around with me on all my trips.
In addition to Portawipes, I also had in my Poop Kit a Deuce trowel, which I didn’t need to use on this trip since there were privies located at each campsite along the trail. I always keep it with me though, just in case, I also packed my Kula cloth, hand sanitizer, doggie bags to pack out used wipes and a menstruation cup. And I store everything in this super cute Space Bear Bags Poop Emoji Bag – which is kind of perfect for a poop kit.
Misc Gear
For Misc Gear, I brought with me my Diorite Telescopic Carbon Fiber Trekking Poles and a bug net with bug repellant wipes, just in case the bugs were bad. Thankfully the bugs weren’t an issue on this trip so I didn’t need to use any of my bug repellant system.
Electronics
Since I planned on shooting video of our backpacking trip back to Enchanted Valley, I brought my GoPro 10 that also sits on a small selfie stick along with 6 additional batteries. I always like to carry additional camera batteries with me, so I don’t have to worry about charging batteries when out on trail. Other electronics I packed for this trip were my Garmin inReach Explorer+, my mobile phone, a portable charging battery pack and various charging cords.
For easy access to my camera to shoot video and my phone for navigation when out on trail, I kept both of these things along with a couple snacks in my Summit Bum Fanny Pack.
Packed Clothing
This is the clothing I didn’t wear on trail while hiking but used as extra layers to bundle up in while at camp and to sleep in at night. For Packed Clothing, I brought with me a puffy jacket, a lightweight rain jacket, a lightweight fleece, a pair of leggings, a pair of liner gloves, a pair of shorts, tank top and sports bra to sleep in, two extra pairs of socks and an extra pair of underwear.
Worn Clothing
And for the clothes I wore while hiking, I wore my Outdoor Research Echo Sun Hoodie, a pair of running shorts, a pair of Darn Tough socks along with a super cute pair of rainbow and unicorn gaiters to help keep trail debris out of my shoes, a pair of Altra Lone Peak trail running shoes, a pair of sunglasses and a trucker hat to help keep the sun out of my face and eyes.
My total base weight for all of the backpacking gear I packed with me for this trip was 21.22 lbs.
To get more details and links for each of the items on my backpacking gear packing list for this trip, check out my LighterPack.com list.
Backpacking Food I Packed
Since this trip would be 3 days and 2 nights in the backcountry, I packed the following meals and snacks for the trip:
- 2 Breakfasts
- 3 Lunches
- 2 Dinners
- And 10 Snacks
Breakfast
For Breakfast, the two Breakfasts I packed for this trip were:
- 1 serving (1/2 a bag) of Peak Refuel’s Breakfast Skillet
- 1 serving of Backcountry Foodie’s Berry Breakfast Crumble
Interested in using Backcountry Foodie to help you put together a backpacking meal plan for your next trip? Click this link and use coupon code “HUNGRYHIKER20” to get 20% off your membership.
Lunch
For Lunch, the three lunches I packed for this trip were:
- 4 homemade PB&J Uncrustables (2 Uncrustables equals 1 lunch)
- 1 serving of Backcountry Foodie’s Spicy Peanut Noodles
Dinner
For Dinner, the two dinners I packed for this trip were:
- 2 servings (1 bag) of Peak Refuel’s Homestyle Chicken & Rice
- 1 serving of a Backcountry Pasta Alfredo, which I found the recipe for online thanks to REI
- I also packed two after-dinner desserts, which were two servings of Backcountry Foodie’s Fudge Walnut Brownie Batter and 6 pieces of Almond Roca
Snacks
For this trip, I packed 10 snacks, 4 for Day 1, 4 for Day 2 and 2 snacks for Day 3. The snacks I packed for this trip were:
- Backcountry Foodie’s S’Mores Trail Mix
- 2 servings of Trader Joe’s Chile Spiced Mango
- 2 servings of Harvest Snaps Lightly Salted baked green pea snacks
- 2 single serving pouches of SuckerPunch Gourmet’s dill pickle chips
- Rhythm Buffalo Ranch flavored cauliflower bites
- Trader Joe’s Dark chocolate covered graham crackers
- Trader Joe’s Almond Butter Covered Almonds
- Gummy bears
- A Reeses Snack Pack
- And 2 packets of Liquid IV electrolytes for each day
Plus 2 packets of Kencko Smoothies to have with breakfast and two packets of bone broth to have a warm drink while at camp if I needed one.
For easy access to my food throughout the day, I packed my lunch, snacks and electrolytes for Day 1 in a stuff sack that I would carry in the back mesh pouch of my pack.
The rest of my meals, snacks, electrolytes and drinks I was able to pack into my hard-sided bear canister for the trip, the BV450.
How Did The Trip Go?
Overall, our overnight backpacking trip to Enchanted Valley in Olympic National Park was a complete success. One of the ladies in our group crushed her goal of completing her first overnight backpacking trip EVER!
The only piece of gear I forgot was a pair of microspikes that I was going to use for our day hike on Day 2. We ended up not needing them because as a group we decided to have a slow, lazy morning in camp and then shorten our hike during the day so we could come back to camp and enjoy soaking our feet in the river.
As for overpacking gear, I think the only two things I didn’t use were an extra pair of socks I packed and bug repellant. Thank goodness the bugs were only slightly annoying at the end of the day at camp when there was hardly a breeze out.
I had plenty of food to eat during the trip and really enjoyed all of the meals and snacks I brought, especially the new Backcountry Foodie recipes I tried while I was out there.
While out on trail, I created Waypoints for the places we stopped to get water, day hike to and took breaks at. I also took note of a potential campsite in Enchanted Valley I’d like to stay at next time.
Other than that, there isn’t anything else I’d change about this amazing trip.
Hopefully you’re now inspired to want to start planning an overnight backpacking trip of your own. If you’ve been thinking about planning a trip back to Enchanted Valley in Olympic National Park, hopefully this blog post has also helped answer any questions you might have about planning your trip.
Need help trying to figure out what backpacking gear to pack for your next trip? Tired of forgetting to pack something for a trip?
I’ve created a FREE backpacking gear packing list to help you get organized and figure out what backpacking gear to pack for your next trip. CLICK HERE to get your FREE The Hungry Hiker Backpacking Gear Packing List sent directly to your inbox.
Disclaimer: The-Hungry-Hiker.com is a participant in the Amazon Affiliate Links and AvantlInks Program, affiliate advertising programs designed to provide a means for sites to earn advertising fees by advertising and linking to Amazon.com and other affiliated sites at no cost to you. Please note, I only link to products and services I personally use and trust.