Solo hiking can be intimidating for ANYBODY, whether you’re a man or a woman.
Hiking, backpacking, spending time in the backcountry is one of my most favorite things to do and I’ve spent a number of miles out on trail hiking by myself. For me, solo hiking is empowering. It’s an opportunity to get closer connected with nature, my surroundings and myself. It’s my uninterrupted “me time.” and it’s where I get all of my good ideas and make great decisions.
With all of the solo hiking and backpacking trips I’ve gone on and all of the solo hiking and backpacking videos I’ve created and posted on my YouTube channel over the years, a question I see pop up in the comments and get asked all the time is,
“How can I stay safe while solo hiking?”
When I first started going solo hiking and even planning my first solo thru-hike along the PCT, I got questions and comments like:
- “Why would you want to do that?”
- “Aren’t you scared of hiking alone?”
- “You’re a woman. You shouldn’t go hiking in the woods by yourself.”
- “What are you going to do if X happens?”
- “Are you going to carry a gun?”
- “I wish I was as brave as you.”
- And of course, the endless quoting of horror stories by friends and family that they had either seen on TV, read in the news or heard from a friend.
Not only was it enough that I had to deal with MY OWN fears of hiking out in the backcountry alone, but I also had to deal with my friends and family’s fears of me wanting to go hiking alone.
Over the years, I’ve spent a number of miles being out on trail by myself and YES, solo hiking and backpacking IS challenging, and CAN be risky. There’s a lot of researching, planning and preparing involved. There’s the potential for more possible risks to deal with when you’re out on trail by yourself and you have to learn how to be self-reliant.
BUT, the payoff for solo hiking and backpacking is incredibly rewarding. Suddenly, I’m in charge of my trip. I get to decide when and where I want to go. I can hike at my own pace, stop for breaks whenever I want to and just be without having to worry about someone else while I’m out there.
If you’re curious to learn about all of the different reasons why I love solo hiking so much, make sure you check out this video:
Now I want to make it perfectly clear. I’m not opposed to going on group trips in the backcountry. Even though I’ve done a fair amount of solo hiking and backpacking, I’ve gone on a ton of group trips as well. There are certain areas where I prefer hiking and backpacking in a group because I just feel more comfortable and safer than if I were out there by myself.
With group trips, I have a built-in support system of people who are traveling with me through areas I might not feel comfortable traveling through by myself and group trips help me build up my confidence with exploring a new area or country that I’ve never been to before.
I’ve even led several group day hikes and overnight backpacking trips for students in my online backpacking program for women, The Confident Solo Female Backpacker System, who want to help build up their confidence of going backpacking in a group setting first before venturing out on their own for solo trips.
If you’re a woman who is scared and intimidated about backpacking alone and want to learn how you can feel comfortable planning your trips so you feel more confident getting out on trail by yourself, click to learn more about The Confident Solo Female Backpacker System and how you can be a part of this incredible program.
Whether I’m hiking solo or with a group, I always live by the motto, “Always be prepared for the worst-case scenario.” When you do your research, take the right precautions and are prepared for your adventure BEFORE you get to the trailhead, you’ll have a lot less to be afraid of when it comes to getting out on trail by yourself.
If you’re thinking about giving solo hiking a try and are looking for tips on how to stay safe while you’re out there, here are 10 mistakes to avoid when hiking alone that will help you stay safe while solo hiking.
here are 10 mistakes to avoid when hiking alone that will help you stay safe while solo hiking.
MISTAKE #1:
Not Doing Your Research
Trip planning should always start with research. First, you’ll want to figure out where you want to go and then plan the route for your trip, using either a paper map or a digital map like onX Backcountry.
From the desktop version of onX Backcountry, you can use the Discover feature to find nearby trails. Click on any trail and you’ll get an overview of the trail including the number of miles, elevation gain and loss, a timeframe you can expect to complete the hike, a cool elevation graph so you can see on the map where the elevation gains and losses are along the trail, photos of the trail, nearby routes and the current weather forecast for the area including sunrise and sunset times and even moon phases.

Important note about checking the weather forecast: Make sure you are checking for the current weather forecast for the area you plan on hiking in, not the nearby town. The weather in the mountains at a higher elevation can be much more different than the weather at a lower elevation, in town. Online navigational tools and apps such as onX Backcountry make it super easy to be able to check for the current weather forecast in the specific area you plan on hiking in, just by clicking on the map.
Knowing the weather forecast for the area you plan on hiking in will help you decide what gear you’ll need to bring for the conditions and terrain you’ll be hiking in, like if you need to pack rain gear, extra insulation layers, a pair of microspikes or even the types of shoes you should wear, whether it’s a pair of waterproof hiking boots or trail runners.
Once you’ve decided where you want to go, you can then use the Route Builder to create a route for your hike. Use the Snap To feature to create the actual route.
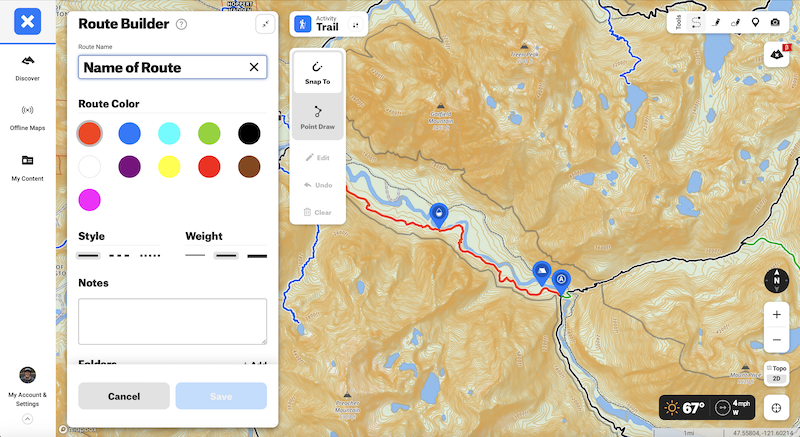
Then once your route is created and saved, use the map to create Waypoints marking potential water sources, campsites and exit points at other nearby trailheads, in case of an emergency and you need to get off trail. You can change the view of the map from Topo to Satellite and even Hybrid, which includes topo lines over the satellite imagery.
There’s also an option to look at the map of the area in 3D, if you want to get a better feel for the terrain and elevation gain and losses in the area before getting out on trail.
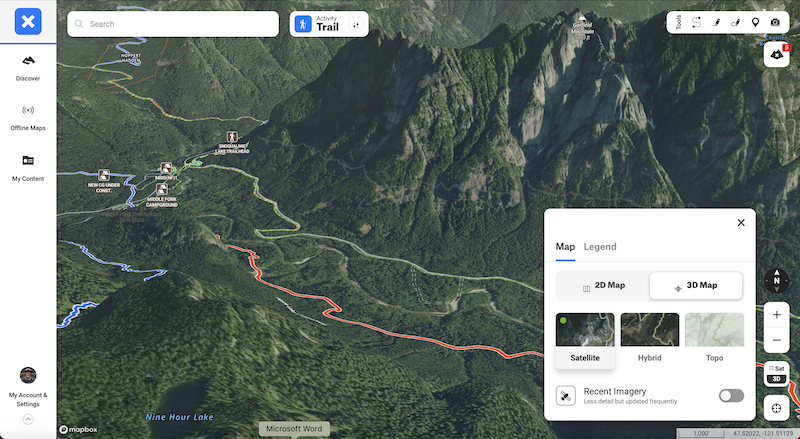
If you’re concerned about the possibility of there being snow along the trail, you can click on Recent Imagery, which is updated frequently but has less detail and will show you a recent satellite image of the area, helping to indicate if there’s currently any snow on the ground.
Once you’ve finished creating your route and Waypoints, make sure you create an Offline map of the area your route is in and then double check to see that your map has properly downloaded onto your phone. Any changes you make in your onX Backcountry account should automatically reflect in the app on your mobile device.
Then, just to be safe, always test to make sure your map has downloaded correctly by putting your mobile device in Airplane mode and checking to see that the offline Map you created shows up on your phone. This is an important step you’ll want to make sure you complete before you get to the trailhead, while you still have cell and WiFi service.
~~~
Get 20% off your purchase of onX Backcountry OR start a free 14 day trial of onX Backcountry Elite by CLICKING HERE and using promo code “HungryHiker”
~~~
When choosing a trail to go solo hiking on, it’s important to pick something within your limits, both comfort level and fitness. If this is one of your first times planning a solo hike, consider starting small. Pick a trail close to home. Choose a shorter hike at a lower elevation. If you’re still working on building up your confidence in your navigation skills, choose a trail that’s well-marked, well-maintained and well-traveled.
With solo hiking, often times it’s about the journey and not necessarily the destination. Try to avoid getting summit fever while you’re out there by yourself. Always listen to your gut. If the trail becomes too challenging, if you’re starting to lose daylight, f something feels off, weird, wrong or uncomfortable, don’t be afraid to stop, turn around and head back to the trailhead.
MISTAKE #2:
Not Letting Anyone Know Where You’re Going When Solo Hiking
Always let someone know where you’re going. Pick a trusted friend or family member who won’t be out on trail with you and share your trip itinerary and planned route with them before getting to the trailhead.
Once you’ve created and saved your route using onX Backcountry, you can “Share” your route by copying the link to your route and sharing it with another onX Backcountry user.
In addition to sharing your route, you’ll also want to let your friend or family member know how long you plan on being out there, your intended hiking or camping destination, what time you expect to finish and then don’t forget to check back in with them after your hike to let them know that you’ve made it back to the trailhead and home safely.
MISTAKE #3:
Telling People You’re Solo Hiking
Whether you’re on trail or on your way to the trail, never tell people you’re hiking solo.
If you’re heading to the trailhead for your solo hike, don’t post on social media ahead of time where you’re going for your solo adventure. Keep all of your on-trail selfies, geo location tags, GPS tracking and fitness tracking private until you’ve made it back home safely.
While out on trail, don’t share with other hikers that you’re hiking solo. If someone asks if you’re out there by yourself, you can always make them think that you’re hiking with someone else by saying that the person you’re with stepped off trail for a quick bathroom break, is slightly in front of you/behind you or that you’ve tracked them and they’re not that far away.
Whenever you’re hiking or backpacking alone, it’s always a good idea to keep your intended hiking and camping destination private, just to be safe.
Remember, if you’ve done your research and proper planning ahead of time, a trusted friend or family member at home will know where you’re going, where you’re heading and know what time to expect your return.
MISTAKE #4:
Not Being Aware of Your Surroundings When Solo Hiking
ALWAYS be aware of your surroundings whenever you’re out in the backcountry, especially if you’re hiking alone. Instead of listening to headphones, listen to the sounds around you. Music, audiobooks and podcasts are better distractions to enjoy once you’re safely at camp, inside your tent for the night.
If you do decide to listen to headphones while out on trail, make sure to turn the volume down as low as you can and only use one ear bud. This way you can still hear everything going on around you, including wildlife and if any other hikers, runners and mountain bikers who might be coming up behind you.
And don’t just pay attention to what’s going on front of you. Always have a feeling for what’s happening behind you and all around you while you’re solo hiking out on trail.
MISTAKE #5:
Not Appearing to Look Confident When Solo Hiking
Even if you don’t feel confident while you’re hiking alone, at least look like you are. Avoid looking like you’re scared. Don’t run away. Most attackers (whether it’s an animal or human) will go after easy prey. If someone gives you the creeps, stare them in the eye. Take notice of what they look like and what they’re wearing. If you feel like you’re being followed, let the person pass and then create as much distance between you and them as possible.
MISTAKE #6:
Not Carrying Whatever Helps Make You Feel Comfortable
Consider carrying some sort of self-protection tool that helps you feel more comfortable when hiking solo. Self-protection tools can be used against both animals and humans and include things like mace, pepper spray, bear spray, a knife, a firearm and even a whistle.
Whatever you decide you need to carry that helps you feel more comfortable while you’re out hiking alone, avoid hurting yourself by making sure you’re familiar with and are fully trained on how to use your self-protection tool of choice. It’s also your responsibility to know the local rules and regulations and make sure it’s legal to carry your self-protection tool of choice in the area you plan on hiking in.
At the very least, consider carrying a whistle with you for your solo hikes. Make sure it’s always easily accessible and not at the bottom of your pack. A whistle can be used as a loud noise to scare off animals, can be used as a distress signal if you need help and can signal to people in the area who might be looking for you if you’re lost or injured. Before buying a whistle, check the sternum strap of your pack. A lot of pack brands will have a built-in whistle located on the pack’s sternum strap for easy access.
Trekking poles are a piece of gear with multiple uses. Not only are they a third point of contact with the ground, helping you to stay more stable while out on trail, but they can be used to help defend yourself against animals and humans and can be used as a crutch in the event you get injured and need extra support to get yourself back to the trailhead.
Also, consider learning self-defense techniques and awareness of what you can do to help protect yourself in certain situations, whether you’re hiking by yourself in the backcountry or walking down the street alone while in town or in a parking lot.
Keep in mind, there are so many different things you can be afraid of whenever you’re hiking alone. While the fear of being assaulted by a stranger out on trail is a common fear, especially if you’re a solo female hiker and/or backpacker, assaults are actually not as common as you might think.
As a female, solo long-distance backpacker and hiker who has spent a number of miles by myself out in the backcountry, I’d be more concerned with wildlife, water crossings, weather changes, not being prepared, getting lost and getting injured than getting assaulted by a stranger out in the remote wilderness. While these are all very valid fears, don’t let them hold you back from wanting to go hiking solo.
Instead, work to improve your skills and expand your knowledge. Learn how you can prepare yourself for being able to handle any of these fears and situations before getting out on trail by yourself.
MISTAKE #7:
Not Being Aware of Local Wildlife in the Area
Be aware of any possible local wildlife you might encounter while hiking in the area. Depending on the area you plan on hiking in, there could be the possibility of encountering wildlife such as mountain lions, moose, bears, snakes, ticks, cows, elk, deer and even mosquitoes. Know how to handle a possible encounter should you come into contact with any wildlife when out on trail.
Always be aware of your surroundings. Consider carrying a tick removing tool and bug repellant. Be Bear Aware and know the local rules and regulations for proper food storage.
MISTAKE #8:
Not Carrying A First Aid Kit
Getting injured is a common fear most people have when they’re considering solo hiking. Part of your planning and preparation for any trip in the backcountry, especially if you plan on going solo, is learning how to be self-reliant and knowing how to treat yourself should you get injured so that you can make it back to the trailhead safely to get help.
Always carry a First Aid Kit and know how to use everything in your kit. A First Aid Kit is useless and deadweight in your pack if you aren’t familiar with it and don’t know how to use anything in it in. This is why I choose to build my first aid kit instead of purchasing a premade one from an outdoor retailer.
CLICK HERE you’re interested in learning how you can create your own hiking and backpacking first aid kit and want to see what I carry with me whenever I’m out on trail.
Also, consider taking a Wilderness First Aid class and get WFA, or Wilderness First Aid certified to help build up your confidence with knowing how to treat yourself and be able to help another injured hiker out in the backcountry, in case of an emergency.
MISTAKE #9:
Not Carrying the 10 Essentials
“Always be prepared for the worst-case scenario” is my motto for whenever I plan and prepare for any trip out in the backcountry. This is why I always carry the 10 Essentials with me every time I’m out on trail, whether it’s for a day hike and overnight backpacking trip, no matter what time of year or how long I plan on being out on trail.
The 10 Essentials include: Navigation, Illumination, Shelter, Extra Water, Extra Food, Extra Clothes, Sun Protection, Fire, Knife/Gear Repair and a First Aid Kit.
CLICK HERE if you’re interested in learning more about the 10 Essentials, what they’re used for and the 10 Essentials I carry in my pack whenever I’m out on trail.
MISTAKE #10:
Not Having A Way To Communicate With The Off-Trail World
And finally, consider carrying some sort of device that allows you to be able to communicate with the off-trail world in the case of an emergency. Mobile phones aren’t reliable because often times you’ll be out of cell or WiFi service when out in the backcountry.
Instead, consider carrying a satellite messenger or a PLB/Personal Locator Beacon. These devices are much more reliable in the backcountry because they work by satellite, not cell or WiFi service.
My satellite messenger, as expensive as it was, not only for the device itself but also the monthly subscription required to use the device, was the one piece of gear I wish I had gotten sooner, especially with all of the solo hiking I do in the backcountry.
With a PLB, you’re able to send your GPS coordinates to local search and rescue authorities with a push of a button, but there’s no two-way messaging option that gives you a chance to state the nature of your emergency or communicate with emergency authorities.
A satellite messenger gives you the opportunity to have two-way messaging with friends and family at home whenever you’re out of cell and WiFi service range.
In the event of an emergency, you can press the SOS button on the device and have the ability to communicate with Search and Rescue via two-way messaging, which is extremely helpful when relaying the nature of your emergency and knowing when help will be on the way.
With satellite messengers, you can set up an online map for friends and family at home to track and follow you while you’re out on trail alone. Depending on your device and the subscription you setup, you may also have the ability to check the local weather forecast and upload routes into your device.
Just like with any piece of gear, you’ll want to make sure you’re familiar with knowing how to use your satellite messenger FIRST before getting out on trail.
Also, before getting out on trail, setup the subscription for your device and know who you need to connect with and how you can connect with them through your device, if you find yourself in an emergency situation.
Make sure all of your electronic devices, including your satellite messenger are fully charged before leaving the house and bring a power bank so that you have a way to keep all of your electronic devices charged while you’re out on trail.
Don’t let fear (or someone else’s fear) hold you back and get in the way of something you’re passionate about and want to do for yourself. If you want to give solo hiking a try, do your research, properly plan and prepare for your adventure and then go out there and have fun.
Remember, solo hiking can be intimidating for ANYBODY, whether you’re a man or a woman, but it also can be safe, incredibly empowering and it’s a lot of fun.
Disclaimer: The-Hungry-Hiker.com is a participant in the Amazon Affiliate Links and AvantlInks Program, affiliate advertising programs designed to provide a means for sites to earn advertising fees by advertising and linking to Amazon.com and other affiliated sites at no cost to you. Please note, I only link to products and services I personally use and trust.
Great tips for staying safe while hiking alone! It’s always important to be prepared and aware of your surroundings, especially when venturing out on your own.
Great article. As a 28 yr. veteran LEO, it irks me how many people are so aloof to their immediate surroundings. That is both urban & in the bush, then wonder how they were accosted!?!? Agreed, NO EARBUDS! Situational awareness is critical! Put down the lousy device & pay attention…& just maybe enjoy the surroundings. My wife & I day hike a lot and we carry the 10 essentials. Most of ours is in the Sonoran desert so water is HUGE! She & I see it all the time, people grossly unprepared, wearing stupid choices in clothing/footwear, hardly any gear, disposable 16 oz. water bottles from the store etc…. Those are the ones who really annoy SAR teams since they are so ignorant or just lazy. Then get in big trouble. I’ve seen fools wearing flip flops on desert trails! Just dumb! You point out some valid & wise points. Thank you for influencing some commons sense.
Happy to help! 🙂