The question I get asked the most about thru-hiking the Pacific Crest Trail is:
How much does it cost to hike the Pacific Crest Trail?
Not only is asking how much it cost to hike the PCT such a popular question, but it’s also the hardest one to answer. For as many different hikers there are on trail, there are just as many different budgets. The type of budget you need to hike the PCT will depend on the type of hike you want to have. Do you already own your gear or do you need to buy gear for your hike? Do you want to stay in hotels, hostels or campgrounds? Will you be the hiker who camps just outside of town the night before coming into town? Or are you the hiker who will skip towns altogether? Can you resist town urges like restaurant meals and cold beers? Are you planning on shopping out of hiker boxes and/or relying on the generosity of trail angels? Are you planning on taking side trips along your way to Canada?
According to the Pacific Crest Trail Association, the average cost of a thru-hike is anywhere from $4,000 to $8,000 per person. For a five-month hike, that’s about $800 to $1,600 per month, just to live on trail. This doesn’t include off-trail expenses a person might have to pay for while on trail like a mortgage/rent, student loans, utilities, car payment, insurance (car/health) and/or a cell phone bill.
Part of having a successful thru-hike is making sure you have money to live on trail without having a job or a steady income for 5-6 months. People often ask me how it’s possible to quit a job and not work for that long. The answer? Plan, prepare and save more money than you think you’ll need. For my hike in 2018, I had over a year to prepare, plan and save. In 2019, I had less than six months to prepare and save for my hike. No matter how much time you have to prepare, planning and saving for a thru-hike is tough. It takes a lot of dedication, hard work and will probably require you to make quite a few sacrifices.
It’s easy to under-estimate the cost of a thru-hike. I know I did. My first hike in 2018, I had saved enough money, but ran into unexpected expenses like needing to pay for various forms of transportation (taking the bus and renting a car) to get around trail closures and get to Cascade Locks in time for PCT Days along with taking WAY more zero days and staying in more hotel rooms than I had originally budgeted for. The number one reason why hikers get off trail (besides injury) is running out of money. I know this to be fact because for my hike in 2019, injury and lack of funds put an end to my hikeafter only being on trail for two months.
If you suck at saving money, now’s the time to learn how to put together a budget and start living frugal. Cook at home instead of dining out. Go on training hikes outside instead of working out in a gym. Cancel unnecessary memberships and subscriptions. Drink water instead of beer.
Figure out how much money you’ll think you’ll need for your hike. Figure out what your costs will be for Gear, Food/Trail Expenses, Town Days, Transportation and a Post-Hike Nest Egg for once you’ve finished your hike. The most expensive part of a thru-hike is not having an income for the time you’re on trail. This is why you should start saving for your thru-hike NOW. Figure out what your on and off trail costs will be, put together a budget and then save, save, SAVE.
Gear
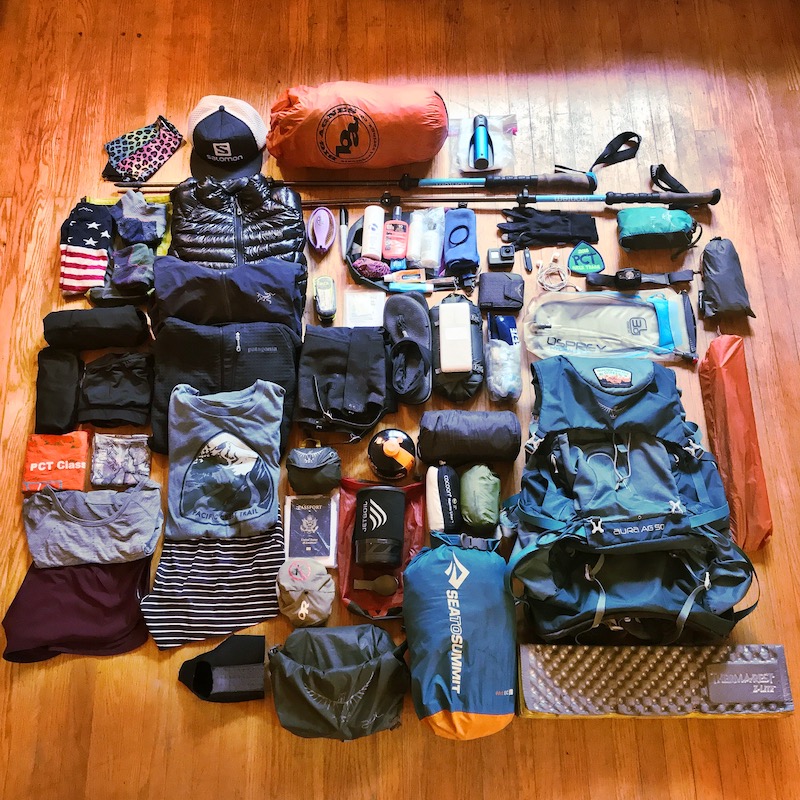
One of the most expensive parts of a thru-hike, besides quitting your job and not working for five months, is buying gear and replacing gear. If you’ve been backpacking before or have done a thru-hike already, you might have gear you can use for your trip. Then it’s a matter of replacing a few items or switching out some things for lighter options.
If you’re someone who’s new to thru-hiking or have never gone backpacking before, expect to make a significant investment in gear for your trip. Depending on what you need and what you purchase, plan on spending anywhere from $2,000 to $4,000 on gear and gear replacements you might need to make along the way.
If there’s one area to splurge on when it comes to a PCT thru-hike, it’s gear. Look at your gear as a one-time investment. If you invest in quality, lightweight equipment the first time around and take care of it, your gear will last for many more hikes, long after the PCT. Get your gear purchases right the first time – do your research, buy from a reputable retailer with a solid return/exchange policy and try every piece of gear out to make sure it works for you before leaving to hike the PCT.
Don’t make the mistake of skimping on gear. Grit, whom I hiked most of the PCT with in 2018, bought the cheapest gear possible for his hike including his tent, sleeping bag and pack. The only thing he “invested in” were his hiking boots. The first pair of boots he started his hike with lasted for him all the way to Oregon! Most hikers have replaced their shoes at least three times on trail by the time they reach Oregon, so this was quite impressive.
All of Grit’s other gear didn’t quite work out for him as well. His sleeping bag was always too cold, so he grabbed a (heavy) fleece blanket out of a hiker box at Kennedy Meadows South and used it, in addition to his sleeping bag, to keep himself warm throughout the Sierra and for the rest of the way to Canada.
Grit’s first pack fell apart within the first 700 miles. The second pack he had to purchase was much heavier and caused him lots of back pain, slowing down his hiking pace considerably. When he was about 1,400 miles into his hike, I was able to gift him his third and final pack with the help from Osprey. We got Grit into an Osprey Atmos 50. During the first week of using his third pack, his back pain disappeared and his hiking pace got much faster.
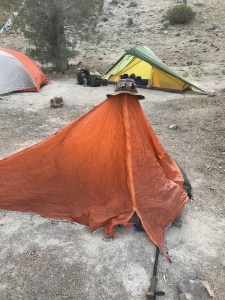 Grit and I lovingly referred to his tent as his, “Sad Little Tent.” Grit’s tent was small and lightweight, but started falling apart on him almost immediately. All of the zippers broke, which caused lots of cold nights and visits from pesky mosquitoes and rodents. If it rained, he always got soaked. By the time he reached Canada, the only thing keeping his tent together were binder clips and duct tape.
There are plenty of lower priced, non-named brand versions of gear available on the market for budget-conscious hikers, but be selective in what you purchase. Shop around, test gear out and talk to other hikers to see what gear works/doesn’t work for them. At the very minimum, you should invest in shoes, a sleeping bag, a pack and a tent. You can either invest in your gear the first time and enjoy your hike OR be like Grit and buy crappy, cheap gear only to have it all fall apart on you. With cheap, crappy gear, you think you might be saving money upfront, but once it starts falling apart, you’ll only end up having to spend more money replacing it.
Food/Trail Expenses
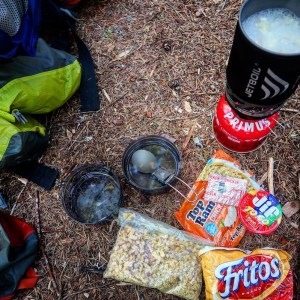 Get ready to spend a good amount of your PCT budget on food and trail expenses. When putting together a budget for your hike, take into consideration the cost of food, snacks, beverages and electrolytes you’ll stock up on each time you resupply. Prepare for Hiker Hunger to hit, usually anywhere from 300 to 500 miles into a thru-hike. Hiking the PCT will make you hungrier than you’ve ever been before. With wanting to eat double breakfasts, double lunches, double dinners and snacking throughout the day, you’ll be buying way more food than you could’ve ever anticipated. In addition to food, you’ll also need to purchase fuel canisters, batteries and toiletries for showers and laundry detergent whenever you’re in town and/or run out.
You could try to cut down your costs by putting together a resupply strategy and send yourself food on trail. Be careful with setting up a resupply strategy though. Resupply boxes can get costly with the shipping, you could get sick of the food you send to yourself and you’ll probably have to adjust your hike at some point to make it into town to pick up your package before the post office closes.
Resupply strategies make sense if you have specific dietary restrictions like being vegan, following a keto diet, are gluten-intolerant or have food allergies. Some of the really small towns near trail are limited in resupply options to foods like instant mashed potatoes, ramen and Snickers Bars.
Town Days
When I started planning my first thru-hike, I thought it would be easy to avoid the town vortex. Skipping towns is easy to do on paper, but when you’ve spent the last five days in the heat and sun or rain and cold, haven’t had a shower and would do anything to have a meal that doesn’t require boiling water to cook, a town day becomes incredibly difficult to say no to.
Some hikers splurge at every town stop with a hotel room and restaurant meals. Others shop for their resupply out of hiker boxes and rely on the generosity of trail angels. There are many hikers who do a little bit of both – splurging on a hotel in one town and skipping the next town altogether. Nothing can drain a PCT budget faster than spending time in town though. With the lure of a bed, flush toilet, warm shower, laundry facilities, restaurant meals with food you’ve probably been dreaming about over the last several miles along with cold beers and sodas, it’s understandable why a lot of hikers get vortexed into staying in town longer than they originally planned. It’s easy to get sucked into town with all of the off-trail temptations.
Town days can cost hikers anywhere from $50 to over $100 a day. Expenses can include a stay in a hotel or hostel, restaurant meals, beer, soda and if you’re staying with a trail angel, a monetary donation of at least $20 each night you’re hosted.
 There are ways you can make a town day more affordable. One option is to split a hotel room with other hikers to keep costs low. Just make sure you don’t break the hotel’s rules by sneaking in unaccounted hikers into your hotel room. There’s also the option to skip towns all together, if you can resist the temptation. Many hikers can’t. On trail, I often had a hard time resisting a town day. Another option is to camp on trail, just outside of town the night before and then come into town in the morning. If you do opt for a restaurant meal in town, make it breakfast since they tend to be cheaper than lunch or dinner. Then to help get through town faster without getting a hotel room, shower at an RV park, do your laundry at the laundromat, resupply and once the rest of your town chores are done, head back out to trail by the end of the day and camp just outside of town.
Transportation
 When putting together my PCT budget, transportation was something I didn’t think about saving money for. I figured since I was walking from Mexico to Canada, I wouldn’t have a need for a bus ticket, train ride, rental car or flight. I was wrong.
Transportation costs for a PCT hiker start with getting to and from either terminus – the Southern Terminus in Campo, California and the Northern Terminus in Washington at the Canadian border. For my first thru-hike, I stayed with family in San Diego who then gave me a ride to the Southern Terminus. Once I reached the Northern Terminus, I had family waiting for me in Manning Park who then gave me a ride home back to Seattle. For my second thru-hike, I stayed with trail angels, Scout and Frodo in San Diego the night before starting my hike. In the morning, Scout and Frodo arranged rides to the Southern Terminus for us with the help of other local trail angels.
Unexpected things can happen while hiking the PCT – injuries, trail closures, fire reroutes, family emergencies, heavy snowpack on trail and bad weather. This is why it’s a good idea to set aside extra money in your PCT budget for transportation costs, just in case you’re not able to hitchhike and need to get on a bus, train, plane or rent a car to get off or back on trail.
In 2018, Grit and I had a few unexpected transportation costs we hadn’t planned for. In Northern California, Grit and I bought a Greyhound bus ticket and a rented a car for three days, from Medford, Oregon to Portland, Oregon. From Portland, we hopped on the light rail and a bus that took us back to the trail at Timberline Lodge. From Timberline Lodge, we hiked the 50 miles to Cascade Locks and made it in time for Trail Days, where I’d be speaking on the Osprey panelduring the event.
In 2019, Bleeder and I had quite a few unexpected transportation costs we hadn’t planned for. We decided to skip the late season storms and massive snowpack in the High Sierra and opted to take a two-week trailcation instead. During our trailcation, we took a bus from Tehachapi, California to Lancaster, California where we picked up a rental car. We rented a car for the first week of our trailcation and drove through Death Valley, Vegas, Hoover Dam, Grand Canyon and then back to Lancaster. From Lancaster, we hopped on the MetroLink train and took it into downtown LA. Then from LA, Bleeder and I hopped on an Amtrak train and rode it for 33-hours, all the way up to Seattle where we’d spend the second week of our trailcation.
Post-Hike Nest Egg
Not only do you want to save enough money for the time you spend on trail, but it’s also a good idea to save money for when you get off trail and come back home. Getting off trail is hard enough, having to deal with the post-trail blues. Help make the transition from trail life to city life much easier and less stressful by giving yourself some sort of financial cushion. Everyone’s post-hike nest egg will be a different amount. Aim to save enough money to help pay for a couple weeks of living expenses while you’re adjusting back to off-trail life and looking for a job.
When it comes to defining how much it cost to hike the Pacific Crest Trail, there’s no one right answer. It’s going to be different for every hiker. Remember, the most expensive part of a thru-hike will probably be not having an income for the time you spend on trail. This is why it’s important to figure out ahead of time what you’re trail costs will be, put together a budget and then start saving for your hike long before you get on trail. Hiking the PCT is hard enough without having to worry about whether or not you have enough money to make it to Canada.
Disclaimer: http://www.The-Hungry-Hiker.com is a participant in the Amazon Affiliate Links and Skimlinks Program, affiliate advertising programs designed to provide a means for sites to earn advertising fees by advertising and linking to Amazon.com and other affiliated sites at no cost to you. Please note, I only link to products and services I personally use and trust.
Inspired? Pin It!