Want to go on an overnight backpacking trip and have no idea where to start with planning a trip like this? Trip planning for an overnight backpacking trip can be overwhelming and intimidating for a lot of people, especially if you’re new to backpacking.
I’m going to share with you some of my favorite tools I use to plan overnight backpacking trips, in hopes of helping you learn how to plan either your first or next overnight backpacking trip of your own.
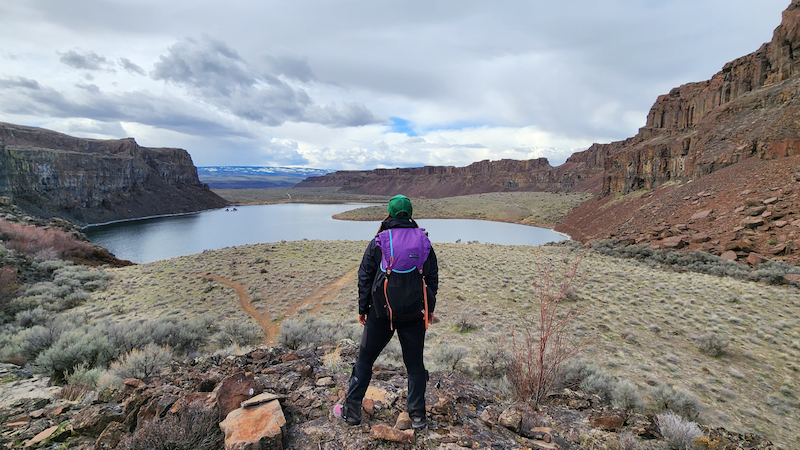
I recently took a group of my students from my online backpacking program for women, The Confident Solo Female Backpacker System out for an early season overnight backpacking trip to Ancient Lakes, here in Washington State. This turned out to be a very fun, successful and amazing trip!
In this blog post, I’ll walk you through my entire process of how I planned this trip for my students including how I decided where to go, why I chose this specific location and some of my favorite resources I used to plan our trip. Then I’ll share with you a special online tool I created that will help you start planning your first or next overnight backpacking trip.
If you’re feeling a little overwhelmed with the trip planning process, it’s okay. Trip planning for any trip, no matter where you’re going and how long you plan on being out there can be overwhelming for a lot of backpackers, AND not just beginner backpackers, but also experienced backpackers as well.
Here’s how I planned our recent overnight backpacking trip to Ancient Lakes. Starting with how I decided where to go for our group overnight backpacking trip.
How I Decided Where To Go Overnight Backpacking
When planning a group trip for my students, I always start by taking the trip objective and the experience level of my students into consideration when deciding where to go.
My objective for this group trip was to give my students a chance to practice using their gear in a low risk setting while having fun. I knew for most of the students in the group, this would be their first overnight backpacking trip this year. This would also be considered an early season trip, a first for a majority of the group. I wanted to pick a place where they could safely and comfortably ease back into the backpacking season, apply what they’ve been learning in my program out on trail and have fun while they’re out there.
The time of year is another consideration I kept in mind when deciding where to go. We would be going on our overnight backpacking trip in March, which is still considered winter/early season here in Washington. When most places, especially at a higher elevation are still covered in snow, I knew Ancient Lakes over in Eastern Washington would be a good option, terrain and weather-wise. This time of year, the temperatures can be milder than most areas in Western Washington. There’s very little elevation gain and there’s no snow on the ground. Ancient Lakes is also a great option for this time of year because during the warmer months, the snakes and ticks come out, the area is exposed with very little shade and the water sources are extremely limited.
I also wanted to keep the total trip mileage and daily mileage in mind for my students. Since I knew this would be the first overnight backpacking trip of the year for most of the group, I didn’t want to pick a place where we’d have to hike a lot of miles just to get to camp.
Ancient Lakes has a number of different trails with multiple trailheads to access the area. I could make this trip – the hike to camp, water and our day hikes throughout the trip – as long or as short of a hike as I needed to, while keeping my students in mind.
I also didn’t want to have to deal with needing to secure a permit for this trip. There’s no permit needed to camp anywhere at Ancient Lakes. All of the tentsites are first come, first served and free. The only permit required is the Discover Pass at the trailhead.
Something else I wanted to take into consideration when choosing a place to take my students backpacking was picking an area that I was already familiar with. Since I would be leading the group, I wanted to pick a place where I felt comfortable and had been before.
I’ve day hiked the Ancient Lakes area multiple times before. I was familiar with the drive to get to the trailhead, the different trailheads we could start our trip from, the tentsites in the area, the terrain we’d be hiking through, and all of the day hike options we’d have while we were out there. I also knew that this area would be well-traveled and that we wouldn’t be the only group out there.
Research
Part of my research for this trip included previous day hikes I’ve been on out in this area. I was familiar with the drive to get to the trailhead, the different trailheads we could start our trip from, the tentsites in the area, the terrain we’d be hiking through, and all of the day hiking options we’d have while we were out there.
I also read current trip reports for the area on both the WTA website and AllTrails, to get a feel for the current trail conditions.
Then, I looked at a map and created a route using Gaia GPS to determine our total trip and daily mileage, possible places to camp, water sources and day hiking options in the area.
While doing my research, I also learned that there would be limited water sources in the area. Even though there were lakes nearby, they wouldn’t be safe to drink out of, even if we filtered the water because all of the water in the lakes were irrigation runoff.
For this trip, we’d have to carry in a large amount of water on Day 1 and then plan to hike down to the river, which would be a 6-mile hike roundtrip from camp and back, to collect and filter safe drinking water to bring back to camp.
Also, while doing my research, I learned that since it was still considered early season (meaning that the area would be cooler days and even colder nights), local wildlife like ticks and snakes wouldn’t be an issue yet.
Checking The Conditions
Once I’ve completed my research for the Ancient Lakes area, I started checking the trail conditions, road conditions and weather forecast to get an idea of what we could expect while being out there.
Each day up until leaving for trip, I would look for any new trip reports on both the WTA website and AllTrails.
Since I knew I’d have to travel over a mountain pass to get to Eastern Washington, I also kept an eye on the road conditions for Snoqualmie Pass through the Washington State Department of Transportation (WSDOT) website.
And for weather, I checked the current weather forecast through the National Weather Service or NOAA website for the Ancient Lakes area a week prior to leaving for the trip, a couple of days before the trip and then again, the night before and morning of leaving for the trip, just to see if anything had changed.
Planning The Trip
Then for the actual planning for the trip, I used the routes I created on Gaia GPS to note total trip and daily mileage, elevation gain/loss, nearby trailheads and parking lots, possible tentsites, potential water sources and multiple day hiking options in case we wanted to make our hikes during the day shorter or longer.
Once I put together a plan for the whole trip and plotted out a route for each day we’d be out on trail, I put together my meal plan for the trip based on the number of days we were planning on being out on trail. Then I packed up my food and moved on to deciding what backpacking gear to bring for the trip.
Backpacking Gear To Bring
If you’re interested in seeing the backpacking gear I brought with me for this trip, check out my LighterPack.com list for this trip.
Keep in mind when deciding on what backpacking gear to bring for your trip, you’ll need to consider how long you plan on being out there, how many miles you plan on hiking during your trip, both daily mileage and overall trip mileage, the time of year, the forecasted weather for the area, the type of terrain you’ll be traveling through and camping on and nearby water sources..
There’s a lot of information out there about backpacking gear, but how do you sort through all of the information trying to figure out what gear is going to work for you, the type of trip you want to go on and the area and/or climate you’ll be hiking in?
I’ve put together a free Backpacking Gear Packing List you can download and print out to use when planning your trip. This packing list will help give you an idea on what gear you’ll need to bring with you for an overnight backpacking trip.
READY TO START PLANNING YOUR OVERNIGHT BACKPACKING TRIP?
Now that you’ve seen how I planned my recent overnight backpacking trip with my students using some of my favorite trip planning resources, you’re probably excited about planning your own trip, but maybe you’re still feeling overwhelmed about the whole process. This is why I created a special online tool that will help you start planning your first or next overnight backpacking trip.
Introducing The Hungry Hiker Backpacking Trip Planning Masterclass, a step-by-step guide on how to plan your first or next overnight backpacking trip.
The Hungry Hiker Backpacking Trip Planning Masterclass will cover everything (in detail) from how to prepare, research and plan for your trip to the backpacking gear you’ll need.
This masterclass also includes navigation and trip planning video tutorials and digital and printable trip planning resources along with tips and tricks for first time solo backpackers.
This online class is self-paced so you can work through all of the material at your own pace and easily fit it into you own schedule and time zone whenever you’re ready to start planning your trip. Once enrolled, you’ll have lifetime access to the class so you can refer back to it whenever you’re planning future overnight backpacking trips.
If you’re ready to finally start planning your overnight backpacking trip this year, then this masterclass will help you get to the trailhead.
CLICK HERE to learn more and sign up for The Hungry Hiker Backpacking Trip Planning Masterclass.
Disclaimer: The-Hungry-Hiker.com is a participant in the Amazon Affiliate Links and AvantlInks Program, affiliate advertising programs designed to provide a means for sites to earn advertising fees by advertising and linking to Amazon.com and other affiliated sites at no cost to you. Please note, I only link to products and services I personally use and trust.
Inspired? Pin It!

1 Comment on How to Plan Your First (Or Next) Overnight Backpacking Trip