New to winter hiking? Trying to figure out what to wear? Have no idea what hiking gear you’ll need to bring?
When you have the right gear, wear the right winter hiking clothing layers and take careful precautions when planning a winter hike, hiking during the winter can be fun and a whole lot less intimidating.
I’m going to share with you all of my favorite winter hiking gear including what I wear, the hiking gear I use, some of my favorite winter hiking tips and how I plan and prepare for winter hikes.
What I Wear Winter Hiking
Wearing the right winter hiking clothing layer system is super important when it comes to being safe and comfortable when out on trail during the cold months. If you wear too many layers, you risk ending up a hot, sweaty mess, which can ironically leave you cold and miserable. If you don’t wear enough layers, you risk shivering and being cold and miserable and in extreme cases, can lead to hypothermia.
During the winter, you’ll want to avoid sweating when hiking as much as possible. My motto for dressing for a winter hike is always to: Be bold and start cold. Once you start moving, you’ll warm up, but as soon as you stop for a break, be prepared to bundle up and add layers. It’s much easier to stay warm than it is to try and get warm when you’re already cold. Adjust your layers throughout your hike so that you always stay warm and dry.
Winter Hiking Clothing Layer System
When trying to figure out what I’m going to wear for a winter hike, I always think about dressing in layers that will keep me both warm and dry from weather and sweat.
Here’s my winter hiking clothing layer system:
Base Layers. The goal of base layers is to wick sweat off of the skin and help you stay dry. This is going to be the layer that is the closest to your skin. Look for materials such as synthetic fabric, merino wool or a polyester blend.
Avoid cotton. No cotton t-shirts, sweatshirts, sweatpants, socks or underwear. Cotton is rotten because once it gets wet, it stays wet, becomes heavy and loses any insulating properties, leaving you feeling cold for the rest of your hike.
My winter hiking base layers include my synthetic, moisture wicking sun hoodie, the Outdoor Research Echo Sun Hoodie and a thicker pair of hiking leggings that has lots of convenient pockets like the Athleta Headlands Hybrid Cargo Tights.
Mid-Layer. Mid-Layer is the insulating layer. The goal of a mid-layer is to help retain body heat and protect you from the cold. Look for materials such as fleece, wool, down or synthetic materials.
It’s important to note that with down, it isn’t warm if it gets wet. Synthetic down tends to hold up better in wet weather. If you’re going to be hiking in a wet or humid climate, you might want to consider choosing a synthetic alternative to down for your mid-layer.
My winter hiking mid-layer is always my Melanzana Micro Grid fleece dress that I’ll often also wear as an outer layer, depending on the weather.
I always wear a synthetic puffy vest because it’s still breathable without covering my arms, but also keeps my core nice and warm.
I also pack a lightweight synthetic puffy jacket like my Enlightened Equipment Torrid Jacket for an extra mid-layer to use when stopped for breaks so that I stay warm.
Outer Layer. An Outer Layer is considered the waterproof shell that will help protect you from the wind, rain and snow. Look for waterproof, water-resistant, breathable shells made of Gore-Tex. Gore-Tex will be your friend in the wet conditions.
Look for an outer layer that is also packable so you can stuff it in your pack when you aren’t wearing it. Also, check to see if your outer layer jacket has pit zips, which are zippers underneath the armpits that will help with ventilation and provide good airflow while you’re wearing your outer layer with all of your layers underneath.
For my winter hiking outer layer, I always pack a lightweight, waterproof rain jacket like my Enlightened Equipment Visp Jacket and a pair of Outdoor Research Gore-Tex leg gaiters to help keep my legs and feet warm and dry.
Footwear and Socks. When hiking in the winter, I like my shoes to be lightweight, but I also like having more ankle support and protection from the elements than what I would usually wear in the warmer months. The winter hiking shoes I’ve been using this year are the Salomon Outpulse Mid Gore Tex Womens Hiking Boots.
For socks, I’ll always like to wear a slightly thicker merino wool sock with some extra cushioning during the winter, like a pair of the Darn Tough Micro Crew Cushion hiking socks, just to make sure my feet stay comfortable, warm, dry and blister free.
Winter Hiking Accessories can include:
- A Buff or neck gaiter for some extra warmth or protection around your neck and face
- A pair of liner gloves. Mine are touchscreen compatible so I can still use my phone without having to take my gloves off.
- A beanie or a hat to hike in like a Trucker hat
- A pair of sunglasses for the blue bird days or even to help with the reflection from the snow
Hiking Gear I Bring Winter Hiking
When thinking about the hiking gear I want to bring for a winter hike, I always want to make sure I pack the right gear for the right conditions. I always want to be prepared for the worst-case scenario.
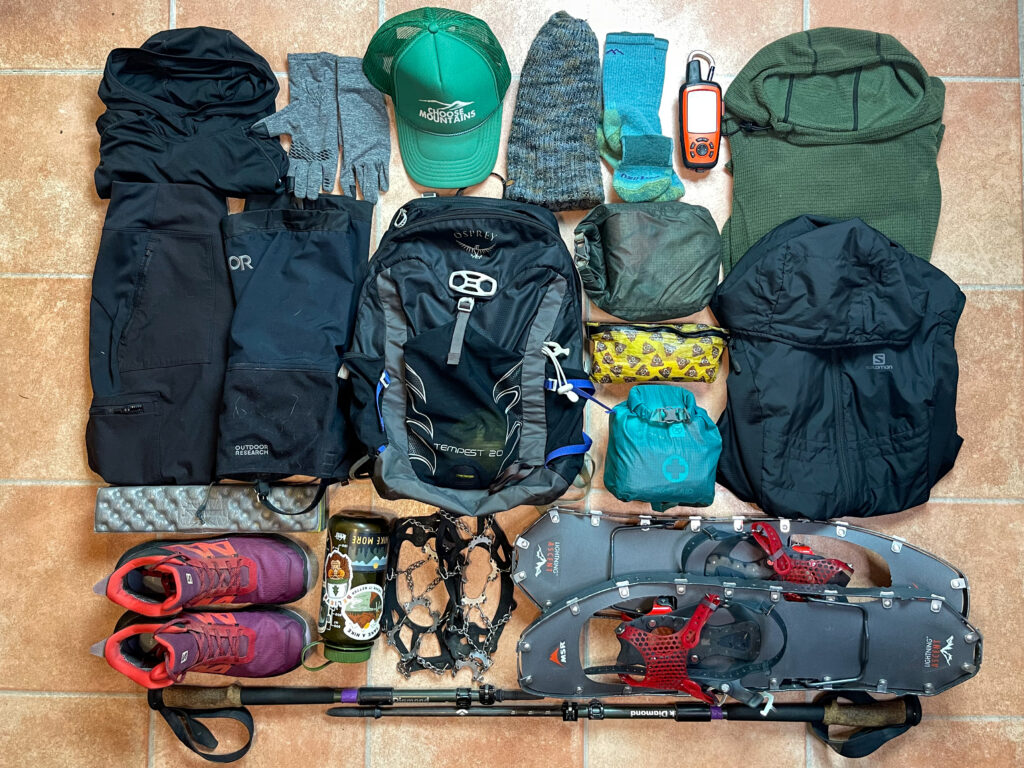
Here’s the hiking gear I bring with me on a winter hike:
For more stability when traveling over snow or ice, I bring traction devices like a pair of microspikes or snowshoes along with a pair of trekking poles with snow baskets so they don’t sink down into the snow.
I like to bring a butt pad so I don’t have to sit my butt down on the wet, cold ground whenever I stop for lunch or a break
I carry the water I drink out on trail in a Nalgene bottle, which helps prevent my water from freezing and I also store my water bottle upside down so that the water will freeze from the bottom, making it so that I can still drink my water out of the top of the bottle.
The 10 Essentials. Always pack the 10 Essentials for any hike you go on, no matter what time of the year it is. The 10 Essentials include: Navigation, illumination, shelter, extra clothing, extra water, extra food, sun protection, fire, knife and gear repair and a first aid kit. For more information on the 10 Essentials, be sure to check out my blog post, “What are the 10 Essentials”.
During the winter, I always bring with me my 11th Essential, which is always a warm drink like a hot cocoa or tea and keep it in a thermos so that it stays nice and warm while I’m out in the cold.
Make sure to bring plenty of snacks and an easy to eat lunch. You’ll want snacks that are quick and easy to eat while hiking or if stopped for a quick break. And always bring more food than you think.
A Satellite Communicator or PLB. I carry a Garmin inReach Explorer+, which is a satellite communicator. It has an SOS button in case I find myself in an emergency, I can check the current weather forecast for where I’m at on trail and I have two-way messaging not only with friends and family, but also emergency first responders to let them know the exact nature of my emergency so they can send help if I need it.
Depending on how far I go, I might also pack an external battery pack and charging cords to make sure I have a way to charge my electronics when out on trail because cold weather tends to drain batteries.
A pair of hand warmers in case my hands get really cold during my hike along with a pair of liner gloves.
And I make sure to use a big enough pack to carry all of my extra winter hiking gear in
My Favorite Winter Hiking Tips
Here are some of my favorite winter hiking tips.
Tip #1: Keep Mileage Low & Go Slow
Winter hiking is challenging and requires more energy than summer hiking so anticipate traveling slower when you’re out there and give yourself plenty of time to make it back to the car before it gets dark.
Tip #2: Give Yourself Plenty of Time
Give yourself plenty of time to stop and make clothing layer changes, adjust gear, take breaks whenever you need them and check your navigation tools to make sure you’re still on trail, especially if the trail is covered in snow. Remember, there’s less sunlight and the days are shorter in the winter so make sure you give yourself plenty of time.
Tip #3: Navigate Like A Pro
Whatever navigation system you choose to use, make sure you know how to use it before getting out on trail. If you’re using a paper map and compass, make sure you know how to use them. Otherwise, they are just deadweight in your pack.
If you’re using a digital map like the Gaia GPS app, make sure you not only know how to use the app, but that you’ve also downloaded the map for the area you plan on traveling in before leaving cell or WiFi service AND don’t forget to charge your electronics before your hike!
If you’re using digital maps, it might also be a good idea to bring along an external battery pack so that you have a way to charge your electronics should any of your batteries get drained due to usage and/or cold weather.
Tip #4: Know How To Use Your Gear
Not only do you want to know how to use your navigation system, but you’ll also want to know how to use any of the gear you choose to bring with you on your hike. This is especially important if you’re using a satellite communicator.
Make sure you know how to send a message, turn the tracking on and off, be familiar with knowing how to check the weather on the device or through the pairing app and know how and where to press the SOS button should you need in an emergency.
If you’re using traction devices like snowshoes or microspikes, practice putting those on at home over the shoes you’ll be hiking in so that you’re comfortable putting them on at the trailhead or when out on trail
Tip #5: Keep Your Electronics Warm
When hiking during the winter, always do your best to keep your electronics warm. Cold weather can suck the life out of electronic batteries. Store your electronic devices, batteries and power bank close to your body throughout your hike so that the cold air doesn’t drain their battery life.
Look for chest pockets, internal jacket pockets, hip belt pockets or even consider using a fanny pack to store your electronics in while you’re hiking.
Tip #6: Snack Often
Snack often whenever you’re out winter hiking. Fuel the furnace. You’ll burn a lot of calories when hiking in the cold. The easiest way to do this is to make it a habit to snack every hour when you’re out hiking or eat a quick snack each time you stop for a break, Also, pack the food and snacks you love because you’ll be more likely to eat it.
Tip #7: Stay Hydrated
Staying on top of your hydration is much more challenging when it’s cold out. Get in the habit of taking a sip of water every time you stop for a break. Also, make sure you take precautions to prevent your water from freezing. Avoid using a water hydration reservoir and drinking tube in the winter because they tend to freeze.
If you do use a reservoir, make sure the reservoir and the tube are insulated and blow back through the tube after every drink.
Or, use a Nalgene bottle and store it upside down so only the water at the bottom of the bottle freezes, not the top where you drink out if.
Tip #8: Take Shorter Breaks
When hiking in the winter, you’ll want to take shorter breaks and avoid sweating at all costs. Don’t give your body a chance to get cold. As soon as you stop for a break, remove any wet clothes and put on an insulating layer like a fleece, puffy jacket and a pair of gloves. It’s much easier to stay warm than it is to try and get warm once you’re cold.
If sitting down on your break, use something insulating to sit on the cold ground with like a butt pad. This way you’re more likely to stay warm while you’re stopped.
Tip #9: Prevent Hypothermia & Know The Symptoms
Help prevent hypothermia by knowing the symptoms before its too late. Hypothermia happens when the body gets to an abnormally low body temperature, usually from exposure to extremely cold temperatures. Signs to look for with hypothermia include shivering, exhaustion or feeling tired, confusion, fumbling hands, memory loss, slurred speech or drowsiness.
To avoid hypothermia, make sure you stay warm when you’re out on trail. Wear clothes that insulate, even when wet. Avoid cotton and instead wear wool and synthetic materials because these types of materials will insulate you even if they’re damp.
Bring a pair of gloves, pack an extra pair of warm socks, bring a hat, a buff and have a couple packets of hand warmers in your pack, just in case. Try to have a change of dry clothes in the car waiting for you after your hike.
How To Plan and Prepare For A Winter Hike
Okay, so you’ve figured out what you’re going to wear on your winter hike, got your winter hiking clothing layer system dialed in and know what hiking gear you want to bring with you. Now it’s time to plan your hike,
Here are some of my favorite tips on how to plan and prepare for a winter hike:
Figure Out Where To Go
You’ll want to start by figuring out where you want to go for your winter hike:
- Check out a detailed trail map for the area you want to go hiking in
- Look up trail guidebooks for the area you want to go hiking in
- Find an online trail association for the state you plan on hiking in to get detail information about the trail including mileage, elevation gain and current trip reports. If you’re in Washington State, I highly recommend using Washington Trails Association or WTA as a resource.
- Look up trails online through social media including hiking specific Facebook Groups
- Talk to people who work in local outdoor retailers and ask for recommendations on where to go
- Visit national and state park websites
- Refer to trail apps like Gaia GPS, AllTrails or the FarOut app
When deciding on where to go for your winter hike, make sure you choose your destination wisely. Play it safe! Your favorite summer hike might be dangerous in the winter. Pick a safe, low technical, low mileage and low avalanche risk route.
Check Conditions
You’ll always want to check the conditions before venturing out for any hike you decide to go on, no matter what time of the year it is, especially during the wintertime. You’ll want to check conditions like:
- Trail conditions by reading trip reports and trail alerts. You can usually find these through your state’s trail association or an online hiking guide
- Check road conditions with your state’s Department of Transportation, especially if you plan on driving over mountain passes.
- Check the weather AND avalanche forecast for the area you plan on hiking in. I’d recommend starting to check the conditions a week before your planned hike, a couple of days before and then again, the morning of when you plan to go. Check the conditions often since conditions in the mountains can change quickly.
Here’s a list of winter hiking resources to use when planning your next winter hike:
- What are the 10 Essentials?
- Hiking Guide on WTA
- American Trails – Resources By State
- Washington State Non-Motorized Sno-Parks
- The Mountaineers Activities
- Washington Trails Association
- WSDOT Road Conditions
- National Weather Service
- Mountain Forecast
- Northwest Avalanche Center (NWAC)
- FREE ONLINE COURSE: Basics for Backcountry Recreation, presented by NWAC (Northwest Avalanche Center)
Make A Trip Itinerary
Put together a trip itinerary for your winter hike and make sure it includes:
- When and where you’ll be starting your hike from
- Where you will park your car
- Your intended hiking destination
- Your expected return time and date
- Your emergency contact information
- The make, model and license plate number of your car
- And contact information for the local authorities in the area you’ll be hiking
Leave a copy of your itinerary at home with someone you trust, along with keeping a copy of your itinerary in your car. If someone doesn’t know you’re missing, they won’t know to come looking for you. Make sure you stick to your itinerary. This way if someone has to come find you, they’ll know exactly where to go.
Set A Turnaround Time
Set a turnaround time for your hike and then stick to it., even if you don’t make it to your intended hiking destination. Winter hiking is harder and generally takes longer than when hiking in the summer. There are more obstacles on trail like snow, which can be slow to travel in, possible blowdowns and low hanging, snow-covered trees to navigate around and there’s less day light, making for shorter days.
Also, always be okay with turning around if you need to. Conditions can change quickly in the mountains, especially during the winter. The weather can change, there could be obstacles on the trail, you could get cold and wet, sometimes the hike takes longer than you anticipated, or you might even start to run out of daylight.
Make Sure Your Car Is Winter Ready
Take the time to make sure your car is winter ready prior to your hike. Before leaving, check your car and tires. Make sure you have plenty of gas and good snow tires and/or chains in the car…and know how to put them on properly!
Also, consider carrying emergency items in your car like blankets, extra clothing, extra food, water, a shovel, flashlight/headlamp, a first aid kit and jumper cables.
I hope you found this helpful with planning your next winter hike and are now excited to give winter hiking a try. Remember, winter hiking can help extend your hiking season, making it so you can hike all year-round and it’s a great way to physically train for the upcoming backpacking season.
READY TO MAKE YOUR SOLO BACKPACKING GOALS A REALITY? If you want to learn how to be more comfortable and confident with getting out on trail by yourself or want to take a more leadership role with planning future backpacking group trips with your friends, family or kids, CLICK HERE to schedule a time with me to see if we’re a fit to work together inside The Confident Solo Female Backpacker System.
Why I Created An Online Backpacking Program For Women
Learn More About The Confident Solo Female Backpacker System
Disclaimer: The-Hungry-Hiker.com is a participant in the Amazon Affiliate Links and AvantlInks Program, affiliate advertising programs designed to provide a means for sites to earn advertising fees by advertising and linking to Amazon.com and other affiliated sites at no cost to you. Please note, I only link to products and services I personally use and trust.
Great post! I’m planning to go winter hiking for the first time this weekend and your gear recommendations were super helpful. Do you have any tips on how to stay warm and dry during the hike? Thanks! 😊
My best piece of advice is to “Be Bold, Start Cold.” That means wearing less layers coming out of the parking lot so that you don’t start to sweat as you make your way up the trail. As soon as you feel yourself start to sweat, stop and do a layer change. Then as soon as you stop for a break or start heading back downhill, put all of your layers back on so you stay nice and warm while you’re not working as hard.
Once you start sweating, it’s hard to get dry (both yourself and your clothes) and then once you stop hiking (take a break/start going back downhill), it will be really hard to warm back up. Avoid sweating during the your winter hikes at all costs.
Do you have a good method for strapping snowshoes to a backpack like the one in the gear pic?