![]()
Last week, I got to check something pretty big off of my bucket list…I went solo backpacking along the Trans Catalina Trail down in Southern California.
Here’s the video where you can join me for my hike and see for yourself what hiking the Trans Catalina Trail is like (in January):
Since so many of you always have questions about how I plan my solo backpacking trips, I wanted to put together a trip planning guide showing you exactly how I planned my recent Trans Catalina Trail hike.
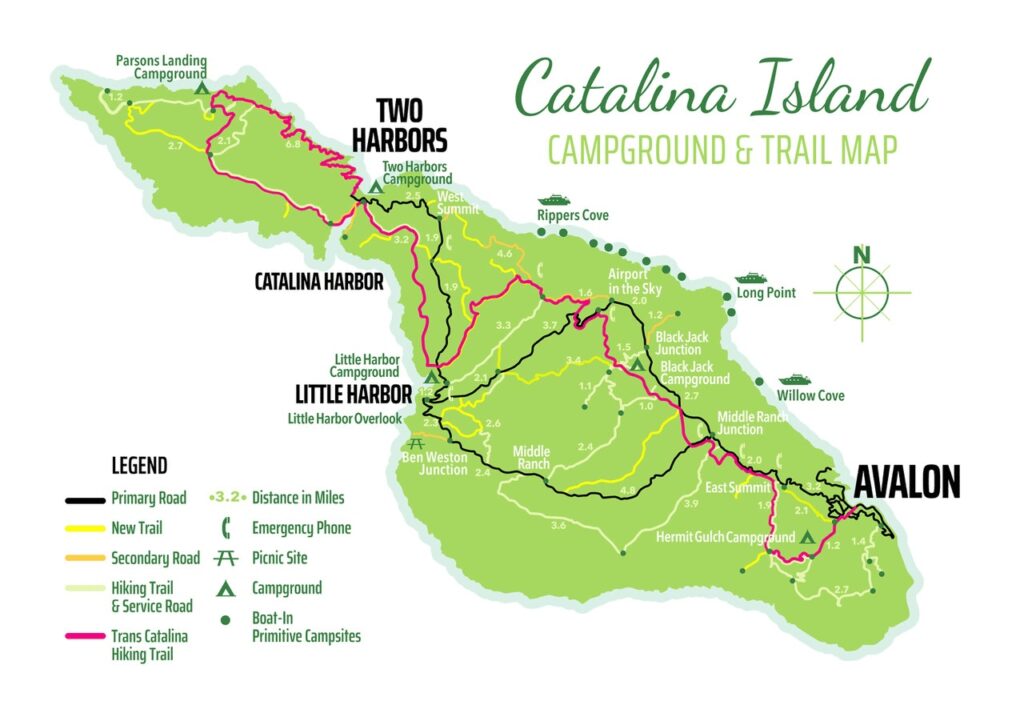
The Trans Catalina Trail is a 38.5 mile thru-hike along Catalina Island in Southern California with (according to the FarOut Guide app) has a total elevation gain of 11,176 feet.
This is NOT a flat hike. The daily mileage for this trail might be shorter than other hikes, but the ascents and descents along the TCT are pretty steep and there doesn’t seem to be any switchbacks. It’s just straight up in a lot of places along the trail.
The Trans Catalina Trail was a tricky and expensive hike to plan. Since the Trans Catalina Trail is on an island (Catalina Island), you have to take a ferry to get there. Then, once you get there, you need to have reservations for each of the campsites you camp at.
The campsites aren’t cheap either. Each campsite is about $30 per PERSON, not per campsite. This means if you have a group of 4 staying at a campsite, each person has to pay $30, making the campsite total for the night $120 for a group of 4. Link to book campsites on Catalina Island
There’s no dispersed camping allowed anywhere on the island and with limited campsites available, the reservations for the sites book up pretty quickly.
My Trip Itinerary for the Trans Catalina Trail
Here’s how I got to Catalina Island.
After flying into LAX, I took an Uber to Long Beach and checked into my hotel room for the night.
The next morning, I got up early, took an Uber from Long Beach to San Pedro and caught the Catalina Express. Catalina Island is an hour and 15-minute ferry ride from San Pedro to Avalon.
Avalon is where I started my Trans Catalina hike from. Before I left Avalon, I headed to Vons for a quick resupply to grab lunches for the trail and stopped by the hardware store to pick up a fuel canister since you can’t bring fuel canisters on the ferry.
Day 1: From Avalon, I hiked 10.8 miles and up 3,970 feet of elevation gain to my first campsite, which was Black Jack Campground.
Day 2: I hiked 8.1 miles from Black Jack Campground to Little Harbor Campground. Less than two miles after climbing out of Black Jack Campground, I made a short a detour and stopped for a proper breakfast at the Airport in the Sky. Totally worth the detour.
Day 3: I hiked 5.4 miles from Little Harbor Campground to Two Harbors. This was probably my most favorite day of hiking on the trail. The morning started off pretty foggy and with lots of climbing, but when the fog burnt off in the early afternoon, there were tons of beautiful ocean views.
Day 4: I was supposed to pick up my locker key for my water and firewood and hike from Two Harbors to the Parsons Landing Campground. But, due to heavy rain, all the trails on the island were closed for the day by the rangers.
I ended up spending two nights in a tent cabin at the Two Harbors Campground while it rained.
Day 5: I caught the ferry back to San Pedro in the morning and spent the rest of the day in Long Beach, unpacking, eating and getting cleaned up before for my flight home.
Since I didn’t get to hike to Parsons Landing, I ended up only hiking 24 miles of the trail for this trip.
I want to give a special shoutout to the Visitors Center in Two Harbors. The staff here was incredibly friendly and extremely accommodating. I had originally booked a traditional campsite on Day 3 at the Two Harbors Campground, but they were able to move me to a tent cabin so I didn’t have to camp in the rain. Then when the trails on the island were closed the next day due to all the heavy rain, they transferred my reservation for Parsons Landing to another night in the tent cabin so I didn’t have to camp out in the rain.
Weather on Catalina Island
I hiked the Trans Catalina Trail in January, which is technically wintertime and is considered Catalina Island’s off-season and rainy season.
The weather during my hike was anywhere from low 50s to high 60s. Each morning started off with a heavy layer of fog, but it would burn off before lunchtime, leaving behind lots of sunshine. Then by the end of the day, the fog would roll back in again.
On the night of my Day 3, it started raining and didn’t stop until the morning I left the island to head back to San Pedro.
I don’t recommend hiking the Trans Catalina Trail in the rain. Most, if not all of this trail is exposed. And when the dirt on the island gets wet, especially with the heavy downpour I got to experience during my trip, it turns into a thick, heavy, clay-like substance and wasn’t very fun to hike in.
I prefer to travel during the shoulder/off-season for busy trails like this one so I can avoid the crowds and have a better chance of getting the campsite reservations I want.
Plus, since most of the trail on Catalina Island is dry and exposed, I wanted to hike this one with slightly cooler weather.
Trail Terrain Along the Trans Catalina Trail
The Trans Catalina Trail reminded me so much of hiking along the Pacific Crest Trail in Southern California. Everything from the desert landscape to a lack of natural running water sources, quite a few road walks and plenty of interesting landmarks to see along the way.
I really enjoyed the vibe of this trail. After Little Harbor, there were tons of beautiful ocean views – something that’s really unique to this trail.
Navigation System
My navigation system of choice for this hike was the FarOut Guide app. Once I downloaded the map and waypoints for the trail on my phone, I used the app while my phone was in Airplane mode and got all the information I needed for the trail while I was out there including:
- GPS to know exactly where I was at while I was on trail
- The routes I created for each day while I was out there to show the daily mileage and elevation gain and loss
- And information, photos and user comments for each of the waypoints along the trail, which were all pretty helpful
Water Sources on the Trans Catalina Trail
Even though there weren’t any natural running water sources along the trail, each campsite on the island had water spigots. The water spigots at Black Jack Campground were turned off because they were repairing a broken pipe, but there were boxes of bottled water available for hikers to use.
There were also a couple, random working water spigots I found along the trail that weren’t listed on my map.
I did pack my normal Water Filtration System for this trip including my Sawyer Squeeze water filter but ended up not needing to use it during my hike.
Clothes I Hiked In
Here’s what I wore for my Trans Catalina Trail hike in January:
Duluth Trading Co. Flexpedition Pull-On Slim Leg Pants Since I was hiking during the winter, I opted for hiking in trekking pants instead of a pair of running shorts. I love that these pants are light, comfortable to hike in, have decent-sized pockets and are fairly water-resistant.
Purple Rain Skirts Adventure Dress This was my first time wearing my new Adventure Dress while hiking and I loved it! It was comfortable, covered my rear end when hiking, was easy to layer with my other clothes, has two big pockets on the sides and I could wear it as a town or beach dress while at camp.
Sun Hoodie I loved hiking in a sun hoodie because its light and provides great coverage from the sun. The only thing I’d do differently is opt for a lighter color instead of black. Black is just too hot for me to hike in when in exposed areas, even when it’s cloudy out and the temps are on the cooler side.
Trucker Hat (with a wide brim) An all-year-round hiking essential for me
Sunglasses Another all-year-round hiking essential for me
Footwear
Shoes: Altra Lone Peak 7s
Socks: Darn Tough socks
Gaiters: Super cute pair of Ultra Gam Gaiters to help keep rocks and debris out of my shoes.
Thru-Pack Summit Bum Fanny Pack to keep my camera, phone, sunscreen, sunglasses, extra batteries and wallet in.
OR Gore-Tex Crocodile Gaiters At first, I thought might have been overkill with the forecasted rain but ended up being very happy I had these with me on the dewy mornings and then later having to hike through thick, heavy mud.
My Cooking System
For this trip, I splurged and treated myself to some of my favorite Peak Refuel and Mountain House freeze-dried backpacking meals. I only needed boiling water to make my dinners so I brought my JetBoil Stash Stove, long handled spoon and my DIY backpacking food cozy to help rehydrate my dinners faster.
I also loaded up on some of my favorite snacks from Trader Joes and made myself Backcountry Foodie’s Peanut Butter Protein Shakes for breakfast.
I stored all of my food in my 10-liter AllMitey Ursack, but each of the campsites I stayed at along the TCT had metal fox boxes to store food and smelly items in while at camp.
Backpacking Food I Packed
As far as the number of meals I packed for this trip, I brought three breakfasts, 3 dinners, tons of snacks, electrolytes and got three lunches at the Vons in Avalon as soon as I got to the island.
Places to Eat on Catalina Island
There are a couple of places you can eat at on Catalina Island along the TCT, which meant having to carry less food in my pack. You can opt to eat in one of the restaurants in Avalon or grab something to go at Vons.
On Day 2, I stopped at the Airport in the Sky to have a proper breakfast. There was also a lunch menu, snacks and lots of cold drinks available too.
In Two Harbors, there’s the general store where you can do a small resupply, get some pre-made sandwiches and even order pizza. Sadly, the restaurant was closed for the entire month of January due to construction.
Wildlife on Catalina Island
There’s plenty of wildlife on Catalina Island including birds, foxes, rattlesnakes, ticks and bison. I could even hear sea lions from my tent cabin at Two Harbors.
Bison are actually not native to Catalina Island. Fun fact about the bison on the island: A movie crew in the 1920s left behind a small herd, which has grown to a herd of 150 bison today.
Sadly, I didn’t get to see a single bison during my hike.
Backpacking Gear I Used
During my hike along the Trans Catalina Trail, I got to try out a new tent – my very first trekking pole tent, which is the Durston X-Mid 1 Solid along with the groundsheet. Not only was this my first time using a trekking pole tent, but I also got to set it up at night and in the rain.
I really loved this tent and will be putting together a detailed video in the future comparing it with a couple other tents I’m currently trying out.
If you want to know more details about all the backpacking gear I brought with me and used on my TCT hike, click here to check out my complete gear list along with links for each item listed.
2024 Trans Catalina Trail Backpacking Gear List
Also, if you’re in the process of planning an overnight backpacking trip, make sure you download my FREE Backpacking Gear Packing List to help you get organized for your trip.
My Thoughts About the Trans Catalina Trail Campsites
As far as the campsites on Catalina Island go,
Hermit Gulch was the first campsite along the trail, coming out of Avalon. I didn’t stay there, but the campground seemed huge. This would make a nice option for a Day 1 if you wanted to spend more time in Avalon, before starting your TCT hike.
Black Jack Campground was my least favorite campground. It was high up on the island and not very scenic. There were vault toilets, fox metal boxes, trash, picnic tables and bottled water available since the water spigots were turned off.
Little Harbor Campground was the most remote site I got to stay at along my hike and my most favorite place to stay on my trip. It was right on the beach and there was no cell or WiFi service. There were port-a-potties, fox metal boxes, trash, picnic tables, fire pits and water spigots. Plus, the view of the beach from here was pretty epic.
Two Harbors Campground was huge. There were tent sites near the beach and tent cabins throughout the campground. The campground is about a half mile hike up a steep hill from the village and is not noted as a waypoint on the FarOut Guide map. It was nice to have the tent cabins as an option during the big rainstorm while I was there.
My site also had a metal fox box, trash, a port-a-pottie, picnic table, fire pit and a water spigot, plus a pretty sweet view of the water and the rest of the campground.
Parsons Landing was probably the best campsite on the island and probably the most remote, but I don’t know for sure because I didn’t get to go because of the heavy rain.
Trip Costs for the Trans Catalina Trail
As I mentioned earlier, the Trans Catalina Trail is an expensive hike to plan. Here are some of the costs from my trip:
- Ferry ride to Avalon and from Two Harbors on the Catalina Express: $85
- 4 campsites for 4 nights on Catalina Island were: $186
- This included $30/for each night at each campsite, a $9.25 transaction fee for each campsite reservation AND for an additional $26, I opted for the 2 gallon of water and 1 bundle of firewood delivery for my reservation at Parsons Landing
- I did get charged an additional $72.00 for the tent cabin upgrade on Day 3 at Two Harbors, but was not charge for the additional upgrade the next night since the rain had closed the trails, preventing me from getting to hike to Parsons Landing
The total cost for my Trans Catalina Trail hike was $342
You can make this hike cheaper in a couple of different ways:
- You can do bigger mileage days and reduce the number of nights you’d need a campsite on the island for
- Don’t upgrade to a tent cabin at Two Harbors (or at Hermit Gulch)
- Also, if you’re looking to do an overnight hotel stay on either the front or backend of your trip, I’d recommend NOT staying in Long Beach. The hotels there were kind of pricey. Stay closer to the airport and get something a little cheaper.
My Final Thoughts and What I’d Do Differently
Some final thoughts about my hike and what I’d do differently next time:
- First, I’d hope for warmer, dryer weather. While I enjoyed being on the island in the off-season when there wasn’t a whole lot of other people was really nice, being on the island in the heavy rain was not ideal and the fog was really limiting with the views of the island in the morning. If you’re looking to do this one in the winter and early season and want to avoid rain, February might be the month to do it.
- I’d consider an overnight stay at Hermit Gulch on Day 1, spend more time discovering Avalon and get an early start on Day 2.
- I’d skip Black Jack Campground, do a bigger mileage day on Day 2 and hike all the way from Avalon to Little Harbor Campground instead
- I’d wait for the fog to burn off at Little Harbor Campground before starting my hike for the day, just so I could see all the views.
- I’d save Two Harbors Campground for my last night on the island and instead hike from Little Harbor to Parsons Landing on Day 3 with a quick lunch break at Two Harbors.
- I’d wear a lighter color sun hoodie to help keep myself cooler while hiking in the sun
- And I’d bring a sun umbrella if the forecast was calling for warm, sunny weather.
What’s Next?
I’m in the process of planning a return trip to Catalina Island later this year to hike the Trans Catalina Trail again, only this time with a group of students from my online backpacking program for women, The Confident Solo Female Backpacker System.
At the end of 2023, I asked the students in my program where they wanted to go for group backpacking trips this year and a majority of them said they wanted to hike the Trans Catalina Trail so we’re going to go hike it together.
Ladies, if you’re interested in learning more about The Confident Solo Female Backpacker System and how this program can help you achieve your backpacking goals this year, click here to schedule a free one-on-one Zoom call with me.
During our call, we’ll talk about your backpacking goals and I’ll share with you all the details of the program I’ve put together and how this program can turn your backpacking dreams into a reality. If you’re a good fit for the program, you’ll get the chance to enroll into the program during our call.
Disclaimer: The-Hungry-Hiker.com is a participant in the Amazon Affiliate Links and AvantlInks Program, affiliate advertising programs designed to provide a means for sites to earn advertising fees by advertising and linking to Amazon.com and other affiliated sites at no cost to you. Please note, I only link to products and services I personally use and trust.
Thank you for the thorough trail report and detaills. I’m planning my first solo trip 3/11-3/15/24. My biggest concern initially was running into the buffalo! Now I’m a little concerned with rain looking at the forecast. Not sure if should continue with the trip and just have some alternatives available like you did with the camping cabins or what the trail conditions will be.
Hi! Love your videos. I’m planning on hiking the trans Catalina with both my girls in October. I was wondering, did you have any issues pitching the Xmid anywhere? What stakes did you bring? I usually use mini groundhogs, but I was wondering if there were any sandy conditions where something else would be better. Thank you!
I had no problems getting my tent stakes into the ground at any of the tent sites on Catalina Island. I also didn’t camp directly on the beach for this trip.