
As a beginner backpacker, I made a TON of mistakes and have had to learn quite a few lessons the hard way. This is why I want to share with you 10 of my favorite backpacking tips for beginners including the mistakes I made and how you can avoid them as you start your backpacking journey.
Since I started backpacking back in 2016, I’ve gone on and planned a TON of overnight backpacking trips. Everything from solo backpacking along the Pacific Crest Trail to backpacking around Mount Rainier on the Wonderland Trail, hiking the John Muir Trail, solo hiking the Grand Canyon, solo hiking the Trans Catalina Trail and several group overnight backpacking trips with students in my online backpacking program for women, The Confident Solo Female Backpacker System.
I made a lot of mistakes and have learned quite a few lessons along my backpacking journey since I first started backpacking over 8 years ago.
If you’re someone who’s new to backpacking and looking to get started or maybe you’ve gone on a few overnight trips and you’re looking for some backpacking tips on how to make your next trip even better, this post is for YOU!
Backpacking Tip #1: Get A Properly Fitted Backpack
When I bought my first overnight backpacking pack, I thought the larger size pack I got meant the more stuff I could bring with me on a trip.
Although this is technically true, something I didn’t take into consideration was that I also had to carry all of that stuff, often times up a steep trail for several miles. It was only after my first couple of overnight backpacking trips (and a few tears) that I realized bigger wasn’t necessarily better when it came to my backpacking pack.
First, decide what size pack you’ll need. You’ll want to take into consideration how long your trip is, how many nights you’ll be out on trail, the season you’ll be backpacking in, the distance you plan on traveling and the backpacking gear you’ll be bringing with you. Remember, more space means more weight.
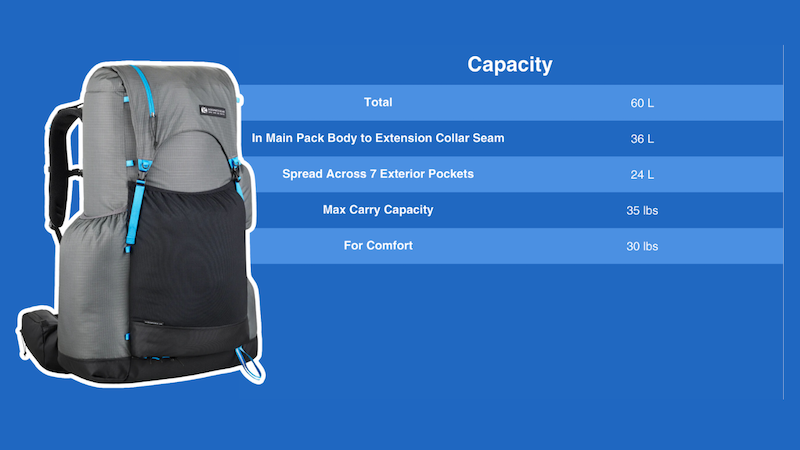
Packs are measured in liters, which is often included in the name of the pack. So for example, the Gossamer Gear Mariposa 60 backpacking pack means that this pack has the carrying capacity of 60 liters.
The carrying capacity of a pack is also known as the pack’s volume, which is the amount of space in a pack, including interior and exterior pockets.
Pay attention to a pack’s comfort and maximum carry capacity, which is usually provided by the pack’s manufacturer on their website.
For Example, according to Gossamer Gear, the Mariposa 60 has a maximum carry capacity of 35 lbs, but for comfort, they recommend carrying only 30 lbs inside the pack. This carry capacity would include all of your backpacking gear, food and water.
For maximum comfort (because you want to have fun and not have to suffer through your backpacking trip), try to never carry in your pack more than 1/3 of your body weight.
For example: If you weigh 150 lbs, the total weight of your pack with gear, food and water shouldn’t be over 50 lbs. Of course, carrying less weight is always going to feel more comfortable and be better on your body.
Something I didn’t realize when I first started backpacking was that pack size corresponds to torso length, not height. Just because you’re tall doesn’t mean you need a larger pack. Your torso length is going to be the key measurement when it comes to determining the right pack size for your body. You’ll want to start by measuring your torso correctly.
To Measure Your Torso:
Start at the C7 vertebra at the base of your neck. To find this, bend your neck and feel the first bump along the base of your neck. This bump is where you will want to start your measurement.
Next, you’ll want to find the midpoint between your iliac crest. To find your iliac crest, cup your hipbones on both sides and find the center point on your spine. This midpoint is where your thumbs should be pointing.
Finally, you’ll need help measuring from the C7 vertebra to your iliac crest and then from there, you’ll have your torso measurement.
Measure Hips & Waist:
Then, you’ll want to measure your hips and waist. To measure your hips, start with finding your iliac crest again by cupping your hipbones on both sides. Then, wrap a soft measuring tape or string around the top of your iliac crest. This will give you your hip measurement.
To measure your waist, use the same soft measuring tape and find the smallest part of your midsection, which is typically 1-2 inches above your belly button. Then measure around that area for your waist measurement.
Each pack manufacturer should have on their website their corresponding pack and hip belt sizes based off of a range of torso, hip and waist measurements. Make sure you check the specs page for the pack you’re shopping for before purchasing to make sure you get the right size pack for your body.
Also, outdoor retailers like REI will often have a pack-fit expert inside the store who can help measure you if you’re having trouble trying to do this on your own at home.
Backpacking Tip #2: Get Properly Fitting Shoes
As a beginner backpacker, I didn’t really give much thought to the shoes I wore out on trail. I thought whatever shoes I was wearing to the gym would be fine to go hiking and backpacking in and I was perfectly happy with buying whatever shoes were on sale that were in my normal shoe size.
It wasn’t until I started experiencing blisters and pain in my feet that I realized how wrong I was. Let me tell you as someone who’s feet have hiked 1,000’s of miles while wearing a loaded pack, your feet are the star of the show, and you should do everything in your power to take care of them. This means investing in properly fitted footwear so that your feet are comfortable, making it less likely that you’ll have to experience foot pain and injury.
Here are some things to consider before investing in a pair of shoes for backpacking:
- Purchase your first pair of backpacking shoes from a real-life salesperson in a brick-and-mortar store. Trained salespeople can analyze your feet and help you select the most appropriate footwear for your feet.
- Buy shoes a half size bigger than your feet. My feet tend to swell when I’m out backpacking, especially when wearing a loaded pack for long miles.
- Shop for shoes at the end of the day. Since feet tend to swell as the day goes on, shopping for shoes at the end of the day can help prevent you from buying too small of shoes.
- Try on as many shoes as you can in order to get a good feel for all of the varying fits
- Bring the socks, custom insoles and/or orthotics you plan on wearing when backpacking when shopping for hiking shoes.
- Walk around the store wearing the hiking shoes to get an idea on how they’ll feel on your feet.
- Look for breathable material that will help provide good ventilation to reduce moisture, which can help prevent blisters.
- Your toes should have enough room to move inside your hiking shoes. You should be able to wiggle your toes comfortably. This is why I’m a huge fan of having a wide toebox with all of my hiking shoes.
- You’ll also want to take into consideration durability, support and cost.
Backpacking Tip #3: Don’t Wear The Wrong Type of Shoes
Take the time to figure out the right style of hiking shoe for your own foot based on your comfort preference, the types of backpacking trips you plan on going on and the time of year you plan on going. Not every hiking shoe is going to work for every foot, for every season and for every trip.
When it comes to hiking shoes, you’ll usually hear backpackers talk about how they love either wearing trail runners or hiking boots.
With trail runners:
- They can be a less expensive, more lightweight option than hiking boots
- They’re flexible because they’re constructed with a lighter more bendable sole
- The flexible sole can also mean less support for the foot
- The low ankle cut of a trail runner can also result in less support, making it more likely to get debris inside the shoe while you’re hiking.
- Since they’re light, they can fatigue the legs much less than heavier shoes
- Trail runners require less time to break in. They’re comfortable right out of the box
- And they tend to be less durable than hiking boots and need to be replaced more frequently.
With hiking boots
- They tend to be more durable than trail runners, but they’re also a lot heavier
- They’re usually made of sturdier material like leather
- Hiking boots tend to have stiff soles and might not be very flexible
- They offer more protection for the bottoms of the feet and have more defined thread on the bottom of the shoe
- They’re designed to support the joints and help prevent ankle rolling
- They take more time to break-in so you’ll want to make sure you have plenty of time to break in your hiking boots before wearing them on your backpacking trip.
As someone who has worn both hiking boots and trail runners, I prefer both styles of hiking shoes, but it depends on the time of year and the conditions I plan on hiking in.
In the summer when it tends to be warm and dry out and I’m hiking longer miles with a loaded pack, I prefer wearing trail runners. I like wearing a pair of the Altra Lone Peaks Trail Running Shoes because they’re lightweight, comfortable, have an extra roomy toebox and dry quickly, which is a huge bonus if my foot gets wet doing a water crossing.
During the winter, when there’s more likely to be rain, snow, mud or ice out on trail, I’ll opt for a high-top hiking boot like the Altra Lone Peak All-WTHR Mid 2 Hiking Boots. I like these hiking boots because they’re lightweight, comfortable, have an extra roomy toebox, help keep my feet warm and dry and provide extra ankle support when navigating over trail obstacles in inclement weather.
Backpacking Tip #4: Don’t Wear Cotton Socks
Don’t do what I did when I first started backpacking and wear cotton socks. At first, I didn’t think that the type of socks I wore when backpacking really mattered. I was so wrong! I made the mistake of wearing cheap, cotton socks and on my first few backpacking trips, I paid dearly with some gnarly blisters all over my feet.
Invest in your feet. It’s worth the price to pay for high quality socks.
Socks:
- Can help cushion your feet
- Wick away sweat from your skin
- And prevent friction from building up in your shoe
Friction and excess sweat are a surefire recipe for getting blisters.
Cotton is rotten, especially when it comes to socks because cotton can trap heat and moisture against your foot causing painful blisters. Instead of cotton, look for materials like wool, merino wool or synthetic fibers that will help wick away moisture and help keep your feet warm when wet.
Not only do I highly recommend investing in a good pair of high-quality hiking socks, but I also recommend carrying multiple pairs of hiking socks for each trip you go on. This way if your socks get dirty or wet, you’ll have a backup pair to change into that will ultimately help keep your feet happy and comfortable throughout your entire trip.
Backpacking Tip #5: Make Sure You Use A Warm Enough Sleeping Pad
When I first started backpacking, I got to experience some REALLY cold nights out on trail thanks to my sleeping pad not being warm enough. In your Sleep System, you’ll want to make sure you not only have a sleeping bag or quilt, but also have a sleeping pad.
The goal of a sleeping pad is to:
- Insulate: Your sleeping pad will act as insulation between you and the ground
- Protect: Your sleeping pad can help prevent you from losing heat to the cold ground so you stay warm at night.
- Provide Comfort: Your sleeping pad will act as a mattress, providing you with a bit of cushion to protect your bones and joints from the hard ground.
Before you invest in a sleeping pad, you’ll want to take into consideration:
- The different types of sleeping pads available on the market
- Where you’re going to be camping
- How cold the temperatures be
- How much weight you’re willing to carry
- R-Value
- The size of the sleeping pad
I personally like using an inflatable sleeping pad because:
- They’re lightweight and packable. They typically weigh less than a pound and can pack down to the size of a 32 oz Nalgene bottle.
- You can inflate the pad with your mouth, a pump sack or a small, portable air pump via a small valve on the mattress.
- They’re semi-customizable. You can release bits of air until you find the perfect amount of cushioning.
- Different pads will have different insulation. Keep in mind, the more insulation will mean more weight.
- They’re pretty durable
Sleeping pad personal preference aside, the most important thing about a sleeping pad is its R-Value.
The R-value is a shortened way of referencing the sleeping pad’s ability to resist the transfer of heat. R stands for resistance. The higher the number, the more heat the pad retains and the warmer you’ll sleep. Basically, the higher the R-value, the more insulation the sleeping pad will have. The Standard R-value number for a sleeping pad is 3 or higher, but an R-Value for a sleeping pad can be as high as 9.5.
If you’re a cold sleeper like me, you’ll want to choose a sleeping pad with an R-value of 4 or higher.
The sleeping pad I’ve been using for all of my overnight backpacking trips over the last few years has been the Therma-a-Rest NeoAir XTherm sleeping pad, which has a 7.3 R-Value. Since I’ve added this sleeping pad to my backpacking sleep system, I haven’t had a cold night of sleep yet. This sleeping pad weighs a pound, but as someone who tends to always sleep cold, I really appreciate the warmth-to-weight ratio of this pad on those really cold nights.
Backpacking Tip #6: Use A 1-Person Tent For Solo Trips
On my first thru-hike along the Pacific Crest Trail back in 2018, I used a 2-person freestanding tent. Even though I was out on the trail alone, I thought I’d want to have extra space inside my tent at night to move around and store my gear. All of that extra space ended up coming with a price.
Not only did my 2-person tent weigh a whole pound more than the 1-person version, but on those really cold nights, there was so much extra space inside the tent that needed to be heated up, which would leave me feeling pretty cold overnight.
After my first PCT thru-hike, I switched to using a 1-person freestanding tent for all of my solo backcountry trips. I was still able to store my pack inside the tent at night. Even though there was now less room inside my 1-person tent, I still had more than enough room to move around inside, and I really liked the weight savings from not using the 2-person tent.
Just recently, I made the switch from using a freestanding 1-person tent to a 1-person trekking pole ultralight tent. Honestly, I was kind of intimidated to make the switch at first because it made me a little nervous knowing that the structure of my tent would rely on my trekking poles instead of tent poles.
I always thought setting up a trekking pole tent would be much more challenging than setting up a freestanding tent. I was also a little worried that I’d be limited in where I could set up my trekking pole tent.
I don’t know why I didn’t make this switch sooner though. Setting up a trekking pole tent has been fairly easy so far, I haven’t had any problems with finding a place to set up my tent yet, there’s still plenty of room inside my tent to store my pack inside overnight and the overall weight savings with this recent tent switch has been huge.
My Gossamer Gear The One Ultralight Trekking Pole tent with the shelter, stuff sack, stakes and extra cord comes to 22 ounces, which is only a little more than a pound! And it takes me less than 5 minutes to setup my tent at camp.
Backpacking Tip #7: Learn How To Use A Map Or A Digital Navigation System
Another mistake I made as a beginner backpacker was not making it a priority to learn how to use a map or taking the time to learn how to use a navigation system before getting out on trail.
Had I made it a priority to learn how to be more confident with my navigation skills sooner, I could have felt more comfortable and confident with being out on trail by myself instead of being dependent on other people.
By learning how to do my own trail and trip planning research, I’ve been able to become less dependent on other people when it comes to planning my trips. I can now plan the trips I want to go on, for the destinations I want to go to, whenever I want to go.
By learning how to become more confident with my navigation skills, I’ve been able to reduce my fears of getting lost whenever I’m out on trail. I’m able to feel more confident with staying found while I’m out there and feel more comfortable going beyond trails I’m familiar with, leading me to want to explore new-to-me areas.
To start building up your own confidence with your navigation skills, I highly recommend taking a basic navigation course, whether it’s in-person or online. Learn how to read a map and use a compass. Learn how to use one of the many digital navigation apps like onX Backcountry, Gaia GPS or the FarOut Guide app.
What’s nice about these digital navigation apps is that not only can you use them for on-trail navigation, but they’re also valuable trip planning tools you can use to plan your trip before getting out on trail.
If you’re interested in checking out onX Backcountry to help plan your next overnight backpacking trip, use promo code “HungryHiker” and CLICK HERE to get either 20% off your onX Backcountry Premium or Elite subscription OR start a 14-day trial of onX Backcountry Elite for FREE.
No matter which navigation system you use, whether it’s onX Backcountry, Gaia GPS or the FarOut Guide app, pick one, learn how to use it and practice using it before getting out on trail for your next backpacking trip.
Backpacking Tip #8: Practice Using Your Gear Before An Overnight Backpacking Trip
Be familiar with your backpacking gear, practice using your gear and make sure everything works before leaving for an overnight backpacking trip. This means everything from setting up your tent to using your backpacking stove, using your water filter, wearing your hiking shoes and packing and unpacking your pack.
When I first made the switch to a trekking pole tent, I watched a couple YouTube videos on how to set up the tent before I attempted to set it up myself. Even with watching these videos and the tent’s overall easy setup, there was still a bit of a learning curve with getting the pitch just right for my new tent.
I also highly recommend practice using your backcountry stove by boiling a pot of water in it while you’re at home, before taking it with you out on trail. I don’t know why, but I was kind of nervous to use my backcountry stove for the first time. I was worried that if I didn’t connect the stove correctly to the fuel canister, it would blow up. Luckily that has yet to happen to me, but I felt much more confident using my stove out on trail after practicing boiling a couple pots of water in it, at home first.
Same goes for using your water filter. Not only do you want to make sure that you know how to use your water filter correctly before getting out on trail, but you also want to make sure that your water filter works. There’s been a couple times when I didn’t test out my water filter at home and my filter ended up not working for me or had an extremely slow flow once I got out on trail.
It’s also a good idea to wear your hiking shoes with the socks you plan on hiking in a couple of times before wearing them out on trail, just to make sure they fit correctly and are comfortable.
One of my most favorite pieces of advice for beginner backpackers is to practice packing and unpacking your pack. This doesn’t mean only packing your pack the night before or the morning of when you’re leaving for a trip. I mean, practice packing and unpacking your pack, with all of the gear, food and water you plan on bringing, multiple times the week or two before leaving for your trip.
Why? The more you practice packing and unpacking your pack, the more familiar you’ll become with how all of your gear fits into your pack. Everything will start to have its own place inside your pack, making it less likely that you’ll misplace a piece of gear or forget something you’ll need for your trip.
Backpacking Tip #9: Don’t Pack Too Much Stuff
Speaking of packing and unpacking you’re your pack, another mistake I made as a beginner backpacker was packing too much stuff. Not only with backpacking gear and clothing, but also with food and water.
When I went out for my first few overnight backpacking trips, I was always either worried I’d forget to bring something I’d need, or I was notorious for packing a bunch of “what if” stuff. Well, “what if” this happens? What if I need this? What if I want that?
They say you pack your fears and I always used to overpack my food because I was afraid. What if I run out of food? What if I’m hungry? What if I don’t feel like eating the food that I packed?
Part of the beauty of backpacking is knowing that you have everything you need to survive a night or two out in the woods, inside your pack. And surprisingly you don’t need a whole lot of stuff. As long as you always pack the 10 Essentials and have enough food for the trip, water to get you to the next water source, a way to treat your drinking water and a pack to carry everything in, anything else you bring is considered a luxury item and is extra weight.
Backpacking Tip #10: Don’t Forget To Leave Your Trip Itinerary With Someone At Home
Finally, don’t forget to leave your trip itinerary at home with someone whom you trust before leaving for your backpacking trip. If no one knows you’re missing, they won’t know to come looking for you.
Once you’ve created your trip itinerary and saved the route for your trip using your navigation system of choice, pick a trusted friend or family member who won’t be out on trail with you and share your trip itinerary and route with them before getting to the trailhead.
In addition to sharing your route, you’ll also want to let this trusted person know how long you plan on being out there, your intended destination and what day and time you plan on returning back to the trailhead. Then don’t forget to check back in with your trusted person to let them know that you’ve made it back to the trailhead and are home safely.
Ideally, you’ll carry something like a satellite messenger with two-way messaging. This way, you’ll be able to communicate with your trusted person and let them once you’ve made it back to the trailhead safely or at least let them know if you’re running behind so they don’t worry.
This is why I always carry my fully charged Garmin inReach Mini 2 with me for all of my backpacking trips. Not only do I always have a way to reach my trusted person while I’m out on trail without cell or WiFi service, but I also have two-way messaging with first responders, just in case I need to press the SOS button in an emergency situation.
It doesn’t matter if you’re a beginner backpacker or if you’re a seasoned professional, we’re all going to make mistakes at some point. One of the cool things about backpacking is that there’s NO ONE RIGHT WAY to do it and there are so many different ways to do it.
You never really know all there is to know about backpacking either. There’s ALWAYS something new to learn about backpacking. Even with all of my backpacking experience over the last 8 years, with each trip I go on, I’m always learning from the last one how to make the next trip even better.
I hope by sharing with you some of the beginner backpacking mistakes I’ve made, you can avoid making these same mistakes AND are now more inspired than ever to want to start planning your next overnight backpacking trip.
Disclaimer: The-Hungry-Hiker.com is a participant in the Amazon Affiliate Links and AvantlInks Program, affiliate advertising programs designed to provide a means for sites to earn advertising fees by advertising and linking to Amazon.com and other affiliated sites at no cost to you. Please note, I only link to products and services I personally use and trust.
Hello,
Thank you for the blog post about beginner hiking mistakes. I started hiking at the age of 60. 218 miles on the Appalachian Trail, 30 miles on the PCT, and 500 miles on the Camino Frances.
I’m not an expert by any means, but I disagree with one of your points. Well maybe not disagree, just wondering if maybe something should be amended. I’m referring to a the one person hiking pole tent. I found that I needed my hiking poles to not be a part of the tent setup. Many times while hiking, I found I needed my poles to hike down and back up from water spots or the backcountry potties. It’s probably my age, but I need my hiking poles around camp.
Thanks again and maybe I will see you put hiking some day. I live in the Seattle area too.
Hey Jeanne! I understand that trekking pole tents might not work for everybody for a number of different factors. I know for me personally, I was intimidated by them up until earlier this year when I started using them out on trail. I get what you’re saying about needing your trekking poles to go get water or to use the restroom while at camp. The nice thing about trekking pole tents (at least the two I own and have been using) is that they’re surprisingly easy to setup and take down. If I’m set up at camp and want to go on a day hike and want to bring my poles with me, I can easily take the trekking poles out of the tent and leave my stuff. Then when I come back from my hike, all I have to do is just reinsert my trekking poles and my tent is 100% setup again.
PS: I no longer live in Washington. I moved to Montana in December and have been loving it here so far. So many new trails and areas to explore!
I read this fast; so sorry if I am off topic. Many pole tents you can add on tent poles. I was surprised that the additional poles were not that much money.
I AM YOUR BIGGEST NEW FAN!
Along with my family, I have been a lifelong camper and backpacker since the 1970s, and, like you, I’m always open to new ideas to make my treks easier and more fun. Thank you for sharing your knowledge! “In the old days”, everything was brutally heavy, not very tasty or nutritious, and sometimes even unsafe. Look how far we have come. Let’s trek on!
Thank you!!!