Are you thinking about going on a solo backpacking trip, but you’re letting your fears (or even other people’s fears) hold you back from getting to the trailhead?
When I first decided I wanted to go solo backpacking, I not only had to learn how to overcome my own fears of being out on trail by myself, but I also had to deal with my friends and family’s fears of me wanting to go backpacking solo. I’d hear things like:
- “Why would you want to go by yourself”
- “Aren’t you scared?”
- “What if XX happens?”
- “What are you going to do if XX happens?”
- “Are you going to carry a gun?”
Watch on YouTube: 10 Tips to Help Overcome Your FEAR of BACKPACKING SOLO
After thru-hiking the Pacific Crest Trail by myself in 2018 and solo backpacking 100’s of miles in the backcountry over the last few years, I can honestly say I love solo backpacking more so than going on group trips.
Don’t get me wrong – I still enjoy going on group backpacking trips, but there’s something really special about backpacking solo that keeps me wanting to plan more and more solo trips.
If you are convinced and want to give solo backpacking a try, here are the 10 tips you need to know that will help you overcome your fears (and other people’s fears) about backpacking solo.
1 – Don’t Let Your Fears (and Other People’s Fears) Stop You From Getting To The Trailhead
First of all, it’s completely normal and perfectly okay to have fears when it comes to backpacking solo.
You might be afraid of being alone out on trail during the day or sleeping alone at camp at night. It could be animal encounters, trail obstacles, coming across shady people, getting lost, running out of food or water and sometimes it could be the fear of the unknown or not knowing what to do in a given situation. You don’t know what you don’t know.
The best way to overcome your fears of backpacking solo is to properly plan and prepare to be 100% self-reliant for your backcountry adventures. This starts with trip planning.
Trip planning is essential for any successful trip in the backcountry. Trip planning is important because it:
- Is the ultimate tool to help reduce the unknown when out on trail
- It gives you a better idea of what to expect when you’re out there
- Trip planning also helps prepare you for managing risks and hazards before having to encounter them out in the backcountry
- You always want to be prepared for the worst-case scenario
- Remember, proper preparation and planning can help prevent a negative outcome and increase your chances of having a successful trip
Trip Planning Basics
Before you head out for your solo backpacking adventure, you’ll want to:
Decide on what the goal is for your trip. What’s your trip objective?
- Is there a certain place you want to get to or camp at?
- Are you looking to relax?
- Want to check out a new area?
- Practice using your gear?
- Looking to challenge yourself to hike a certain number of miles each day?
- Knowing “why” you’re out there in the first place will help you plan for the type of trip you want to go on and increase your chances of having a successful trip.
Decide where you want to go
Do your research
- Check the weather forecast of the area you’ll be traveling in
- Check road conditions for the roads you’ll be driving on
- Check trail conditions
- Read current trip reports
Plan your route by using either a paper map, digital map or both
Anticipate hazards you may encounter out on trail
You’ll be able to identify through the research you do ahead of time of the area you plan on traveling in. When you’re doing your research, look for potential:
- Water crossings
- Downed Trees
- Washouts
- Wildfire
Establish an emergency/safety plan for your trip
Note any alternate routes or exit points, in case of bad weather, injury or trail obstacles
Bring the proper gear for your intended trip and forecasted conditions, including the 10 Essentials
Put together a trip itinerary and leave it at home with someone you trust
When it comes to learning how to overcome your fears with backpacking solo, figure out what you’re most scared of and then put together a plan on how you’ll deal with those fears should you have to face them when out on trail.
I’ve put together The Confident Solo Female Backpacker System, an online backpacking program for women that is designed to help women go from feeling scared and intimidated about solo backpacking to feeling comfortable planning their own adventures, so they feel confident going on either their first or next solo backpacking trip. This comprehensive, self-paced, online program will walk students through, step-by-step, everything they need to know in order to plan, prepare and build up their confidence to comfortably go on their own solo backpacking adventures.
Click HERE to learn more about The Confident Solo Female Backpacker System and how you can sign up for a free, one-on-one Zoom call with me where we’ll talk about your backpacking goals. If we decide if working together would be a good fit, you’ll get an opportunity to enroll in the program during our call.
Get inspired. Get excited. Don’t let fear keep you away from wanting to get to the trailhead for your own solo backpacking adventures.
2 – Ways You Can Practice for A Solo Backpacking Trip Before Going on One
Don’t practice making it perfect because honestly there’s nothing perfect about backpacking. When it comes to backpacking, it’s a learning experience that you will constantly be improving upon with each trip you go on. Practice to help lessen the risk and help make your experience out on trail much more enjoyable.
Here’s what I mean:
Go On A Solo Day Hike
If you are new to solo backpacking, start with going on a solo day hike out on a familiar, well-established, popular trail.
Try Solo Car Camping
Once you have a couple of successful solo day hikes under your shoes, then try solo car camping at a drive-in campsite.
Instead of sleeping in your car, set up camp at the campsite like you would if you’re backpacking, including setting up your tent, sleep system, camp kitchen and food storage.
This way you get to practice setting up camp and sleeping in your tent alone. You’ll start to get used to hearing the noises outside overnight. This way if you get scared, you’ll know that your car is nearby and you can easily pack up camp and go back home if you want to.
With car camping, there will more likely be people nearby, making this a less scary experience. Also, depending on the campsite, you might have amenities nearby like running water, pit toilets, garbage and a picnic table so you won’t be “roughing” it like if you were backpacking. Car camping is a great way to practice setting up your camp, using your gear, getting used to sleeping alone in your tent, breaking down camp and packing/unpacking your pack while keeping the whole experience very low risk.
Then, Go On Your First Solo Backpacking Trip
When you’re ready, pick a familiar, well-established, well-traveled, low mileage/less elevation trail for your first solo backpacking trip. With popular, well-traveled trails, there will be more people out on trail so you don’t feel so alone.
Choosing a familiar, well-traveled trail means you’re more likely to know where you’re at and have a less chance of getting lost because the trail will be well marked. By picking a lower mileage, lower elevation hike, you also bring down the risk level for your solo backpacking trip. If you set up camp and decide that you want to go back home, you can easily pack up camp and get back to the trailhead in a reasonable amount of time.
You Can Also Take A Leadership Role With Planning A Group Trip
If you’re going on a group backpacking trip, practice taking a more leadership role with helping to plan the trip. This can be everything from helping your group members figure out where and when to go, the rules and regulations for the area you want to travel in and putting together the trip itinerary to choosing the tentsites for the group when out on trail, locating upcoming water sources, helping to set up camp and participate in camp chores instead of letting other group members do everything for you.
Whatever you decide to do, make sure you always give yourself grace. Practice, practice, practice. Use each backpacking trip, whether it’s a solo or group backpacking trip as a chance to test and then refine whatever you learned after each trip.
3 – How NOT To Get Lost
A lot of people say one of their biggest fears about solo backpacking is getting lost. One way to NOT get lost is to stay found by always hiking with a map, whether it’s a paper map and compass or a digital map downloaded on an app like AllTrails, Gaia GPS or FarOut.
It’s not enough to have a map. You also need to know how to read your map and use your navigation tools, otherwise they are just deadweight in your pack. If you don’t know how to use a paper map and compass, consider taking a navigation course either online or in-person. If you’re using a digital map on an app, make sure you know how to use the app, download the map of the area you’ll be traveling in before leaving cell and WiFi service and create a route and save it within your app.
Always be aware of your surroundings. Look for landmarks along the trail. Double check your map at each junction so you always know where you’re at and where you’re going. Also, if you’re using a digital map, make sure your electronic devices are fully charged before getting to the trailhead and bring an external power bank with you, so you have a way to charge your electronic devices out on trail if you need to.
4 – How NOT To Run Out of Water
Another big fear a lot of people have about solo backpacking is running out of water. A great way to overcome this fear starts with your trip planning before you ever get out on trail. Know how to recognize water sources on a map. When you’re putting together your trip itinerary, note any water sources along your anticipated route by looking at the map of the area you plan on traveling in. Then figure out how much water you think you’ll need in-between each water source.
Make sure you start your trip with enough water to get to the next water source. Always bring a water filter, know how to use your water filter and consider carrying a backup water filtration system such as extra filter or water purification tablets.
5 – Pack the Food You Love and Want to Eat Out On Trail
 In addition to the fear of running out of water, as a solo backpacker, you might have the fear of running out of food when you’re out on trail by yourself. A great way to help overcome this fear is to make sure you include meal planning as part of your trip planning process.
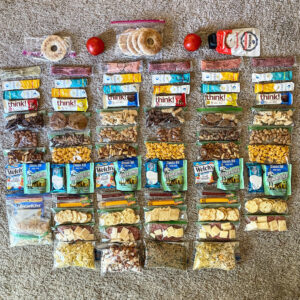
Once you figure out how many days and nights you’ll be out on trail, take the time to create a trail menu for each meal of the day during your trip. You’ll want to figure out how many calories you’ll need for each day, pack the right amount of food for your intended time out on trail and don’t forget to consider the weight of the food you bring. Also, as part of the Hiking 10 Essentials, you’ll always want to pack one extra day’s worth of food, just in case.
When putting together a meal plan for your solo backpacking trip, make sure you pack food you love. Think about the food you enjoy eating at home that you might also enjoy eating out on trail. This could be quick and easy grocery store backpacking meals you put together yourself, dehydrated meals you put together at home, freeze-dried meals from outdoor retailers, your most favorite snacks, leftover pizza from the night before or a fresh deli sandwich you picked up that morning before heading out to the trail.
The first meal you have out on trail should be the heaviest. Then after that, each meal and snack should be light in weight since you’ll have to carry it in your food bag or bear canister throughout your trip.
6 – Be Bear Aware & Know How to Deal with Wildlife Encounters
Part of your trip planning should be to research the potential wildlife in the area you plan on traveling in. Then once you know the types of animals you may encounter out on trail, familiarize yourself with how to deal with these types of wildlife encounters.
Be Bear Aware
If you plan on traveling in area where there have been known bear sightings, make sure you are Bear Aware. Look for bear activity. Make noise, especially if you’re out there solo. You can carry a whistle, bear bells, play music or a podcast out loud, talk out loud or click your trekking poles together.
Be Aware of Your Surroundings
Are there other people out on trail with you? How wide is the trail? Are you traveling through a wide, open space or a dense forest? Do you have an exit strategy if you come up on a bear who’s blocking the trail or is there plenty of room to walk around the bear while giving them plenty of space?
Practice Proper Food Storage
Carry your food in a rodent-proof, bear-proof bag like an Ursack or a hard-sided bear canister. Part of your trip planning should include noting the rules and regulations for proper food storage in the area you plan on traveling in. At camp, store your food away from your sleeping area and cook downwind and away from your sleeping area. If there are metal bear lockers or bear poles nearby, use those options when storing your food at camp.
Bring With You Whatever Makes You Feel Safe
This could be a whistle, bear bells, a knife, mace, bear spray or even a firearm. If you carry mace, bear spray or any sort of weapon or firearm, make sure you are properly trained on how to use that weapon correctly so that you don’t injure yourself or others around you. Also, you’ll want to make sure the item you choose to use is easy to access in the event of an emergency and not buried in the bottom of your pack.
I personally don’t carry bear spray or a firearm on any of my solo backpacking trips. I have a whistle on my pack, carry a knife, have my wits and make sure I’m always Situationally Aware of my surroundings while I’m out there. This is just what has worked for me. If this doesn’t work for you, find whatever makes you feel safe and train yourself on how to use that item properly and safely prior to your solo backpacking trip.
The nice thing about emergency whistles is that they’re easy to use and can often be find built into your backpacking chest straps, so double check this before you get out on trail. Keep your whistle where you can easily access it during an emergency. Emergency whistles can be used to call as a distress signal to rescuers of where you’re at and can also be used to ward off potential wildlife encounters.
Also, if you use trekking poles, trekking poles can be used to make additional noise, used as a crutch in the event you injure yourself and can also be used as a weapon in an emergency situation.
Depending on where you’re traveling, the chances of a deadly animal encounter can be rare and unlikely. The fear of having a wildlife encounter out on trail is a healthy fear, but don’t let this fear hold you back from planning your solo backpacking trip. Do your research. Know the types of animals you might encounter in the area and be familiar with how to deal with these types of wildlife encounters before you get out on trail.
7 – How to NOT Be Lonely When Backpacking Solo
An easy way to overcome your fear of feeling lonely when solo backpacking is to pack distractions. I love to download my favorite upbeat music and inspiring podcasts to my phone prior to my trip and listen to them either when I’m out on trail during the day or in my tent at night. You can also download books, movies and games to help you stay entertained while you’re at camp by yourself. If you are someone who likes to journal, bring a journal or journal on your phone once you’re at camp for the day.
If you find that you get to camp early, have set up camp and have completed all of your camp chores, consider going on a short day hike in the area, take a nap or go to sleep early and get a good night’s sleep.
Also, if you find that you keep getting to camp early and don’t want to, consider hiking bigger mile days and hiking throughout the day longer. The longer and farther you hike each day, the higher the chance you will be more tired once you decide to set up camp for the evening. If you’re worried about feeling lonely once you get into camp, plan on spending less time in camp. Come into camp later in the day and exhausted. This way, the only thing you have energy for is to set up camp, eat and then go to bed for the evening.
8 – How to Sleep Outside Safely and Comfortably
I hear a lot of people say that one thing that holds them back from wanting to plan a backpacking trip, let alone a solo backpacking trip is that they can’t get a good night’s sleep out on trail. I used to be there! I’ve had many really, really cold and miserable nights out on trail and I’m here to tell you, it doesn’t have to be that way.
Start by investing in a warm and comfortable sleep system. You can save money on clothes and a cooking system but invest your money in your sleep system if having a good night’s sleep out on trail is a priority for you. For me, when I’m out backpacking, if I can’t get a good night’s sleep then I have a hard time hiking the next day and if I can’t hike, well why am I even out there on trail.
A sleep system can consist of a warm sleeping bag or quilt, an insulated sleeping pad and if you’re a cold sleeper like me, you might also include a pair of sleeping booties and socks, a sleeping bag liner and a camp pillow. Once I invested in my sleeping system by getting a 10-degree, ultralight quilt along with an insulated sleeping pad with an R-Value of 6.8, I’ve been able to sleep out on trail almost as good as I do in my own bed at home.
Another way you can make sleeping outside comfortable and NOT have to spend any money is to camp wherever you feel safe. Instead of setting up camp in a dark, dense forest, choose a tentsite that is near or above the treeline in a wide-open area. Open spaces tend to stay light out longer.
My favorite place to set up camp as is always near a natural running water source. Not so close that I’ll have animal visitors near my tent overnight, but close enough that I can hear the water running and fall asleep listening to a natural, calming ambient noise in the background without worrying about hearing twigs breaking throughout the night.
Also, another way you can make sleeping outside comfortable without spending any money is to pick a popular, easy and well-travelled trail for your first solo backpacking trip and set up at a tentsite with other backpackers nearby. This way, you’re still backpacking solo, but you have the comfort knowing that there is someone close by in case of an emergency.
Don’t forget to pack your distractions to keep you entertained while you’re in your tent at night and consider wearing ear plugs if you are someone that has to tune out all of the noises around you, including snoring coming from nearby backpackers, in order to get a good night’s sleep
9 – How To Deal With Other People’s Fears of You Wanting To Go Backpacking Solo
As someone who has now done a number of successful solo backpacking trips and has hiked 100’s of miles by myself in the backcountry, here are some of the ways I’ve been able to help manage the fears of my friends and family members who are scared of me wanting to get out for my solo backpacking trips.
Share Your “Why”
Share your “why” for going solo backpacking and tell them why it’s important to you. Making videos of my solo backpacking trips is not only my way of helping to inspire others to want to get out for their own solo adventures, but it’s also a great way for me to show my friends and family what I’m doing out on trail and share with them why I love solo backpacking so much.
Invite Your Concerned Friends and Family Members to Join You
To this day, I haven’t had any family members join me out on trail for an overnight trip YET, BUT I’ve had a number of friends join me for various backpacking trips over the years. Once we’re out on trail together, I can share my favorite trail stories with my friends, which often helps explain why I love solo backpacking so much. I’m also able to show them how prepared I am for solo backpacking. By the end of our trip, my friends feel much more confident in my solo backpacking abilities and have learned something new about backpacking that they didn’t know before. Often times, they’re inspired to want to plan their next trip, sometimes wanting to plan a solo backpacking trip of their own!
Share The Precautions You’re Taking
If friends and family members are really concerned with your upcoming solo backpacking trip, offer to share with them the precautions you’re taking in order to be safe when you’re out on trail. Sometimes sharing how you’ve planned and prepared for your solo backpacking trip is enough to help put a friend or family member at ease. Share with them your entire trip planning process. Let them know where you plan on going. Share with them the research you’ve done of the area and the plan you’ve put into place with possibly dealing with challenges and fears that might come your way once you’re out there.
If you’ve been taking any backpacking, navigation or first aid courses, share what you’ve been learning in the courses you’ve been taking and how you plan on applying what you’ve learned to your solo backpacking trip.
Make Them Your “Safety Person”
You can also offer to make a concerned friend or family member your “safety person” for your solo backpacking trip. This would mean that you would leave your trip itinerary with them, check in with them throughout your trip if you’re able to, give them permission to contact local authorities if they don’t hear from you within a given timeframe you’ve both agreed upon and make them your first person you contact as soon as you return from your solo backpacking trip.
Use A Satellite Communicator or PLB
Consider investing in and carrying either a satellite communicator or a Personal Locator Beacon (PLB) and know how to use it before getting out on trail. A satellite communicator will generally have two-way messaging and tracking features, which help make it easy for someone at home to be able to follow your journey and have contact with you while you’re on your solo backpacking trip.
Having a satellite communicator or PLB, whether you’re backpacking solo or in a group, is a great way to be able to reach the outside world in the event of an emergency. Even though these devices come with a high price tag and often times require an additional charge for a subscription service, they often provide peace of mind, which makes the financial investment worth it to both you as a solo backpacker and the concerned friend or family member at home.
Remember, other people’s fears are a direct reflection of them, not you. Don’t let someone else’s fears (even if they are a friend or family member) deter you from wanting to achieve your own solo backpacking goals.
10 – How To Deal With Sketchy People Out On Trail
In all of the MANY miles I’ve been out on trail as a solo female backpacker, it seems like the farther I get out on trail, the less likely I am to encounter a sketchy person. As a woman, I actually feel much safer hiking by myself in the backcountry than I do walking alone in any town or city. Why? Because if someone is up to no good, they will more than likely want to stick close to either a trailhead or a road so that they can have a quick getaway.
This is why I always recommend getting at least 3 to 5 miles from the trailhead for any of your solo backpacking trips, whether it’s your first solo backpacking trip or your next. The farther you can get away from any nearby roads or trailheads, the more likely you are to be safe. The people I’ve met out on trail while backpacking have been some of the most happy and friendly people I’ve ever met.
As a solo backpacker, make sure you say hi to the people you come across on trail. Make eye contact and take note of what they’re wearing and their pack. Not only is it friendly to say hi to other backpackers, but it’s also important to be aware of the people whom you come into contact with out on trail.
And while you want to be friendly to the folks you meet out on trail, never disclose any specific information on your solo camping plans to anyone whom you don’t know. Keep your intended destination for the evening vague. Don’t announce to anyone you don’t know that you’re backpacking solo. If someone you meet on trail asks if you’re by yourself, you can always say you’re with someone else who’s behind you or ahead of you. No one out on trail has to know you’re out there solo backpacking unless you want them to know and you feel safe telling them so.
If you’re in a conversation with another backpacker that makes you feel uncomfortable or unsafe, lie and say you’re waiting for a friend who’s on a bathroom break or off taking pictures and then quickly excuse yourself from the conversation. Always listen to your gut. Trust your instincts. If something feels off or wrong, change the situation or turn around and go home. You have nothing to prove to anyone. Your safety should always be your number one priority.
The same goes for people off trail. Never publicly announce your solo backpacking plans and location online either before or during your trip. Save the solo backpacking social media posts for when you’re back at home, safe and sound.
When it comes to setting up your solo backpacking tentsite, you can either set up camp with backpackers nearby to help ease your nerves of camping outside by yourself or if you want to avoid people at camp, set up your tentsite away from the established trail and other backpackers. If you’re opting to avoid other backpackers at camp, avoid camping in shelters, camp far off of the established trail and camouflage your tentsite if you can.
Another safety tip for being at camp as a solo backpacker is to make sure you store your shoes inside your tent at night. That way anyone walking by won’t know that you’re in your tent by yourself. Whether you decide to camp near other backpackers or away from them, always stay alert and be aware of your surroundings.
I really hope this has been helpful and inspiring for any of you who have been thinking about planning a solo backpacking trip.
Disclaimer: The-Hungry-Hiker.com is a participant in the Amazon Affiliate Links and AvantlInks Program, affiliate advertising programs designed to provide a means for sites to earn advertising fees by advertising and linking to Amazon.com and other affiliated sites at no cost to you. Please note, I only link to products and services I personally use and trust.
2 Comments on 10 Tips to Help Overcome Your Fear of Backpacking Solo