 How do you know how much backpacking food to bring with you for a backpacking trip?
Maybe you’ve been thinking about wanting to plan a backpacking trip or section hike along the Pacific Crest Trail and have no idea how much backpacking food you should bring or even what kind of backpacking food to pack. Or maybe you need help figuring out a resupply strategy for your trip.
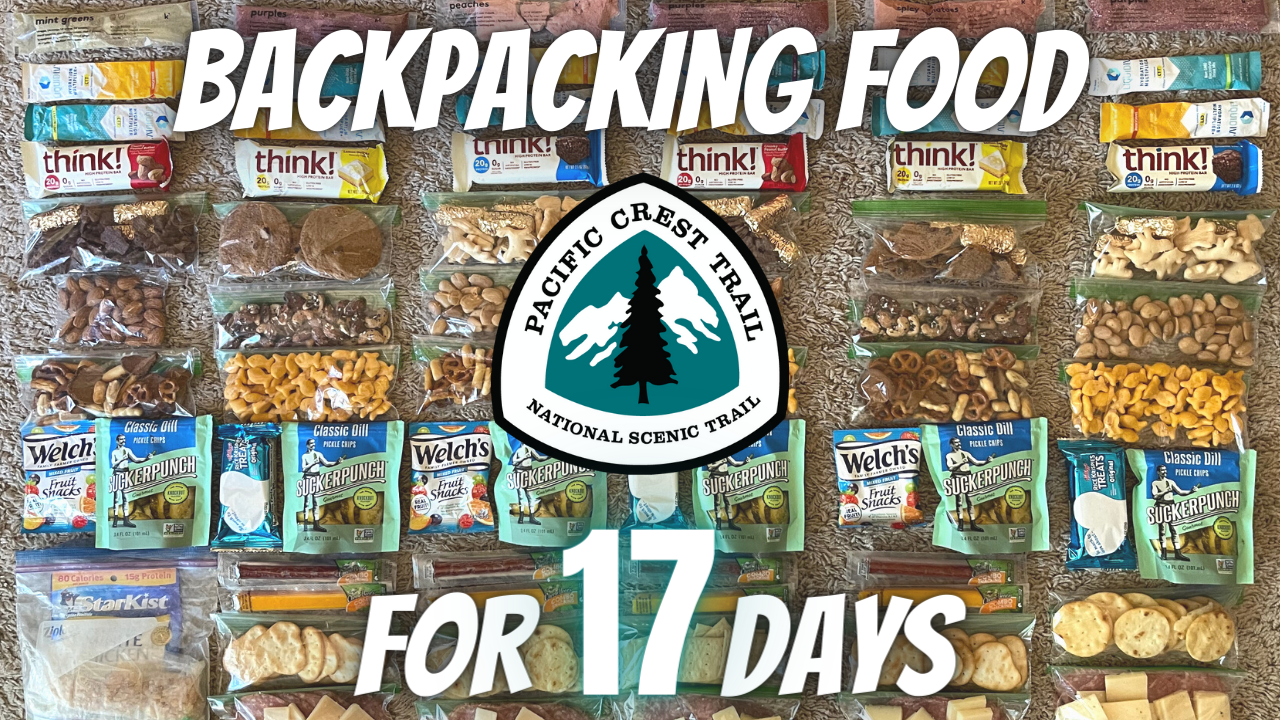
At the beginning of August of this year, I started my 17-day, solo section hike along the Pacific Crest Trail, starting from Snoqualmie Pass and headed south for 250 miles until I reached Cascade Locks at the Washington/Oregon border.
Here’s a quick overview of my section hike along the PCT here in Washington this summer.
Starting from Snoqualmie Pass on August 1st, I headed south and hiked 250 miles by myself until I reached Cascade Locks 17 days later at the Washington/Oregon border.
For this trip, I started out with 6 days’ worth of food and I sent myself two resupply boxes out on trail: one to White Pass and the other box to Trout Lake.
On Day 6 and in 98 miles, I picked up my first resupply box in White Pass at the Kracker Barrel, which had 4-days’ worth of food in it.
On Day 10 and 67 miles later, I picked up my second resupply box in Trout Lake, which had 6-days’ worth of food in it. In Trout Lake, I took my one and only Zero Day for this trip. Then I spent the next 6 days hiking 82 miles until I hiked across the Bridge of the Gods and into Cascade Locks, Oregon where I’d officially end my solo PCT section hike.
The question I get asked all the time is, “How do you know how much backpacking food to bring for trip like this?”
My answer is that I put together a resupply strategy by building a trip itinerary FIRST and then putting together a meal plan for the trip.
Putting Together a Resupply Strategy
For my solo section hike along the PCT this summer, I started by putting together a trip itinerary using the FarOut Guide app. I created a spreadsheet for my trip that had all of the days I’d be out on trail, the dates of the days I’d be out on trail and the number of miles I was planning on hiking each day
From here, I could visually look at my spreadsheet and have an idea of how many days I’d have in-between my resupply stops and therefore know how much food I should carry for each section. Using the trip itinerary I created for myself, I could easily figure out how many breakfasts, lunches, dinners and snacks I’d need to pack for each section.
Once I knew how much food I’d need for each section. I went food shopping and started packing my backpacking food. I started with putting together the 6 days’ worth of food I’d carry at the beginning of my trip. Then, I put together the two resupply boxes I’d send to myself on trail.
I shipped both of my resupply boxes Priority Mail USPS. I made sure to send my boxes well in advance so I knew they’d arrive and be waiting for me by the time I reached each town. Since I live here in Washington, I only needed to send both of my boxes about a week before I started my hike.
Some towns along the PCT are big enough that you can shop for food in and not have to send yourself a box, but the towns along the PCT in Washington are smaller and more remote. Just to be safe and to make sure I had access to the food I loved and wanted to eat, I decided to send myself resupply boxes ahead of time and not worry about resupplying in any of the towns.
Meal Planning for The Trip
As for putting together the meal plan for my trip. I created another spreadsheet for each of my resupply stops along the trail: starting with my first resupply, which was for the first 6 days I’d be out on trail. The second resupply would be the stretch from White Pass to Trout Lake and the third resupply would be the last stretch of my trip from Trout Lake to Cascade Locks.
Based off of the trip itinerary I created, I was able to figure out how many days’ worth of food I’d need for each section. Note: How much food you decide to carry in-between each resupply stop will depend on how fast you hike, the number of miles you hike per day and how hungry you get when out on trail.
Then I added to the spreadsheet the number of days I’d need food for and noted the total number of meals I need for each section. For each individual day, I noted what I planned on eating for breakfast, lunch, dinner and all of my snacks.
Backpacking Food Meal Planning Tips
Here are a few tips for you when it comes to meal planning your backpacking meals for your trip:
Tip #1: Always pack the food you love. That way you’ll be excited to eat your food every day and you’re more likely to eat all of the food in your food bag. Remember, whatever you don’t eat, you’ll have to carry.
Tip #2: Try to figure out ahead of time how many calories you’ll need to eat per day to sustain your body, activity levels, hiking pace and hiker hunger when out on trail. Then choose foods that fit this calorie requirement for your body and activity level.
Tip #3: Don’t just buy the expensive, freezer dried meals in the store. Shop for backpacking food at your local grocery store. You can find plenty of cheap and easy backpacking food options in the grocery store. If you need some inspiration, I’ve put together a few videos that might help you:
Grocery Store Backpacking Food | Cheap & Easy Breakfast Ideas
Grocery Store Backpacking Food | Cheap & Easy Lunch Ideas
Grocery Store Backpacking Food | Cheap & Easy Dinner Ideas
Grocery Store Backpacking Food | Cheap & Easy Snacks from Trader Joes
Grocery Store Backpacking Food | Cheap & Easy One Pot Thanksgiving Dinner
Also, if you have enough time and aren’t packing last minute, consider dehydrating your own backpacking food for your trip. I’ve put together a few different videos that might inspire you to get started with dehydrating your own backpacking food:
White Bean & Sausage Soup | Dehydrated Backpacking Food Recipe
Backcountry Spaghetti | Dehydrated Backpacking Food Recipe
Coconut Cashew Curry with Couscous | Backpacking Food Recipe
Pasta Penne Alfredo | Dehydrated Backpacking Food Recipe
So that’s how I put together my resupply strategy and knew how much food I’d need to bring with me for this trip.
Now, let’s talk about the actual backpacking food I brought with me for this section hike and breakdown of all the backpacking meals I ate during this trip including what I had for breakfast, lunch, dinner and snacks.
Breakfast
For breakfast, I like to go for a “no cook” breakfast if I can. Some of the breakfasts I had out on trail for this trip were:
Bagels + cream cheese in a squeezable container
Kencko Smoothies. I had a Kencko Smoothie each morning out on trail. Each smoothie comes out to being a 2.5 serving of fruits and vegetables. These are an easy way to get fruits and veggies along with some extra nutrition in your food bag, when out on trail.
Almond Biscotti also made a quick and easy breakfast out on trail
Dried Cereal and Powdered Milk. For the last section of trail coming into Cascade Locks, I decided to switch up my breakfast and packed-out dry cereal with Nido Powdered Milk. Not the easiest option because this meant I had to use my small, collapsible bowl and extra water every morning for breakfast, but it was a nice change of pace for my taste buds.
Lunch
For lunch, I also like to go for a “no cook” lunch if I can OR if I do cook something, I keep it quick and easy
I always try to pack out a fresh deli sandwich from town if I can and eat that as my first meal when getting back out on trail
Salami, cheese and crackers are my all-time favorite on-trail lunch. Make sure you choose a hard cheese because it will last longer than a soft cheese. I personally love of the tasty crackers from Trader Joes.
Or if I’m cooking lunch and close to a water source, then I’ll cook a packet of ramen and add peanut butter, making a Backcountry Pad Thai.
Dinner
Dinner is the one meal of the day where I always cook. I always like to treat myself with a warm meal at the end of the day and finish off dinner with a dessert. For dinners, I ate:
My Cheap & Easy One Pot Thanksgiving Dinner, which is a cheap and easy backpacking meal you can put together from the grocery store
White Bean & Sausage Soup, which is one of my dehydrated backpacking meal recipes
Dehydrated Backcountry Spaghetti, which is also another one of my dehydrated backpacking meal recipes
If I have to go with a store-bought freeze-dried meal, then it’s Peak Refuel Meals all the way. These freeze-dried meals have been my absolute favorite all summer long. Some of my favorites that I brought with me are Chicken Alfredo Pasta, Homestyle Chicken and Rice and Chicken Pesto Pasta.
After discovering Dal Bhat on my recent trek up to Everest Base Camp in Nepal this year, I’m excited to try Peak Refuel’s Butternut Dal Bhat freeze dried meal.
My dessert of choice for this trip was always 3 Almond Rocca. The perfect high calorie density dessert. Even when it was hot outside, these things did not end up in a melted chocolate mess in my food bag.
Snacks
Knowing exactly how many snacks I need to bring with me for any backpacking trip is always hard because I’m never sure of how hungry I’ll be throughout the day. For this trip, I definitely overpacked my snacks and ended up donating a few of them to the hiker box in Trout Lake.
Here’s what I brought with me:
Think! Bars because they’re high in protein and pretty tasty, until I got sick of them from eating them all summer long. I would usually have one of these as a second breakfast when I’d stop for my first break of the day after hiking out of camp.
Gardettos Original Recipe because I love the salt and the crunch
Goldfish crackers for more salt and crunch
Chocolate Teddy Grahams because sometimes I wanted the sweet and crunch
Welchs Fruit Snacks because I love everything gummy
Rice Krispy Treats
SuckerPunch Gourmet Pickle Packs, which I just discovered for the first time when I was shopping for snacks for this trip. I came across these snack packs in the grocery store and bought enough to have one each day out on trail. If you’re someone who enjoys snacking on pickles, these snack packs are a super easy and convenient way to bring pickles with you out on trail.
I met a couple of subscribers out on trail during this trip and they asked me what my favorite trail food was currently and without hesitation, I told them: PICKLES! After my intense pickle craving on top of Donahue Pass while hiking the John Muir Trail this summer, I vowed to never hike without pickles again. There’s just something so good about having these delicious salty, dill, crunchy and soft snacks when out on trail. And drinking the pickle juice after I finish the chips – yum!
Cheddar and beef stick combos, which I ended up getting sick of on this trip
Cookies from Trader Joes
Trader Joes has an incredible selection of nuts like their Marconi Almonds, Everything But the Bagel Nut Combo and even just the regular roasted almonds.
And of course, Gummi Bears. I feel like I can’t do a hike without a stash of gummy bears and you have to get the good kind too, which you can find at either QFC or Safeway in the bulk section. Make sure they have the blue gummy bears. Those are the best.
Electrolytes
Don’t forget electrolytes! Backpacking causes you to sweat, especially when you’re carrying a loaded pack during the hot, summer months. Sweating causes you to lose sodium and potassium, which can leave you dehydrated with an electrolyte imbalance.
To stay on top of your hydration game when out on trail, you not only need to be drinking water throughout the day, but also replacing all of the sodium and potassium you lose with sweat, with electrolytes.
I personally have been loving the Liquid IV, which is a tasty electrolyte drink mix powder powered by CTT, or Cellular Transport Technology, which helps hydrate the body faster and more efficiently than just water alone. Out on trail, I drink at least two Liquid IV packets each day.
Water Filtration System
For my water filtration system for this trip, I brought with me the:
- Katadyn BeFree 1 Liter Water Filter Bottle
- 2 Liter CNOC Vecto Bag (with the BeFree Thread) to use to store dirty water in
- 1 Liter CNOC Collapsible Bottle (with the BeFree thread)
- Chicken Tramper Ultralight Gear Shoulder Strap Sleeve for my CNOC collapsible bottle
- And a small Gatorade bottle for mixing my smoothies and electrolytes in
Cooking System
For my Cooking System for this trip, I used the:
- JetBoil Stash Stove
- A medium sized fuel canister
- A small REI multi-towel light
- Sea to Summit Long Spoon
- Small, Collapsible Cup/Bowl
- And Food Cozy I made myself to rehydrate my food in, but a freezer dried food bag works just as fine
Why did this system work for me? I switched over from cooking meals directly in my pot to Ziplock Freezer Bag cooking. I use my pot to boil water and then add the boiling water to my meal in a Ziplock freezer bag.
Make sure you get the freezer bags, not the sandwich bags. The sandwich bags won’t be able to withstand the heat of the boiling water. Then I put my Ziplock freezer bag meal inside my food cozy for about 10-12 minutes and let my food rehydrate without having to use extra fuel or having to clean a dirty pot after dinner. Then when I’m done, all I have to do is dry off the water inside of my pot before putting it all away for the evening.
Food Storage
Whenever you’re out on trail, make sure you properly store your food. Don’t sleep with food in your tent EVER. Instead, carry your food and scented items in either a rodent-proof, bear-proof food bag, use a hard-sided bear canister or know how to properly hang your food at camp. If there are bear poles or metal bear lockers available at camp, use those to store your food and scented items. This way, you’re less likely to have an unwanted animal encounter while on trail or at camp. And, practicing proper food storage is just a good, all around Leave No Trace principle you want to practice whenever you’re out in the backcountry.
Hard-sided bear canisters were not required when hiking through this section of the PCT. There also weren’t any bear poles or metal bear lockers available at any of the tentsites along this section.
For this trip, I kept my food and scented items stored in a 10-liter Ursack, which is a rodent-proof, bear-proof food bag. Then at camp, I made sure to keep my Ursack out of my tent and at least 100 feet away from where I was sleeping.
Trash Storage
Whatever you pack in, you MUST pack out. This also includes used toilet paper and baby wipes. Please, DO NOT bury used toilet paper or baby wipes. These items need to be packed out and taken with you. This also goes for feminine products, not only when in the backcountry, but also when using a backcountry privy.
For all of my trash, I put everything in a used Ziplock bag and store it in the outside pouch of my pack. This way, I always remember to take my trash out of my pack at the end of the day and put it in my Ursack at night. As soon as I get into town and have access to a trash can, I can easily grab my trash bag from the outside pouch of my pack and throw it away.
I hope you found this inspiring with wanting to start planning a backpacking trip or section hike along the Pacific Crest Trail.
Hopefully this has answered some of your questions about putting together a resupply strategy, meal planning and trying to figure out how much backpacking food you should bring or even what kind of backpacking food to pack for your next trip
If you’re planning on packing for an overnight backpacking trip in the near future, I’ve put together a FREE Backpacking Gear Packing List that is designed to help you get organized when planning your next trip. CLICK HERE to get your FREE Backpacking Gear Packing List.
Disclaimer: The-Hungry-Hiker.com is a participant in the Amazon Affiliate Links and AvantlInks Program, affiliate advertising programs designed to provide a means for sites to earn advertising fees by advertising and linking to Amazon.com and other affiliated sites at no cost to you. Please note, I only link to products and services I personally use and trust.
1 Comment on Backpacking Food I Ate for 17 Days on the Pacific Crest Trail