As The Hungry Hiker, naturally one of my favorite parts about planning for any overnight backpacking trip is deciding what backpacking food I’m going to bring with me.
When I’m out on trail, I eat everything from store-bought freezer dried meals to backpacking meals I put together with food items found in the grocery store and I even dehydrate my own backpacking meals at home using some of my most favorite recipes.
Recently, I took a group of students from my online backpacking program for women, The Confident Solo Female Backpacker System, on a 3 day/2 night overnight backpacking trip over in Eastern Washington to Ancient Lakes.
As part of the trip planning process, I had to decide how much food I’d need for the trip and then figure out what backpacking meals and snacks I’d want to eat while I was out there.
If you’re in the process of planning an overnight backpacking trip, you’re probably asking yourself, questions like:
“How much backpacking food should I bring?”
“What kind of backpacking food should I bring with me?”
I’m going to share with you my entire process of how I put together my backpacking food meal plan for this trip. I’ll share with you exactly how much backpacking food I brought with me, show you how I decided what backpacking meals and snacks to bring and even show you the food I didn’t eat and came back home with.
How Much Backpacking Food Should I Bring?
So here’s how I figured out how much backpacking food I needed to bring for my recent overnight backpacking trip.
Starting With The Trip Itinerary
Starting with the trip itinerary. I needed to figure out how many days and nights I’d be out on trail. Then from there, I could figure out how many days’ worth of backpacking meals and snacks I’d need to pack for this trip.
For this trip, we’d be out on trail for 3 days and two nights. Starting on Friday morning, we’d hike from the trailhead to the tentsite, set up camp, hike down to the river and then head back to camp and have dinner.
On Saturday, we planned to have breakfast at camp and then hike all around the area, have lunch somewhere out on trail and then head back to camp for dinner.
And then on our final day on Sunday, we planned on having breakfast at camp, breaking down camp after breakfast and then head back to the trailhead before lunch so we could all stop somewhere for lunch together on our way home.
My Backpacking Food Meal Planning Spreadsheet
Based on our trip itinerary, I’d need:
- Lunch and Dinner on Friday, plus snacks
- Breakfast, lunch, dinner and snacks for Saturday
- And then breakfast and snacks on Sunday
Broken down, this meant I’d need:
- 2 Breakfasts
- 2 Lunches
- 2 Dinners
- A total of 16 snacks, which meant 7 snacks on Friday, 7 snacks on Saturday and 2 snacks on Sunday
- Plus, one extra meal, which I consider part of my 10 Essentials
On my Meal Planning Spreadsheet, I noted at the top: the number of Breakfasts, Lunches, Dinners and Snacks I needed to pack with me for this trip.

*This Meal Planning Spreadsheet template is also included in The Hungry Hiker Backpacking Trip Planning Masterclass
But How Many Snacks Should I Bring?
The number of snacks I bring on any given trip, whether it’s a day hike or overnight backpacking trip is always hard for me because it’s tough to gauge just how hungry I’m going to be while I’m out there.
Typically, on my first day out on trail for an overnight backpacking trip, I’m usually not that hungry.
On Day 2, I knew we’d be doing a fair amount of hiking, so I figured I’d probably be hungrier than the first day.
Then for our last day, since we weren’t stopping for lunch on trail because we were heading straight for the trailhead after breaking down camp, I figured I’d need only 1, maybe 2 snacks in the morning.
For this trip, I decided to pack 7 snacks on both Friday and Saturday and pack 2 snacks for Sunday, which would be a total of 16 snacks for the entire trip.
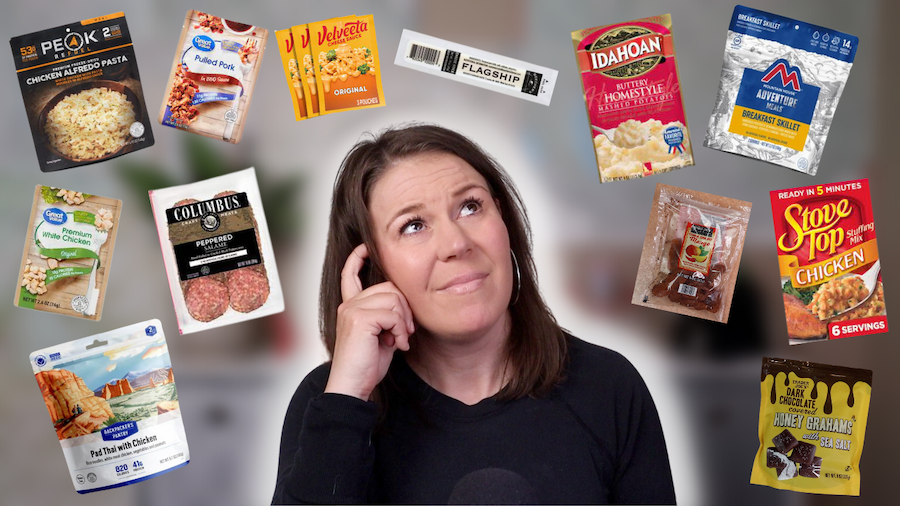
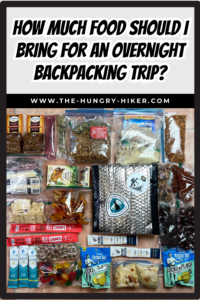
Deciding On What Backpacking Food To Bring
Once I figured out how many meals and snacks I wanted to bring with me for this trip, it was time to put together my backpacking trip trail menu by deciding exactly what backpacking meals and snacks I wanted to bring.
The actual food I bring with me for any trip is always based off of what I’m currently craving at and what I think I’d like to eat while I’m out there. For any backpacking trip, no matter how long or short the trip is, I always pack the food I love. Otherwise, if I’m not excited about the food I pack, I’m less likely to eat it and more likely to carry it, making it deadweight in my pack.
BREAKFAST
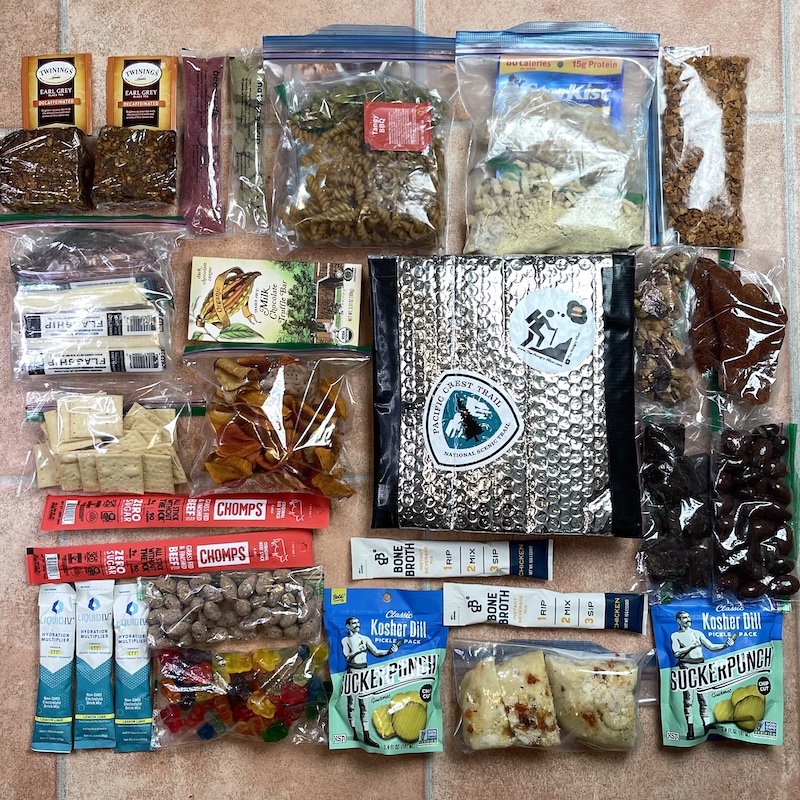
It had been a while since I’d made my Holy Molé Breakfast Bars so I decided to make a batch of those and brought them with me to have for breakfast. With breakfast, I always have a Kencko Smoothie because its an easy and tasty way to get fruits and veggies out on trail, so I packed two of those – one for Saturday and one for Sunday morning.
Since we would be spending more time in camp in the morning for this trip than what I’m used to, I also decided to bring a couple warm drink options including hot tea and bone broth along with my collapsible cup.
LUNCH
For lunch, I wanted to keep it simple and not have to use my backpacking stove and cook lunch. I knew we’d most likely be out on trail hiking during lunch time and wouldn’t have a lot of access to water in this area. For this trip, I brought one of my all-time favorite trail lunches: peppered salami, cheese and crackers. There’s no water or cooking required, and it always hits the spot.
SNACKS
For my snacks, I was kind of all over the place. I wanted something sweet, salty, crunchy AND soft. So I brought with me some of my current favorite snacks to enjoy while out on trail:
- Terra Vegetable Chips, for the salty crunch
- Almond Butter Almonds from Trader Joes
- Chile Spiced Mango from Trader Joes
- Single-serving pouches of pickles thanks to SuckerPunch Gourmet
- Chocolate covered graham crackers from Trader Joes
- Milk and dark chocolate covered almonds also from Trader Joes
- A Trader Joe’s chocolate bar to enjoy for dessert after dinner at camp
- Chomps Beef Sticks
This blog post isn’t sponsored by Trader Joes, but in my personal opinion, they sure do they have the best hiking and backpacking snacks. If you haven’t seen it already, make sure you check out my favorite cheap & easy snacks from Trader Joes video to see some of my most favorite backpacking and hiking snacks.
DINNER
Then for dinner, I did a mix of dehydrated meals I made at home and a couple of my favorite grocery store backpacking meals I’ve put together. For dinner, I packed:
- A One Pot Thanksgiving Dinner
- BBQ Mac n Cheese topped with crispy dillies, which are fried, crispy cucumbers
- And one of my Spicy Chicken soups I dehydrated at home as my backup meal, just in case I was running low on food and hungrier than I thought I would be
- I also threw in a couple pieces of focaccia bread to enjoy with my dinners, just because
My Backpacking Food Meal Planning Spreadsheet
Once I put together my backpacking trip trail menu, I entered all of the meals and snacks individually into my meal planning spreadsheet. Depending on how long I plan on being out on trail, I can also enter into my meal planning spreadsheet for each individual food item:
- the number of calories
- servings in grams
- the number of servings of each food item I packed
- and the weight of each food item in ounces
From here, I can easily determine exactly how much my food weighs, the calorie density for each food item and the total calories I plan on eating each day, based off of everything I’ve entered into my meal planning spreadsheet.
As a great learning tool to help make the next trip even better, I take note of the food I bring with me on each backpacking trip AND also the food I don’t eat and come back with. This way, I can see just how much food I overpacked or didn’t pack enough of.
After coming home from a trip, I also reflect back on how I felt during the trip. Did I have enough food? Not enough? Is there anything I wish I had packed or had more of? Is there anything I wish I hadn’t packed? Did I bonk at any given time while I was out there?
I use my observations from the trip to help readjust my backpacking meal plan for the next trip, with the ultimate goal of not carrying more food than I need, except for the additional, extra meal I consider as part of my 10 Essentials.
Cooking System
For this overnight backpacking trip, I opted to have a no cook breakfast with my Holy Molé Breakfast Bars and a no cook lunch with my salami, cheese and crackers, but for dinner, I planned to have a warm dinner. Having a warm dinner at the end of a day full of hiking is always something I look forward to and is incredibly satisfying whenever I’m out on trail.
To cook, or I should say “boil the water for my dinners”, I used the JetBoil Stash canister stove. To cook my dinners for this trip, I started by boiling the water in my stove. Then added the boiling water to my meal in a Ziplock Freezer bag, gave the food a quick stir with my Sea to Summit Long Spoon, closed up the bag and put the meal in my DIY Backpacking Food Cozy and let it sit until my meal was fully rehydrated.
I really enjoy the Ziplock Freezer Bag method of cooking because instead of dirtying up your pot and then having to wash it, I cook my meal directly in the bag it comes in and then eat my meal out of the bag. This method of cooking also does a pretty good job of being efficient with the fuel you use because instead of letting the stove and fuel run while you cook your dinner, you’re only using the stove and fuel to boil water, which in this stove usually takes about 2 minutes.
I also brought with me my Sea to Summit Cool Grip X-Tumbler to enjoy my hot drinks in while at camp like tea and bone broth. Then when I’m done, it folds down really slim and fits inside my JetBoil Stash pot.
Food Storage
And to store my food in while at camp for this trip, I used a hard sided bear canister, the BearVault BV450. Even though there weren’t bears in the area, we still wanted to keep our food and scented items protected from any critters in the area. This was a short enough trip where I could easily fit all of my food, scented items and stove inside the BV450 at camp at night.
Hard sided bear canisters were not required for the area we were camping in, but there weren’t a whole lot of options to tie a food bag like an Ursack to. Just lots and lots of sage bushes. Since this was a short trip and it wasn’t a long hike into camp, I figured it was just easier to use the BV450.
At the beginning of each day, I put all of the food and snacks I planned on eating that day in a stuff sack and stored it in the front mesh pocket of my pack for easy access while out on trail.
To store all of my trash during the trip, I used one of the used Ziolock bags from a backpacking meal I ate out of during the trip.
The Hungry Hiker Backpacking Trip Planning Masterclass will help you learn how to plan your first or next backpacking trip. You’ll learn how to figure out where to go, when to go, what you should pack, how to not get lost, how to find places to camp and find water sources when out on trail. Most importantly, this class will help take the overwhelm out of the trip planning process!
This class covers everything from how to prepare, research and plan for your trip to the gear you’ll need, navigation and trip planning video tutorials and digital and printable trip planning resources along with tips and tricks for first time solo backpackers.
If you’re ready to finally start planning your overnight backpacking trip this year, this masterclass will help you get to the trailhead.
CLICK HERE to learn more and sign up for The Hungry Hiker Backpacking Trip Planning Masterclass.
Disclaimer: The-Hungry-Hiker.com is a participant in the Amazon Affiliate Links and AvantlInks Program, affiliate advertising programs designed to provide a means for sites to earn advertising fees by advertising and linking to Amazon.com and other affiliated sites at no cost to you. Please note, I only link to products and services I personally use and trust.
Inspired? Pin It!
1 Comment on How Much Backpacking Food Should I Bring for an Overnight Backpacking Trip?