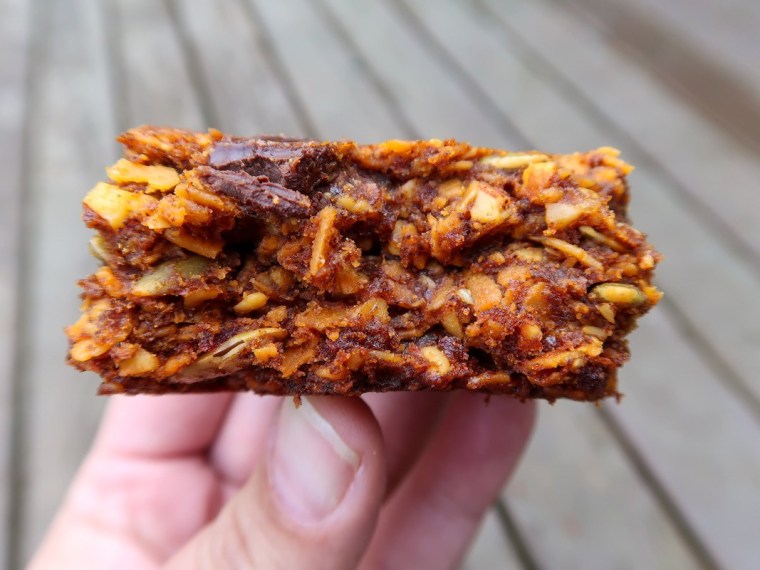
Holy Molé Breakfast Bars just might be the perfect solution to my on-trail breakfast problem. They’re easy to make (ahead of time at home), easy to pack and don’t require any sort of cooking on trail. These DIY breakfast bars are relatively healthy and holy molé are they tasty! Even my non-hiking roommates both seem to think so.
The hardest meal for me to eat on trail while thru-hiking the Pacific Crest Trail was always breakfast. It’s not that I don’t love breakfast. Breakfast is one of my favorite meals in off-trail life! It’s that when I’m thru-hiking, the last thing I want to do is add another chore to my pack-up-camp-in-the-morning routine like cooking breakfast, even if it is just boiling water.
We all know that breakfast is the most important meal of the day, especially when you’re hiking 15+ miles every day. You need to have fuel in the furnace if you want to put in the miles. For me, breakfast on trail needs to be quick and easy. My PCT breakfast items would consist of sugar and calorie laden items like (untoasted) Pop Tarts, granola bars, Cliff Bars, Rice Krispy Treats, various pastries or baked goods I’d pack out from resupplying in the previous town and sometimes even a handful of gummy bears. Holy sugar crash, Batman! Not exactly the healthiest of breakfasts.
I’ve been using some of my free time over the last 40+ days to help prepare myself for the outdoor adventures that lay ahead once “quarantine life” is over, starting with researching and testing out new backcountry recipes. Not only am I interested in expanding my culinary options while out on trail, but I also want to step up my nutritional game in the backcountry.
I love the idea of making my own nuts and seeds bar at home instead of carrying out store-bought granola bars and Cliff Bars I know I won’t be super excited to eat in the morning. The Holy Molé Breakfast Bars are packed with almonds, rolled oats, pumpkin seeds, chopped dates, almond butter, dark chocolate and sweetened with a little bit of agave syrup and a hint of spice with the Ancho chili powder. Each bar is 406 calories, has 7.5 grams of protein and weighs around 2.5 ounces each. One batch of Holy Molé Breakfast Bars makes nine bars.
Holy Molé Breakfast Bars Recipe
Ingredients
1 cup chopped almonds
1 ½ cup rolled oats
½ cup green pumpkin seeds
1 cup chopped dates
½ cup almond butter
½ cup dark chocolate chips (or chunks)
½ cup agave syrup
3 Tbsp. Ancho chili powder
¼ cup coconut oil
Instructions:
- Heat oven to 350 degrees F.
- Add all ingredients together in a mixing bowl and mix well together.
- Add the mixed ingredients into a greased 9×9 inch baking dish.
- Press ingredients down firmly in the baking dish with a spatula and/or the bottom of another small baking dish.
- Bake for 30 minutes.
- Let the bars cool on a cooling rack for two hours.
- Cut bars into nine squares and either package each bar separately or together in a Ziploc bag or a reusable travel-friendly travel container like the Cnoc Outdoors Cold Soak Bag.
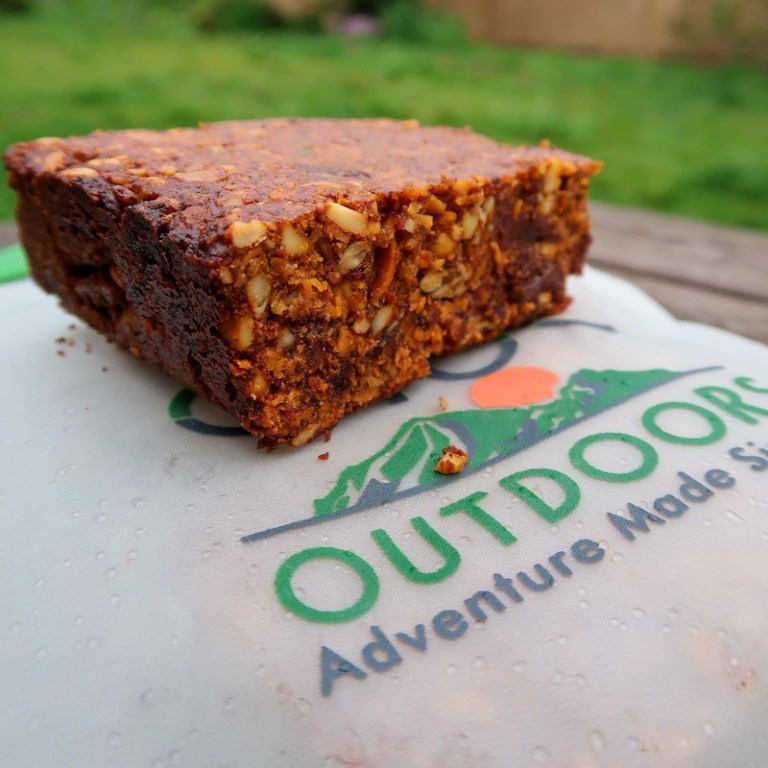
Backcountry Recipe | Holy Molé Breakfast Bars
Learn how to make your own backpacking meals with some of my favorite recipes:
Coconut Cashew Curry With Couscous
Dehydrated Pasta Penne Alfredo
Dehydrated Backcountry Spaghetti
Sweet & Spicy Homemade Trail Mix
Inspired? Pin It!
These look sooooo delicious! It’s difficult to find good pre-made options when you’re gluten-free and dairy-free on the trail sometimes. I’m going to give them a try. Do you have any idea how long they last before going off? Have you ever vacuum sealing them or do they have too much moisture to last? Thanks!
They are so good! Easily my favorite trail breakfast. I really don’t know how long their shelf life would be because I eat them too fast. I’ve only stored them in ziplock bags, but I’m sure their shelf life would extend if you vacuum sealed them. Good luck!
They look great! Those look bigger than 2.5 oz thoe
They can be as big or as little as you want them to be. All depends on how you cut them. I typically cut my batch into 9 squares, equal-sized bars.
Is that really 3 Tbsp of chilli powder??
It is. That isn’t a typo, but with like any recipe, you can tailor this one to fit your tastebud needs.
Hi there, I know I am late to reply, but I thought I’d add a note for anyone with the same question (it was my same one before my trip too!)
I just came back from a 14 day expedition, and I made an entire tray to bring with me for the first week or so of breakfasts. I can confirm that they last about 5 days out of the fridge before they start to smell a little off – and this is keeping them in the middle of my pack during the day, and in shade as much as possible. I believe it is the chocolate chips that went bad first? I don’t see why the nuts or anything else would ever go bad. I hope this helps!!
It helps, thank you!! I’m going on my first backpacking trip soon and I was browsing Kathleen’s website. Got really curious about these bars but I need time to make them! Glad that folks are updating the comments still! Cheers!
Found your youtube videos last week and binge-watched a bunch. You are an adorable badass!
I was so excited to make these, and they are really, really good!
Mine came out pretty close to yours, but just a little bit crumbly compared to how solid yours look. I wonder if it’s because I didn’t take the extra step of pressing down with another pan, but just with the spatula and my hands.
Anyway, we are loving them and gonna take some snowshoeing, tomorrow.
Thank you so much for the goodness of the bars, and for your awesome videos!
xox
Pamela Joy
Thanks Pamela! Glad you are enjoying my videos and super happy to hear the breakfast bars turned out well. The first batch I made of these, I didn’t press them down with another baking dish before cooking them and they turned out pretty crumbly, but they were still delicious. The second batch I made, I was sure to press them down with a baking dish before putting them in the oven and they turned out perfect! Practice makes perfect for me with ALL of my recipes and basically everything I do. hahahaha! Have fun snowshoeing tomorrow! More videos coming soon. Thanks again for watching!
Thank you, Kathleen!
I made another batch and did the pan-press, but still a bit too crumbly. I’ll keep practicing, and if they never end up perfect, that’s okay. We’ll keep eating them, anyway!
I have shared your video about the bars with a few friends who I think will enjoy them.
Looking forward to more videos!
Have a great day,
Pamela
Hi Pamela! I made a double batch of these last night and just cut them up this morning. I think out of all the times I’ve made these bars (A LOT!), this might very well be my best batch. This batch didn’t have any crumbling. Usually I get a little bit with a couple bars here and there, but not this time. I think there are three keys to help reduce the crumbling.
One, make sure you grease the baking pan. I like to use coconut oil spray. Grease the whole thing including the sides and bottom of the pan. I also use a glass pan to bake these in.
Two, pressing the batch down into the pan with another baking dish is crucial. I think I spent a good ten minutes going over and over the top of the batch in the pan with another, smaller glass baking dish. Then I used a spatula to smooth out the top of the batch and the edges. You want these to be as flat and compressed as possible before putting them in the oven.
Three, let them sit and cool. I know in the original recipe, I suggest letting them sit for two hours. Even after two hours, the pan was still warm and the chocolate was still melty and soft. This time, I let them sit overnight before I cut them up.
For storage, I either leave them in the pan I baked them in and cover them with a lid or I cut them up and store them in Ziplock bags or reusable Stasher bags that I can take with me out on trail. I posted a photo of the final product of this recent batch on my Instagram Stories today. Check it out if you get the chance. Hope this helps!
Thanks so much Kathleen! My hubby and I Love these bars, but they don’t hold together for me. Thank you for the tips. Will give those a try next time I make them. We so enjoy your YouTube channel 😊 we are hitting the trail in a couple of days, bringing your bars along!
Yay! Thanks for watching my YouTube videos and glad you’re enjoying the bars!
Kathleen, Tried your suggestions to keep the bars “bars”. I added a little more nut butter (I use Costco’s mixed nut butter), honey & a little bit maple syrup instead of agave. They’ve held together very well! We love them! Thanks!
Hi, i have tried to make these two times now, but living in norway makes almond butter and agave syrup expensive so i changed them with peanut butter and plain syrup. But after they are finished and i have cut it to bars, they fall apart.
Do you have a tip to make the bars be a bar, and not just crumble apart 😅😅 (fist time it was to dry, second time it was sticky)
Make sure you press the bars down really good before baking them. Read my previous comment for details.
Besides pressing better, you might have better luck with honey than with pancake syrup.
I’ve made several times andI use honey instead syrup. Honey would be a better substitution for an agave nectar and will hold the batter together. Also, I started chopping up the dates in my blender, which makes it more like a thick paste. I haven’t had any trouble with the bars crumbling since I started doing this. Also, you do want to pack them down really good. I hope you enjoy these bars. They are absolutely delicious.
Great suggestions! Honey is an awesome substation for agave nectar. I also like adding the dates into my Ninja blender to get them into a crumbling consistency.
my wife made these last night for us, and I have to ask;
Why so much chilli powder?
We put in 3 teaspoons, and it’s almost too spicy. The powder is definitely over powering all the other flavors. why are you using 3 tablespoons?
Because I like the spice! 😀 If they’re too spicy for you, adjust the amount of chili powder you put in. Depending on my mood, I go anywhere from 3 to 2 tablespoons for each batch. You can pretty much adjust any of the ingredients in these bars to tailor them to your likening.
These are amazing! I couldn’t get the pumpkin seeds so I substituted with sunflower seeds.
Sounds like a yummy substitution!
I made them with the 3 tablespoons of chilli, I’m thinking it will get the morning off to a flash!! I might tone them down for the next batch, call me a sissy!! LOL
I adjust the ancho chili myself, depending on my mood and tastes at the time I’m preparing these.
Scanning the comments looking for more info on this “3 Tbsp. Ancho chili powder“!
I thought that amount was a typo after eating these. They are so spicy it overpowers the nut flavors. I wonder if that’s adding to the dryness and crumble too? At least now I know the chef’s preference is for hot, but I will be reducing this to 3 Tsp. in next batch. 🙂
Also, very very crumbly. Will need to spend more time compressing in pan based on reading other comments.
Thanks for sharing your recipes. We also made your dehydrated spaghetti and are SO SO excited to eat that in the backcountry. Yum!
The nice thing about this recipe is that you can modify it however you want, to fit your tastebuds. Enjoy!
Hey there! Super excited to give these a try. Do you heat your coconut oil or use coconut oil that is liquid at room temp?
Great question! I melt the coconut oil enough so it liquifies, but let it cool a bit before adding to the recipe.
Awesome. Thank you! 😊
I freaking love these! I have a question for you though, I am doing some hikes in the desert heat and do not want to deal with the melted chocolate if I leave it out should I add anything to replace the taste or the texture of the chocolate?
I haven’t made these without chocolate so not sure what a good replacement would be. Maybe peanut butter chips? You’d have to experiment. Let me know how it goes.
Try carob chips! Carob tastes a lot like chocolate and can be used as a substitute in about any recipe. Carob has many health benefits, and carob chips do not melt anywhere near as easily as chocolate. Carob will help preserve the molé flavor of this recipe over other substitutes.
Breakfast bars to take this weekend for my husband’s fishing trip to Utah ! though I added some surprises on the side: Nutella, cashew, cranberries, curry, gochugaru, lime peel! Bon a petit
Sounds delicious!!
Ok. Don’t take this the wrong way. This recipe, I love it and I hate it. I am completely conflicted on it. It is clearly the work of a mad genius. My parents are from Puebla and I can’t believe how well you’ve captured the taste of mole using oats lol. Oats!!! It’s so weird! This is the strangest bar I have ever had. It’s delicious but my brain is fighting me completely and telling me this is not for breakfast and where is the chicken!! It’s so so wrong and unnatural and a complete abomination, but so right and delicious at the same time. It is a visceral reaction I’m getting and I can’t tell if I’ll ever be ok eating this. There is just something very very wrong about this bar. But I already plan on making it again. Good work.
Sorry to conflict you, but super happy you’re enjoying this recipe. It’s one of my faves.Definitely my favorite on-trail no cook breakfast!
I’ve made these a few times and I’m making another batch right now for an upcoming hike next week. Just wanted to say thanks for the recipe! I love these bars.
I love this! Thank you!
I just found your YouTube channel and whipped up a spicy (1 tablespoon of chili powder) and non- spicy batch! They are absolutely delicious, and way better than the meal bars I had been buying for the trail! The chili powder added a slightly warmer flavor that was just right! The batch made in an 8×8 pan seemed to crumble less than the batch made in the 9×9 pan, with both being left out overnight! I wrapped each bar individually and placed them in a container in the freezer for future adventures! Thanks so much for this awesome recipe, and your awesome content! Happy trails!
Yay!! Glad you enjoyed this recipe. It’s one of my all-time favorites!!
Just made my first batch of 2023! I found honey roasted almond butter, so I’m interested to see how this mixes things up!
Sounds like a great recipe. Any thoughts on how they might hold up backpacking in the summer in the Sierra or PNW? Wondering how melty they might get. Thanks!
As long as you keep them in your bear canister and out of direct sunlight, they should be fine, especially up in the Sierra and the PNW.
Thanks so much for sharing the recipe. I’ve made a batch of these and they’ve turned out great. I had to substitute peanut butter for the almond butter and I used golden syrup (a NZ product) instead of the agave syrup but they taste awesome. I love the addition of the Ancho chilli powder. I have made some other bars like this too and find that the best way to avoid the mixture crumbling is to compress it when it goes in to the oven and also when it comes out of the oven hot. It then sets up nice and compact and tends to stay together better. Thanks again and happy trails.
Glad you enjoy these!! My favorite trail breakfast!
I make these right to your recipe and freaking LOVE! Only issue is I know I might be a freak but I hate chocolate. I replaced the chocolate chips with butterscotch chips. WLF!!! Best ever for me. Thanks!
Sounds like a good substitution to me!
Made these Monday and I am a fan! Only substitution was to use honey rather than agave syrup, and I did cut down on the spice. I think they are even better cold, and after aging for a couple days. Look forward to trying them again..may add dried cherries next time. 🙂
Nice! I enjoy these bars cold as well. especially when out on trail!
So crumbly. But delicious.
Any other ingredient that can be added to keep them sticking together as bars?
Hi Sally! Glad you’re enjoying the bars. Not sure what other ingredient you could try. I’ve made this recipe several times and haven’t had an issue with them crumbling. My best advice is to make sure that before you put the bars in the oven, make sure you press them down into the pan really good and firm. This process has been key for me to keep the bars from crumbling after cooking. Good luck and hope this helps!
Got close to nailing it first try, with few crumbles. But I made some substitutions. I substituted honey for the agave’ syrup; canola oil for the coconut oil, a half cup of raisins for half of the full cup of dates. I added marshmallows and flax seed. Left out the spice. Pressed down hard with a baking dish as recommended. Baked for 30 minutes at 350, as per recipe. Came out dense and chewy, good balance between moist and dry. If you like texture like I do, this is a wonder. Fun to make – and eat!
Hey 🙂 would you be able to use steel cut oats as a substitute? Or does that mess with the cooking time, etc?
Thanks ! Love your channel <3
I haven’t tried using steel cut oats in this one so you’d have to try it out to see if it works.
I’d like to know too!
How long can these bars last for, can I pre-make thing and ship them in my resupply boxes?
As long as they are store in an air-tight container and in a cool, dark place, your bars should last inside your resupply boxes.
I’ve made these twice. They do taste great, but my problem is getting them to stay together. I’ve pressed them but they don’t look nearly as compressed as the ones in your photos.
pepperscale.com says:
Ancho has more of an earthy, sweet flavor while cayenne has a more neutral peppery taste. And there’s a big spread between ancho spiciness (1,000 to 1,500 SHU) and cayenne spiciness (30,000 to 50,000 SHU). One is mild and the other sits at the upper end of medium heat.
I suspect some of the readers who found it “too spicy” might be using normal “chilli powder” made from cayanne, not ancho chilli. Others just don’t like it spicy.
Holy Moly! These Holy Mole bars are amazing. I’m made them for my boyfriend to try for his upcoming hunting trip. I absolutely love them. They were a little too spicy for my boyfriend so I made another batch, reduced the Ancho chili powder to only 1 tablespoon. These bars were just as delicious and my boyfriend loved them. I’m currently making some adjustments to this recipe to make a peanut butter chocolate chunk flavor. I’ll let you know how it turns out. You should start a “Holy” line of bars for backpacking/ hunting.
Hi! I want to make these for a road trip with my family. How long will they keep in a vacuum sealer bag?
As long as they’re stored in a cool, dark, dry place, they can last anywhere from 6 months to a year in a vacuum sealed bag.
I made these bars and they are fabulous! Pressing down on the dough with another pan did the trick – and possibly the addition of ground flax seed (see below). I did make some substitutions FYI – maple syrup instead of agave; 1 tbsp chili powder instead of 3 T of ancho chili, and added 2 tbsp of flax seed which I measured out and then ground in my coffee – ends up about 1/4 cup of ground flax. I used a 9×9 metal pan greased with EVOO. Convection baked at 350 for 20 min, then 325 for 5 more minutes. Next time: try less savory spices – cinnamon, coriander, hmmmm!! Will enjoy a bar tomorrow morning before my hike… thinking of taking a few on a longer backpacking trip next month!! Thank you for this fabulous recipe!!
These are all GREAT suggestions. Thanks for sharing these!
Oh my… took these spicy chili powder versions on my 5 day backpacking trip!! Used them for breakfast on my first day out, then lunches… or if I didn’t stop til I got to my night-time camping spot, would break it out to munch on as I arrived at and set up camp!! FANTASTIC!! I’ve also made a version with cinnamon for when the grandkiddos came to visit… tasty, but I think I’ll go back to the chili powder version for that little extra kick 😉 I kept these frozen til I went out hiking/backpacking… need to make another batch SOON!! Thank you so much Kathleen!!
This is so awesome! Glad you enjoyed the recipe. It’s one of my all-time trail favorites!
Along with so many others before me, thank you for sharing this recipe. These bars are so good!
I did not have problems with them crumbling like some others have. Maybe because I minced the dates until they’re basically a paste? That along with pressing them very firmly before baking.
I did use honey instead of agave (I keep bees so have lots of honey). I used chipotle powder (1.25 tsp) instead of the ancho chilli powder, and I added some dried and sweetened sour (Montmorency) cherries, chopped.
You’re very welcome. Glad you enjoyed the recipe and I love the modifications!
Am I the only person that finds these way too crazy sweet? I’ve never had Agave Syrup before this, but yikes!
Okay I have to comment my love for these, because I am OBSESSED. I am an absolute hater of oatmeal, it makes me gag when I try to eat it, but I’ve spent years on hiking and mountaineering trips choking it down because it’s just easy, and I hadn’t found a reasonable alternative… I was planning for a longer trip this summer though, and I was like “There’s just NO chance I can eat oatmeal for 14 days. I would rather not eat.” Anyway – I found these last minute and decided to give them a go… and WOW. THANK YOU. Thank you SO much for saving me. I will be making these for every single trip going forward for the rest of my life. They are absolutely wonderful. Filling, tasty, and actually gives me a reason to want to eat in the morning. My friends love them too. I can not recommend them enough. You are a miracle woman!!!